
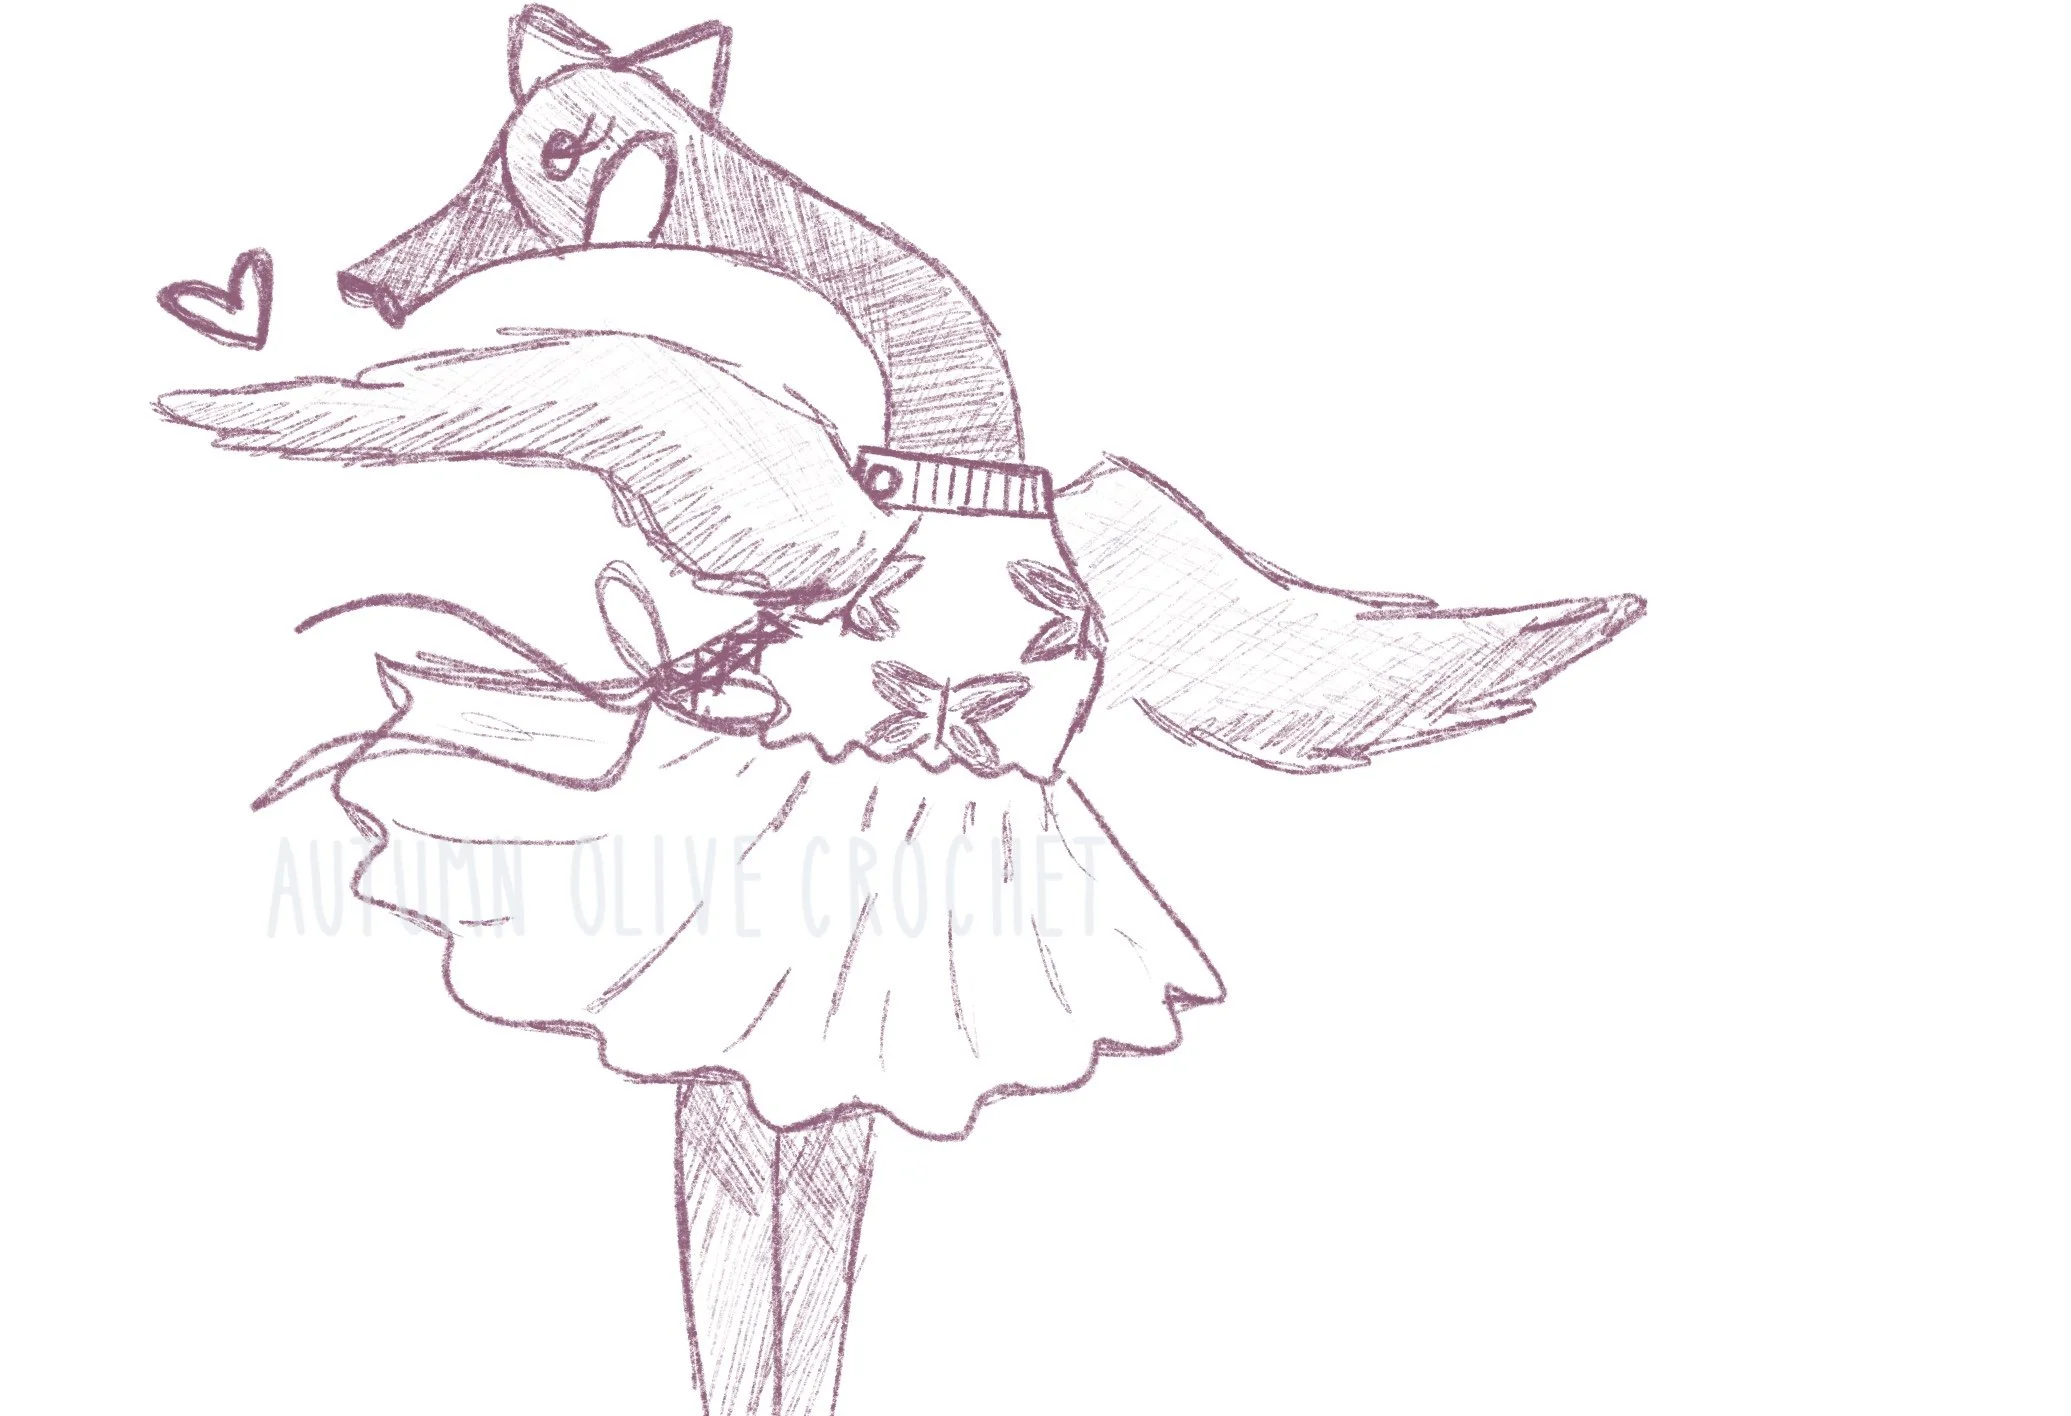
abracadabra dress ♡
♡ an autumn olive crochet original pattern by autumn olivia ward
do not sell, copy, or claim this pattern as your own.
written in standard US crochet terms
you may sell items made using this pattern! please credit me as the designer in your listings and include the link to this pattern.
@autumnolivecrochet on all socials, tag me when you post your creations!

INFO:
this is a versatile, made to measure pattern with clear instructions at every step — I will include suggestions for several measurements but I recommend following the math for made to measure so that the top fits exactly right
the top part is worked from the bottom up, the skirt part is worked from the top down — it uses half double crochet stitch throughout, it has a scalloped bottom, ribbon laced back, and a thick collar with a full button closure — it will also include brief instructions to add a colorwork graphic if desired
MATERIALS:
(rough estimates for some examples, top and skirts listed separately)

yarn of any colors needed for optional graphic
yarn needle and scissors
needle and thread
button (approx. 2.5cm/1in diameter) for the collar
small buttons 2cm/.75in if using buttons to create a detachable skirt ( 10+ depending on size )
ribbon .5”-1” wide (approx. 100cm/40in) or crocheted chain for the shirt
more buttons or ribbon will be needed to close the back of the skirt
GAUGE:
5 rows of 8 stitches, done in HDC
measures in inches 2.5” by 2.5”
if not, try adjusting your tension or hook size — if you do made to measure, the gauge is not so important
TECHNIQUES:
ch (chain), hdc (half double crochet), sc (single crochet), BLO (back loops only), inc (increase), dec (decrease), st (stitch), sl st (slip stitch)
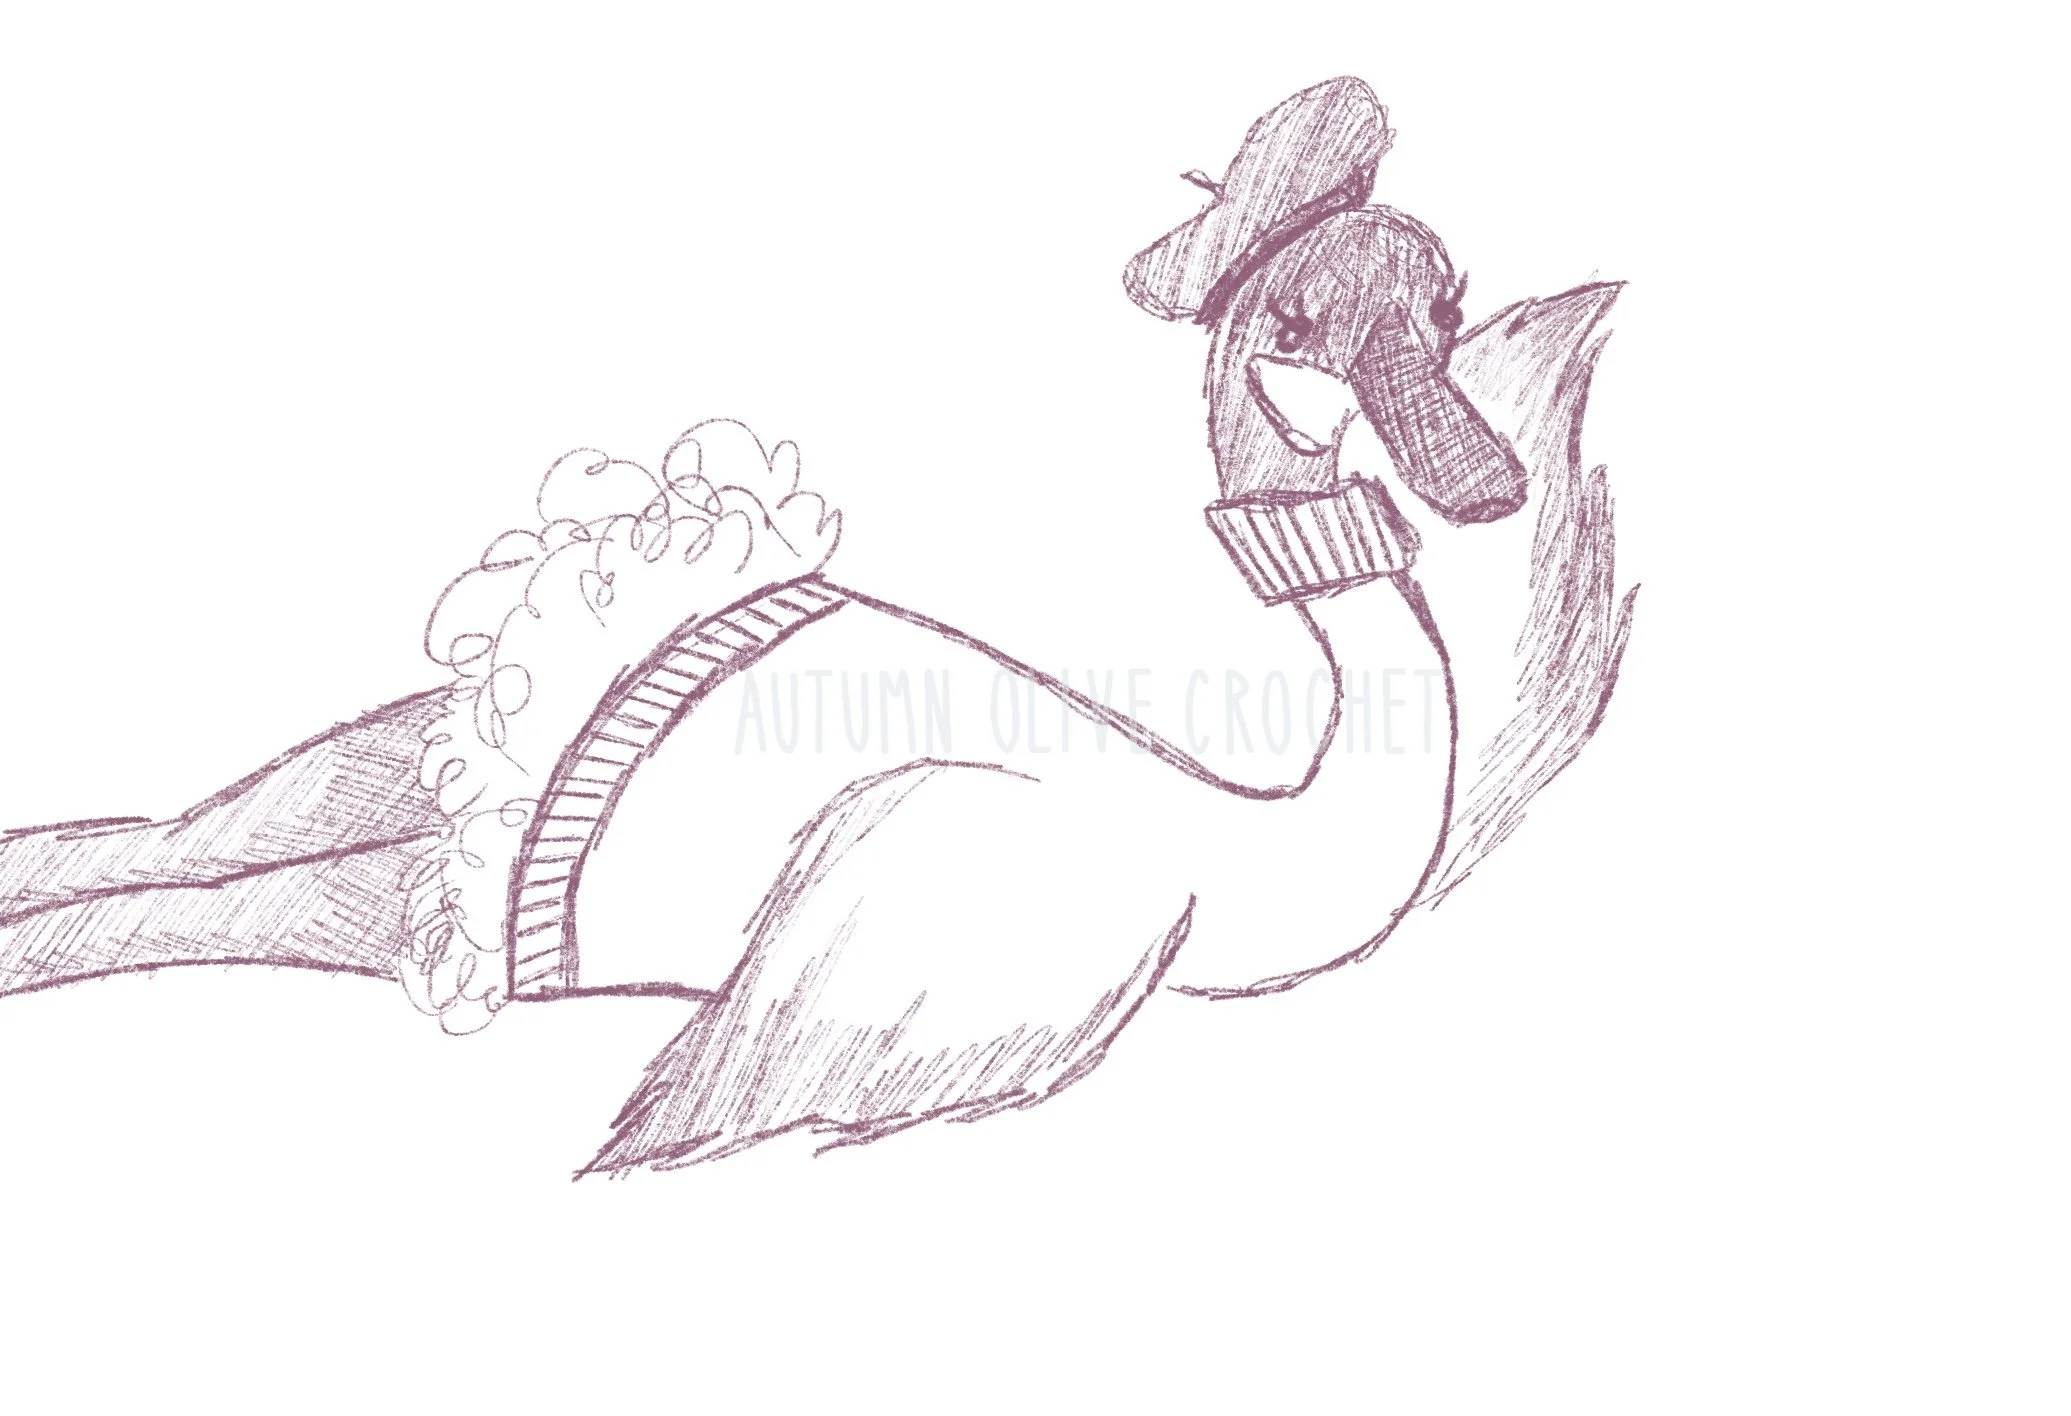
You are a red carpet designer flown out to make a garment for the beautiful French Canadian fashion sensation, Mademoiselle Oie Goose
DETERMINING SIZE:
carefully determine your measurements here before beginning the pattern below ♡
You meet Mademoiselle Oie Goose at her dressing nest for a fitting appointment
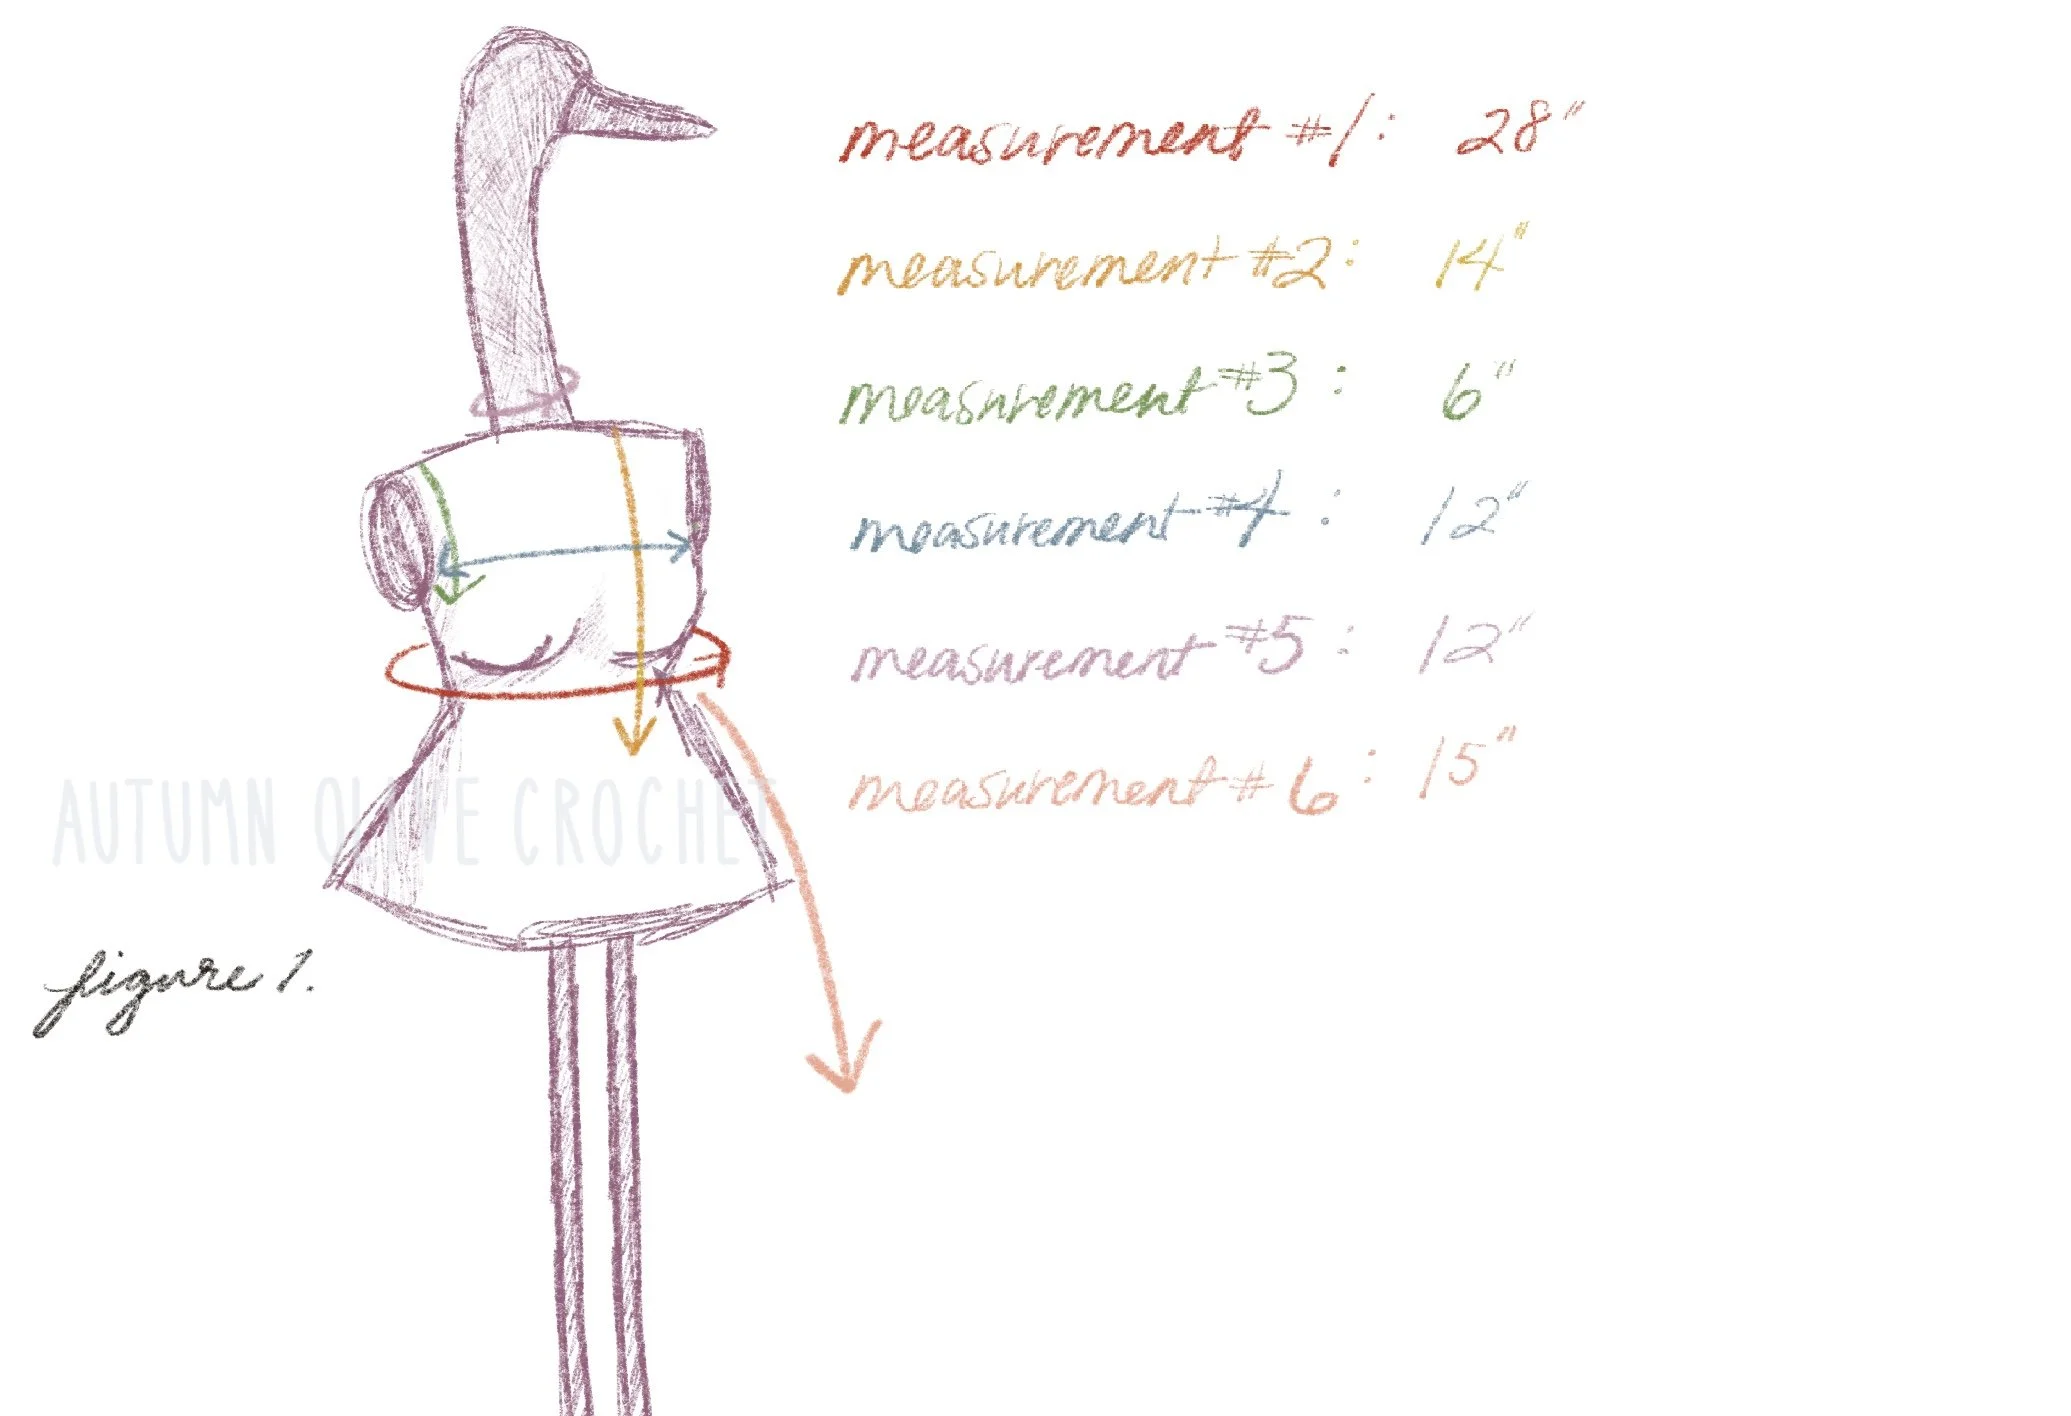
take note of the measurements. round to the nearest inch.
measurement under the bust around the ribcage
measurement from collarbone down over the bust to desired length
(to waist length if you are adding a skirt)
measurement from the collarbone down to the underarm
measurement over heart between the underarms
measurement around the neck
(optional) measurement from waist to desired length of skirt
measurement around the neck
(optional) measurement from waist to desired length of skirt
to find the number of chains around:
take measurement #1 and subtract 3in, divide by 2.5in
then multiply this number by 8
(because we know 2.5in equals 8 stitches)
(if bust measures over 5in more than measurement #1, don’t subtract 3)
round down to the nearest dividend of 4, but only that which can not be divided evenly by 8 (this is for the scalloped edge)
this is the starting chain (calculation #1)
example: Mademoiselle Goose’s ribcage is 28in > minus 3 = 25 > divide by 2.5in = 10 > multiply by 8 = 80 > round down to the nearest dividend of 4 but not 8 = (76) this is the starting chain
if this size chain does not fit with a gap of a few inches in the back, round down again

to find the number of rows you will need:
take measurement #2 and multiply by 2
(because we know every 2 rows will equal 1 inch)
this is the total rows (calculation #2)
the decreases on the shirt will begin at the underarm
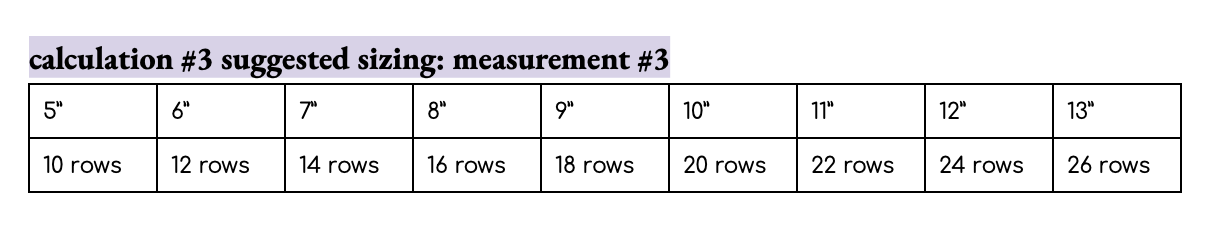
take measurement #3 and multiply by 2
this is the number of rows with decreases (calculation #3)
subtract calculation #3 from calculation #2 to find what row the decreasing will start
example: Mademoiselle Goose’s measurement #2 is 14in > multiply by 2 = 28 > this is the total rows
her measurement #3 is 6in > multiply by 2 = 12 > this is the number of rows with decreases
calculation #2-#3: 28-12= 16 which means decreasing will begin after row 16 and for the last 12 rows of the total 28.

to find the starting # of stitches for decreases on the chest up to the neckline:
(be sure to not measure in the underarm but rather right where the crease begins if arms are relaxed down by your side)
take measurement #4 and divide by 2.5”
then multiply this number by 8
round up or down to the nearest even number
this will be the base number of stitches you start with for decreases (calculation #4)
example: Mademoiselle Goose’s measurement #4 is 12in across > divide by 2.5in = 4.8in > multiply by 8 > 38.4 rounded down to 38 > decreases will start on a new row of 38 st in the center

note:
if you are adding a center graphic, the grid will need to be equal to or less than one third of your starting chain (x axis) and no more than your total # of rows (y axis)
keep in mind where the decreases will start and if it will affect the top corners of your graphic (it will decrease by 1 stitch on either side for each row) determine which row and stitch it will need to start on and incorporate it in below.
to find the collar circumference:
take measurement #5 and multiply by 2; this is the number of rows you need on the collar (calculation #5) add 2 more for the button closure
# of stitches on last row of garment, divided by 3, multiply by 2 = this is the number of rows that will be attached (centered in your collar) plus 2
example: Mademoiselle Goose’s measurement #5 is 12in > multiply by 2 = 24 > 24 total rows with the buttonhole on the 23rd row
the top row has 15 sts across > 15 divided by 3 = 5 > 5 times 2 = 10 > the center 10 of the 24 rows will be attached, with 2 more added at the end
Oh my bird! Miss Goose has requested a new skirt added to her gown

to find the number of rows you will need** (for skirt if done in hdc):
take measurement #6 and multiply by 2
(because we know every 2 rows will equal 1 inch)
this is your total rows (calculation #6)
**you can make the skirt any length/stitch/degree of flare
example: Mademoiselle Goose’s measurement #6 is 15in > multiply by 2 = 30
> this is the total added rows

“Très beau!” said Mademoiselle Oie Goose, “I require a garment for grace and for grass, for this is the annual Big City Park Gala.”
so, while you settle on a color scheme and sit down to get to work, Mademoiselle turns and dials out for a fresh baguette on delivery.
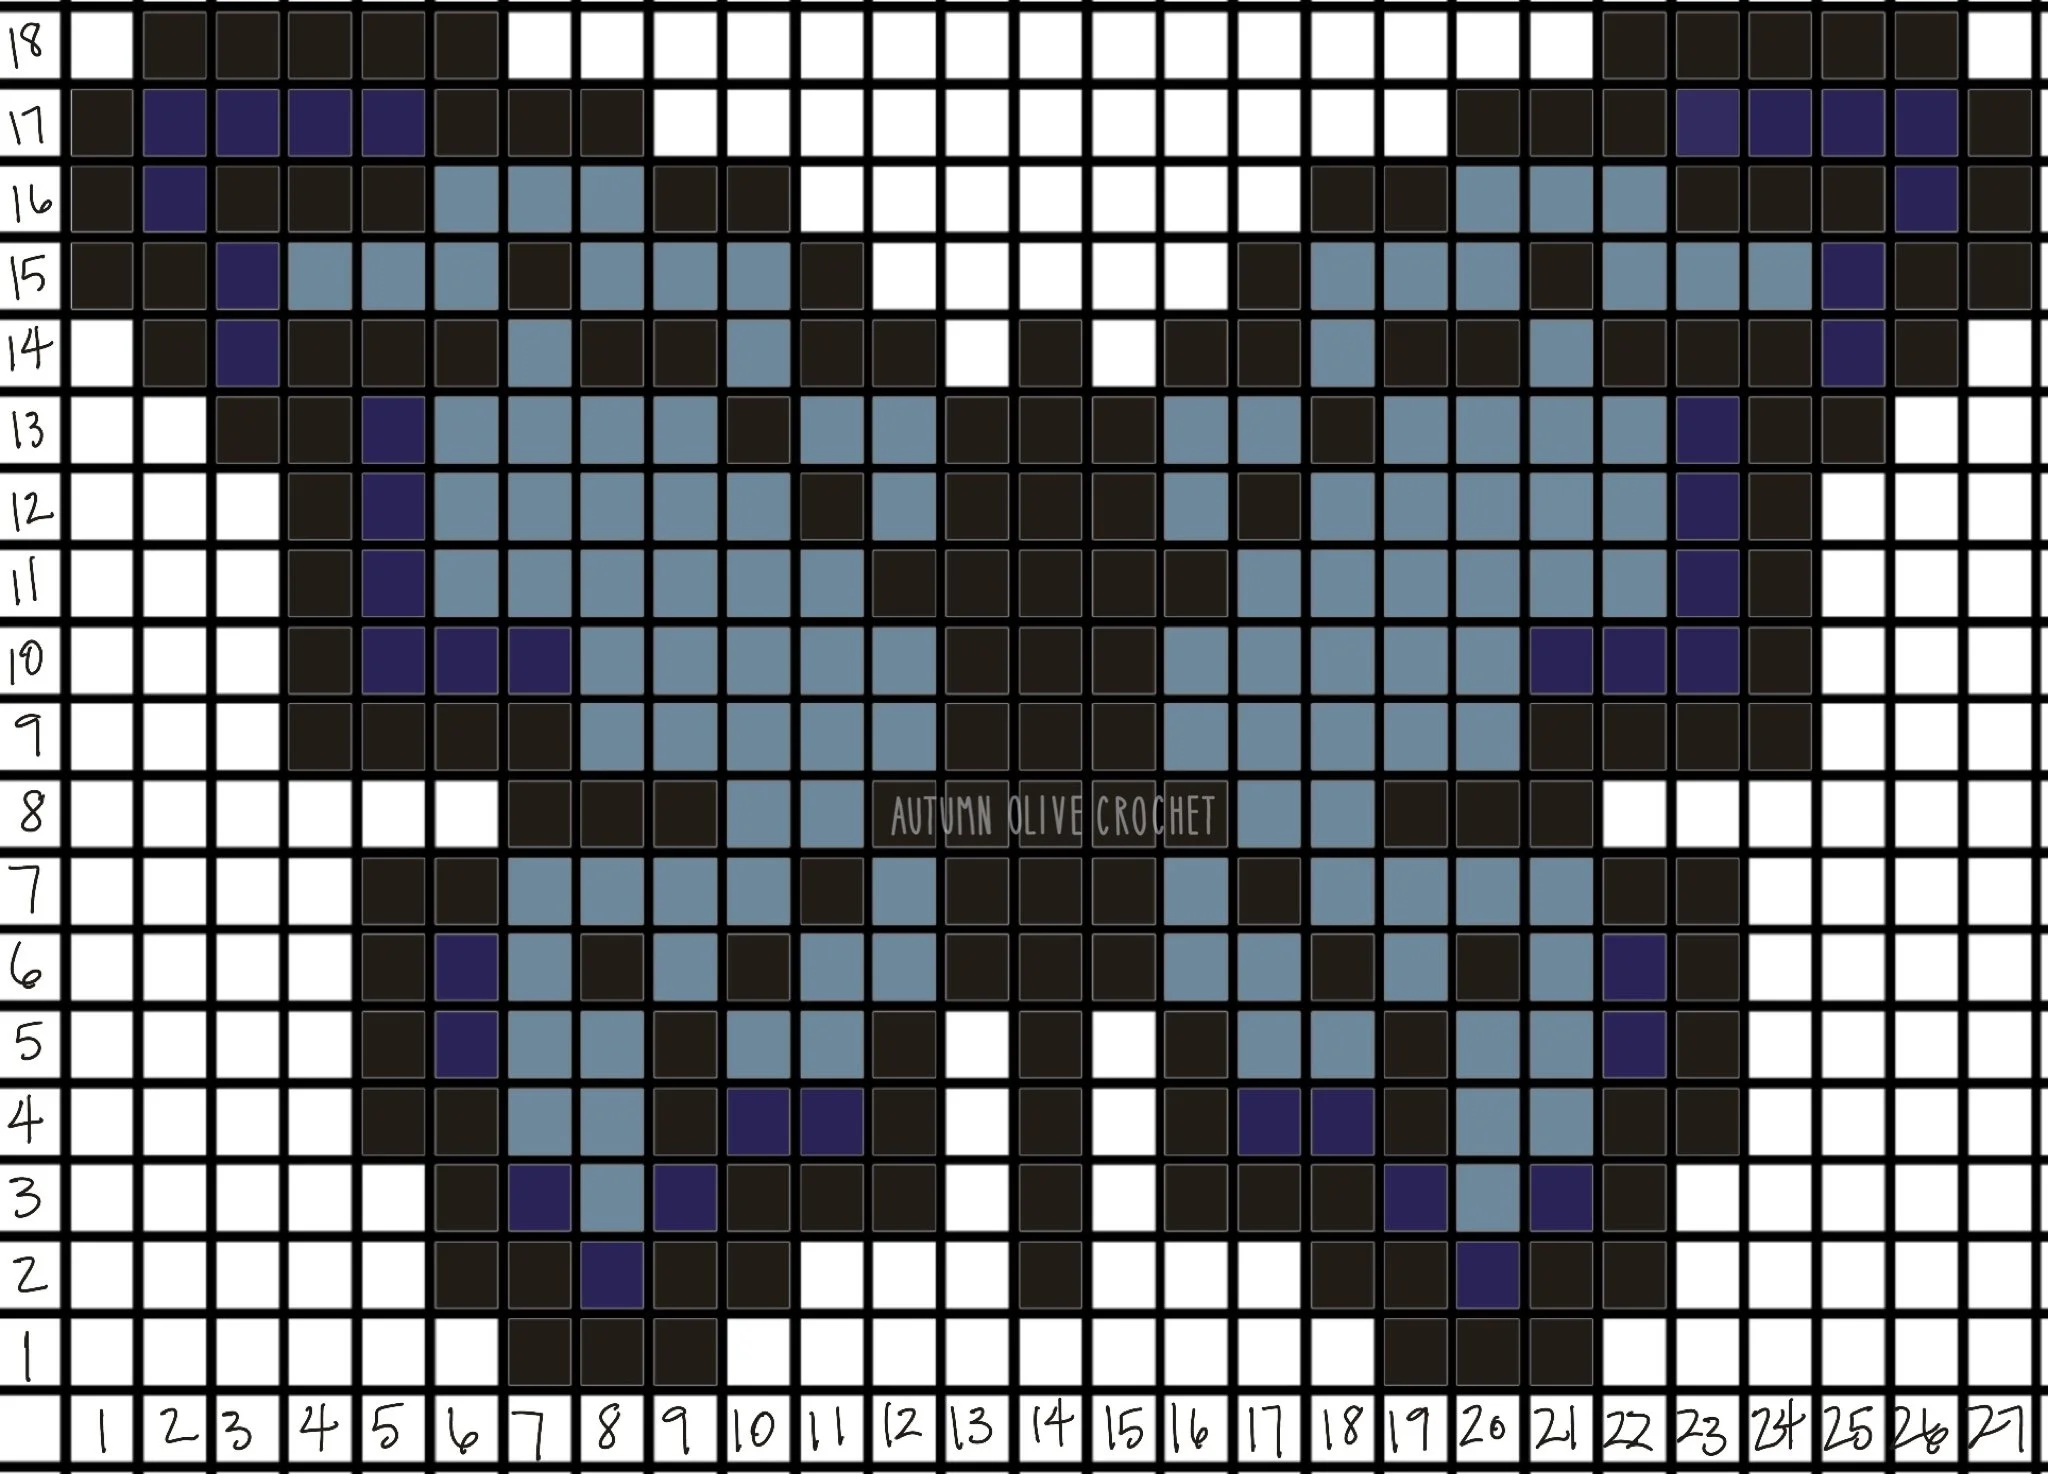
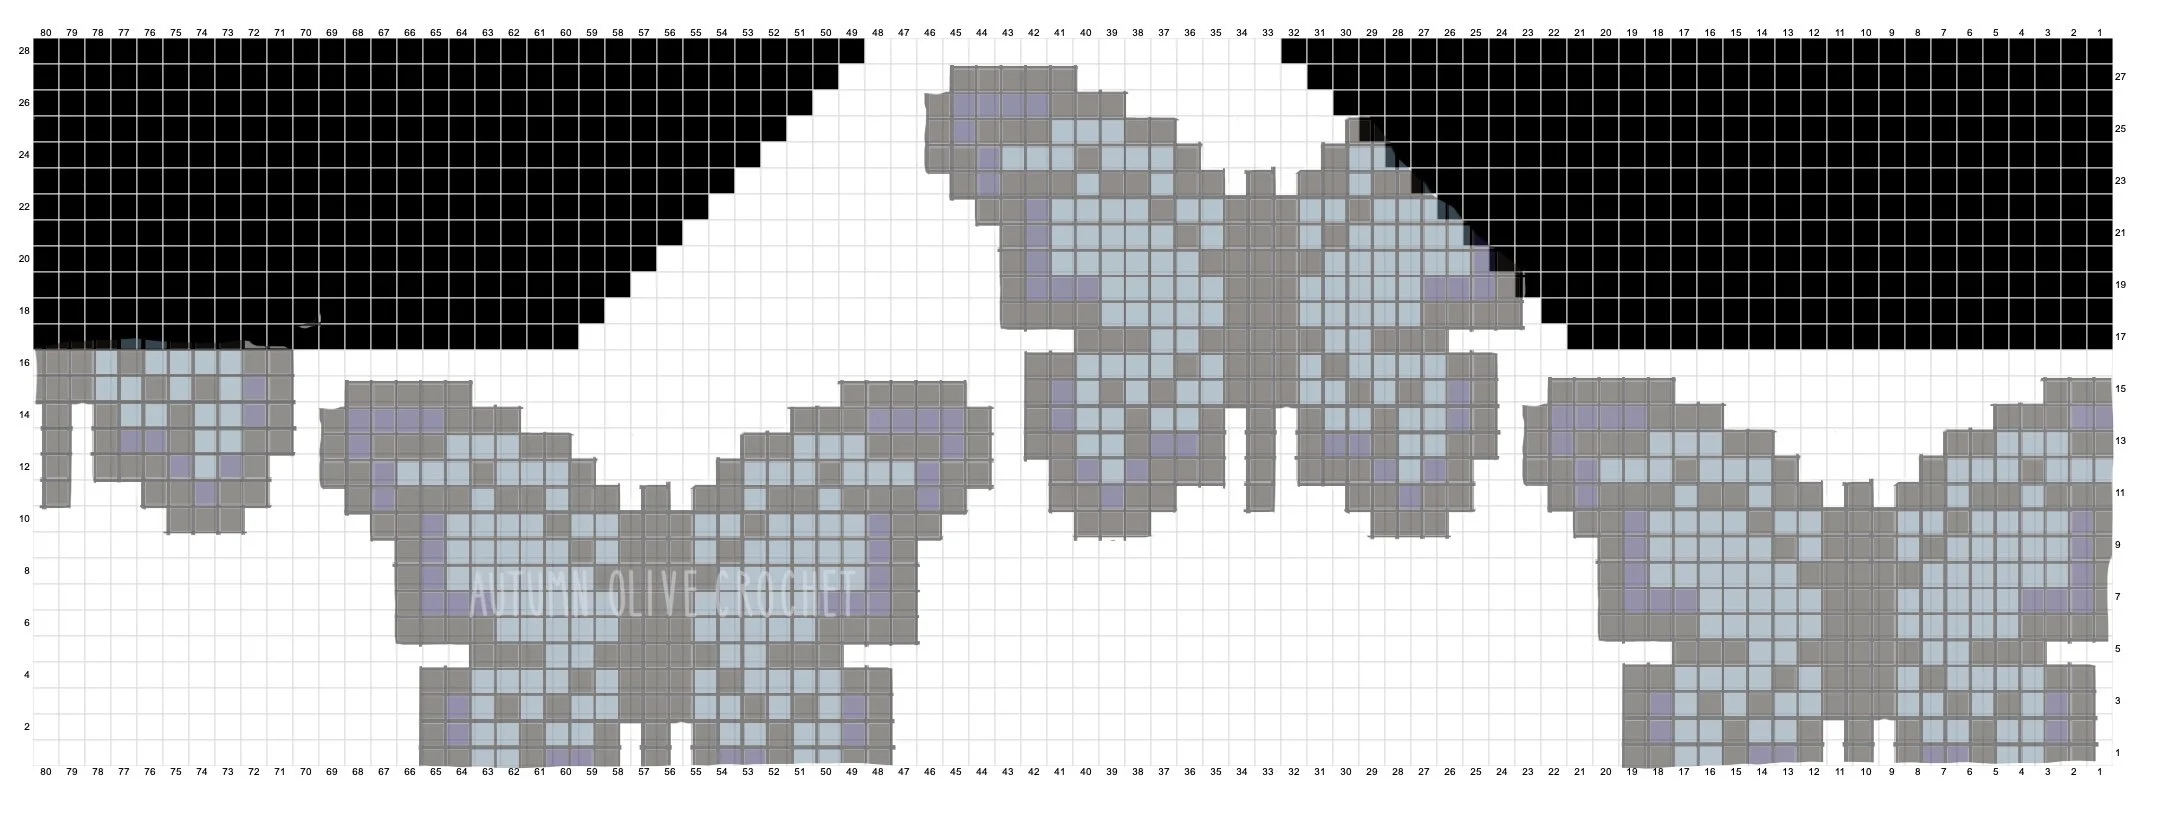
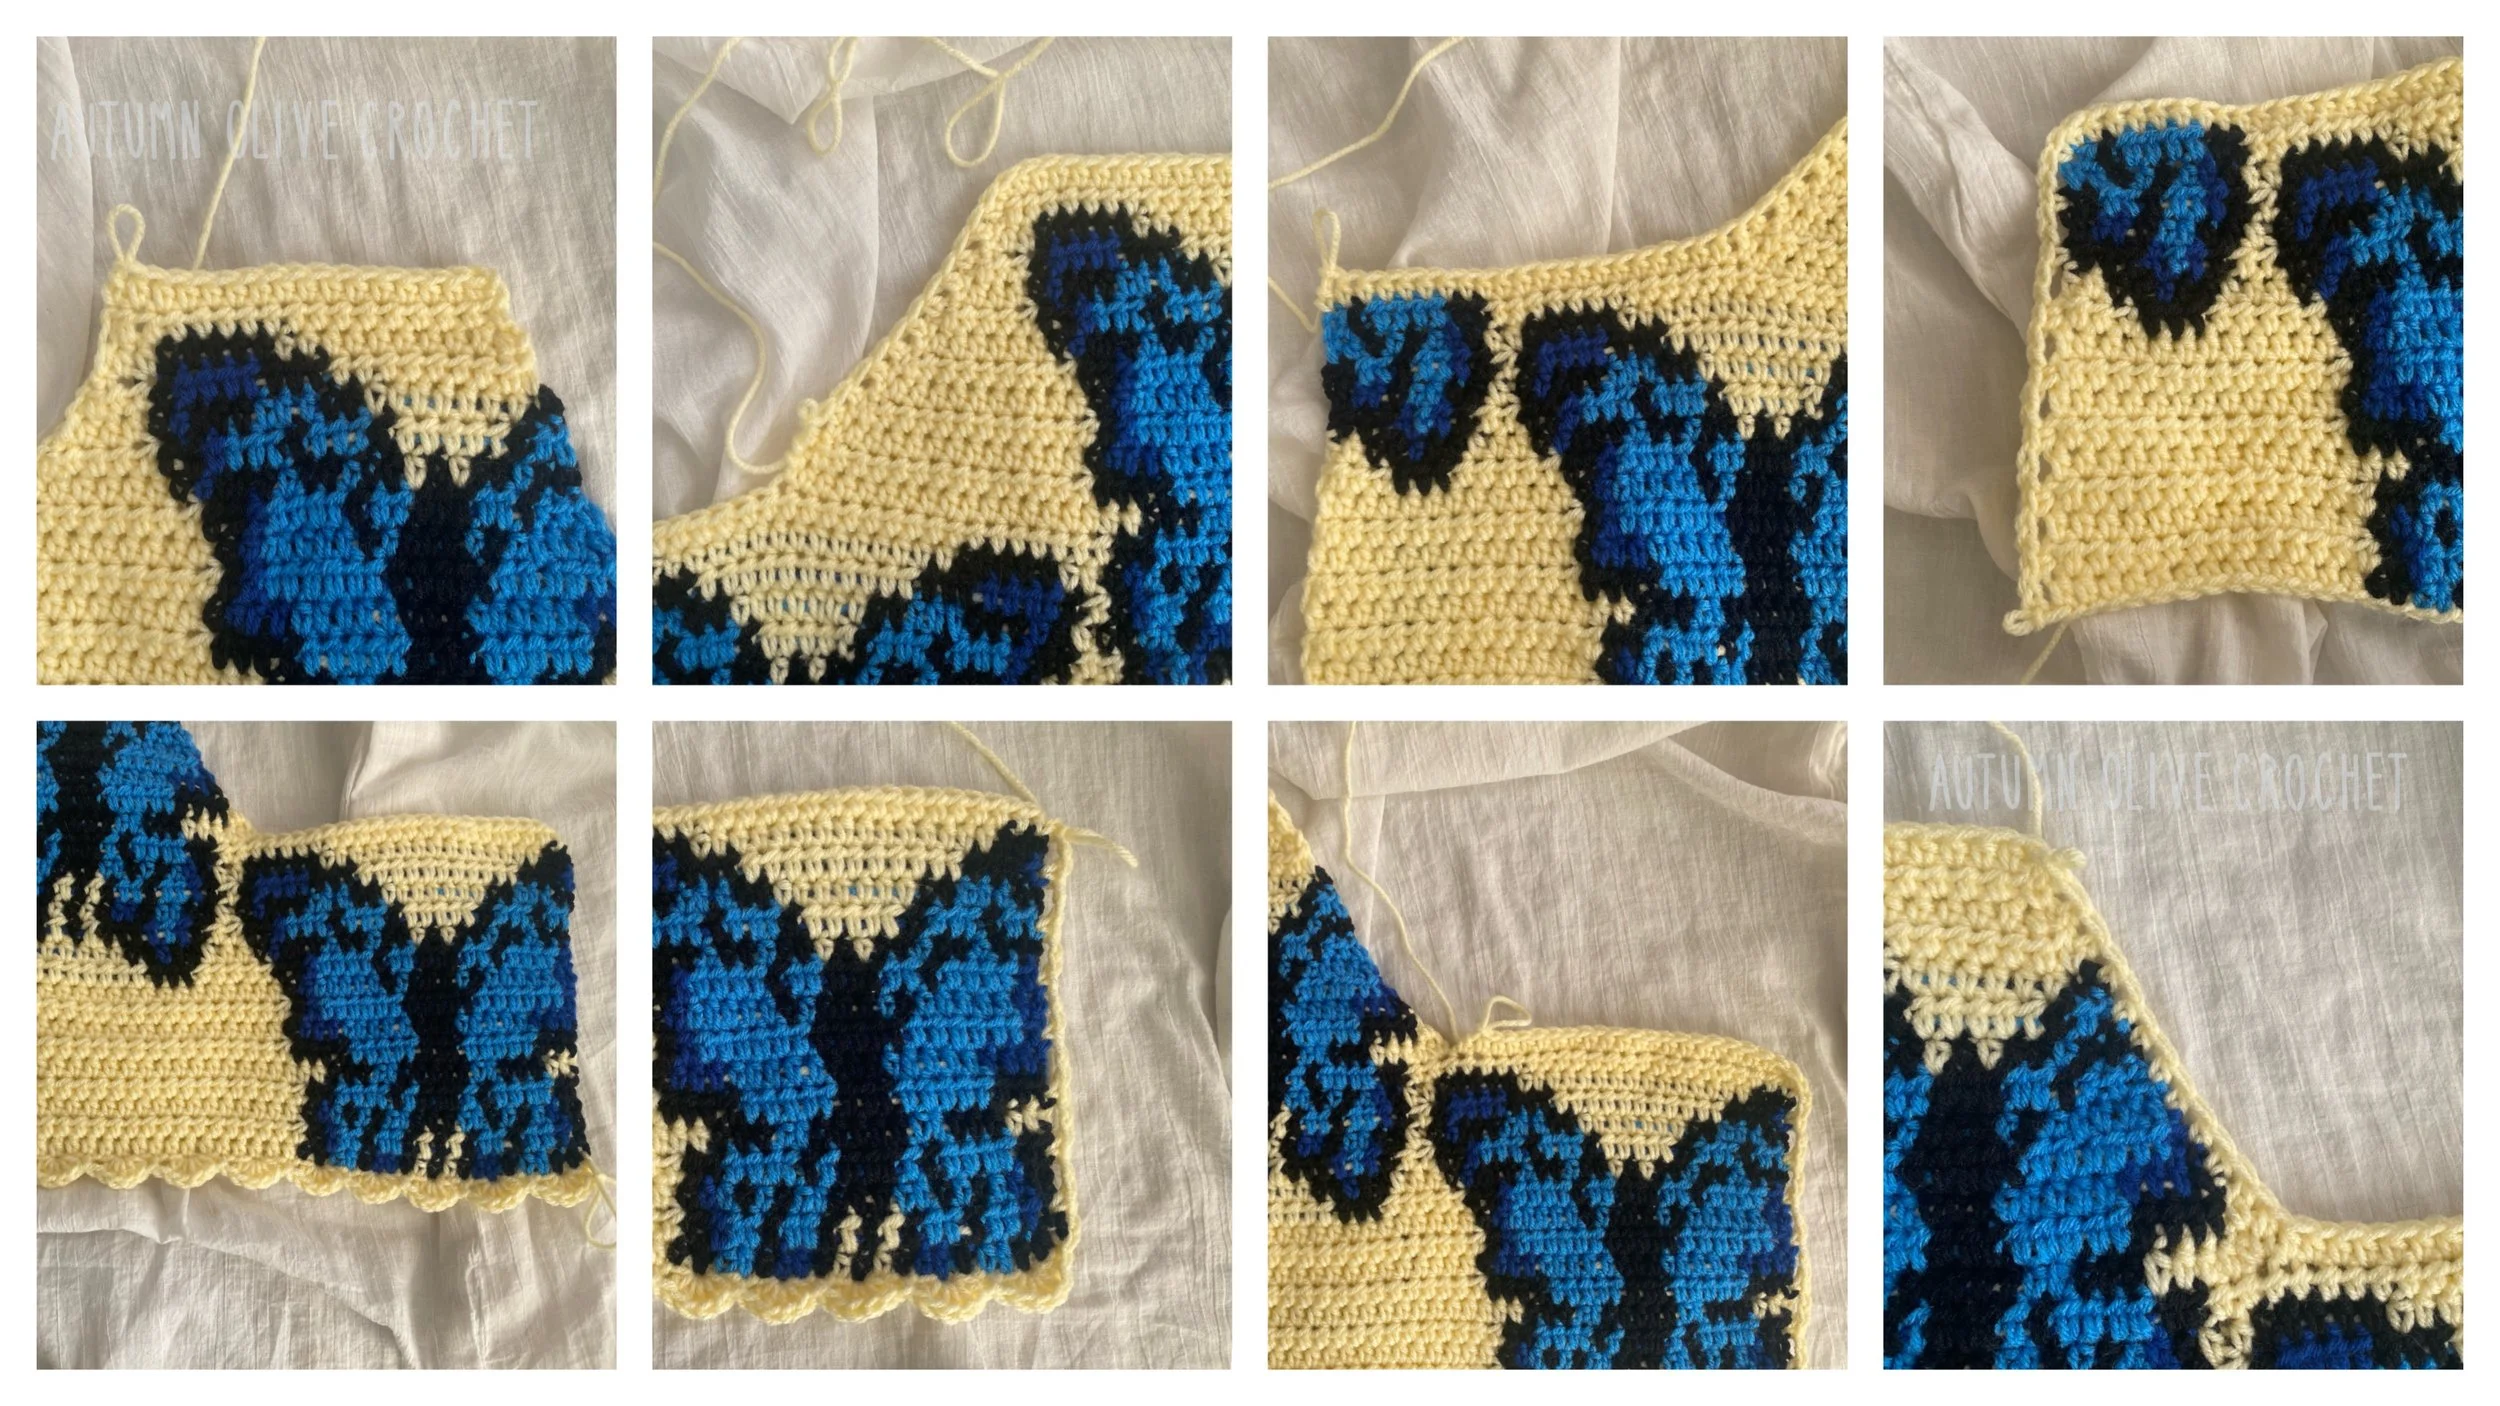
here is the layout for the example size, made using stitchfiddle.com
visit autumnolive.com/free-patterns/category/graphics for free add-on graphics
to adjust to your size, follow the butterfly graphic and just extent the cutoff edges or rearrange
be sure to take the whole 27x18 square into account for placement and fitting
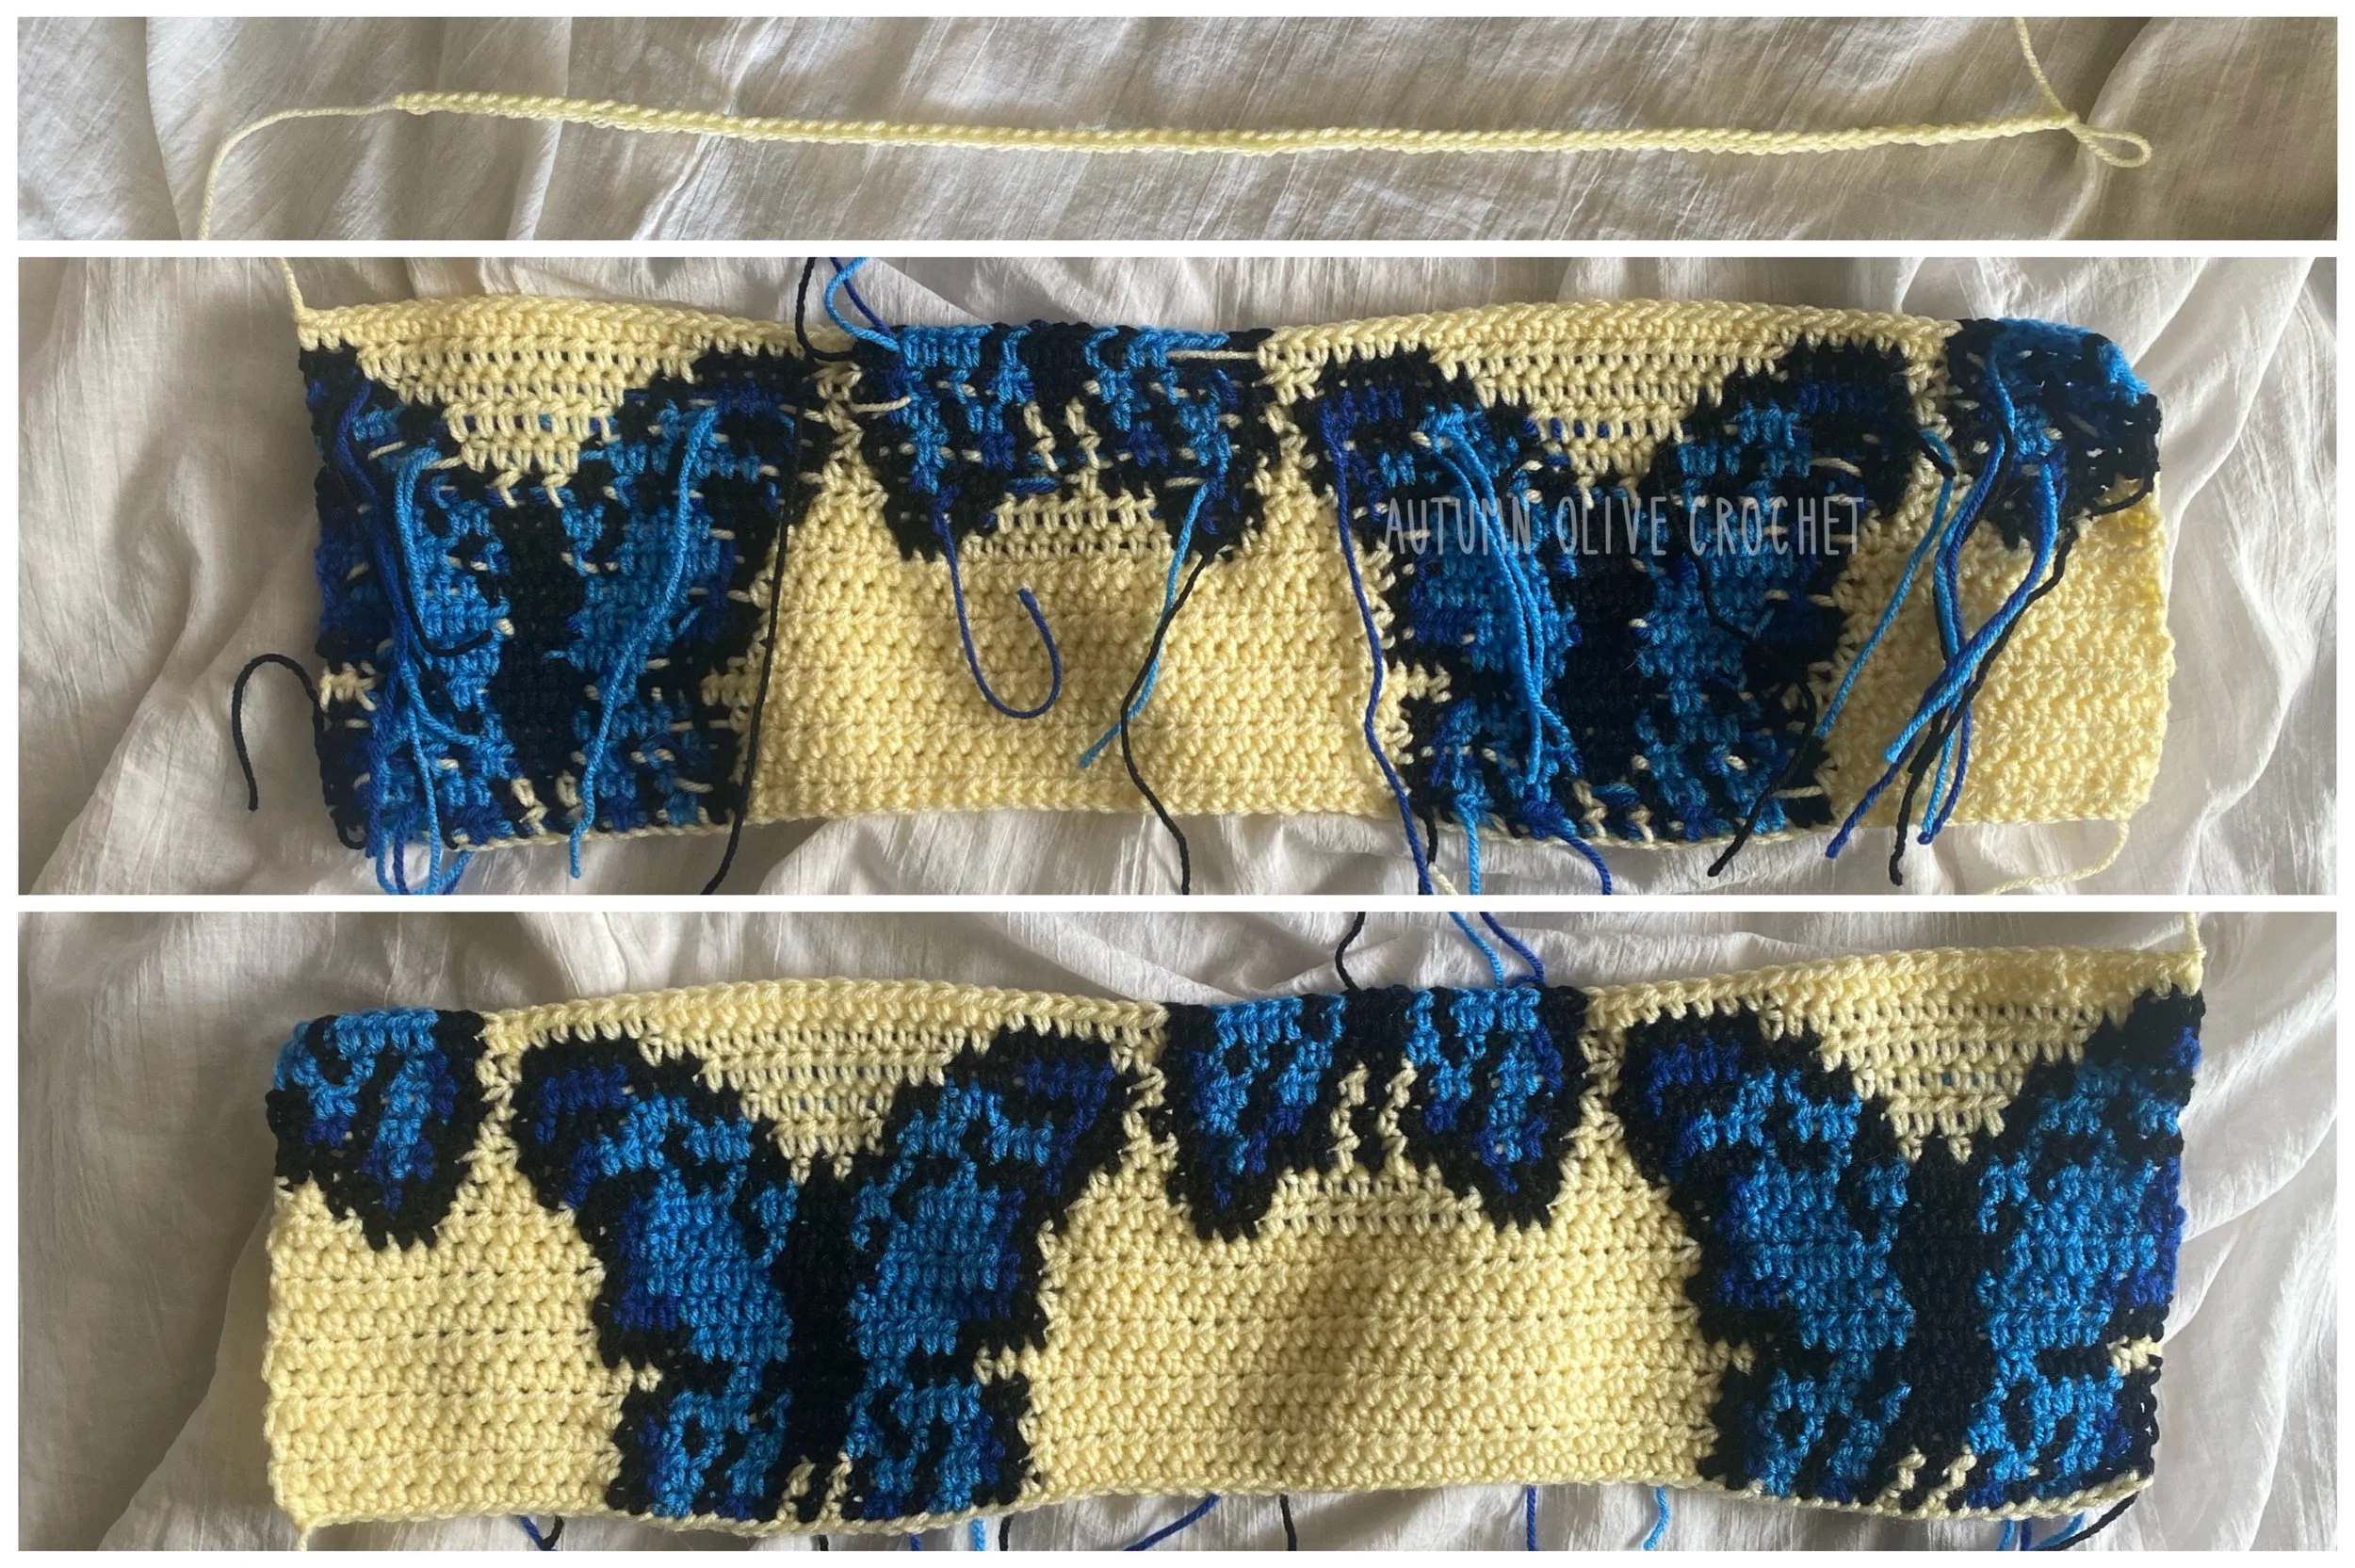
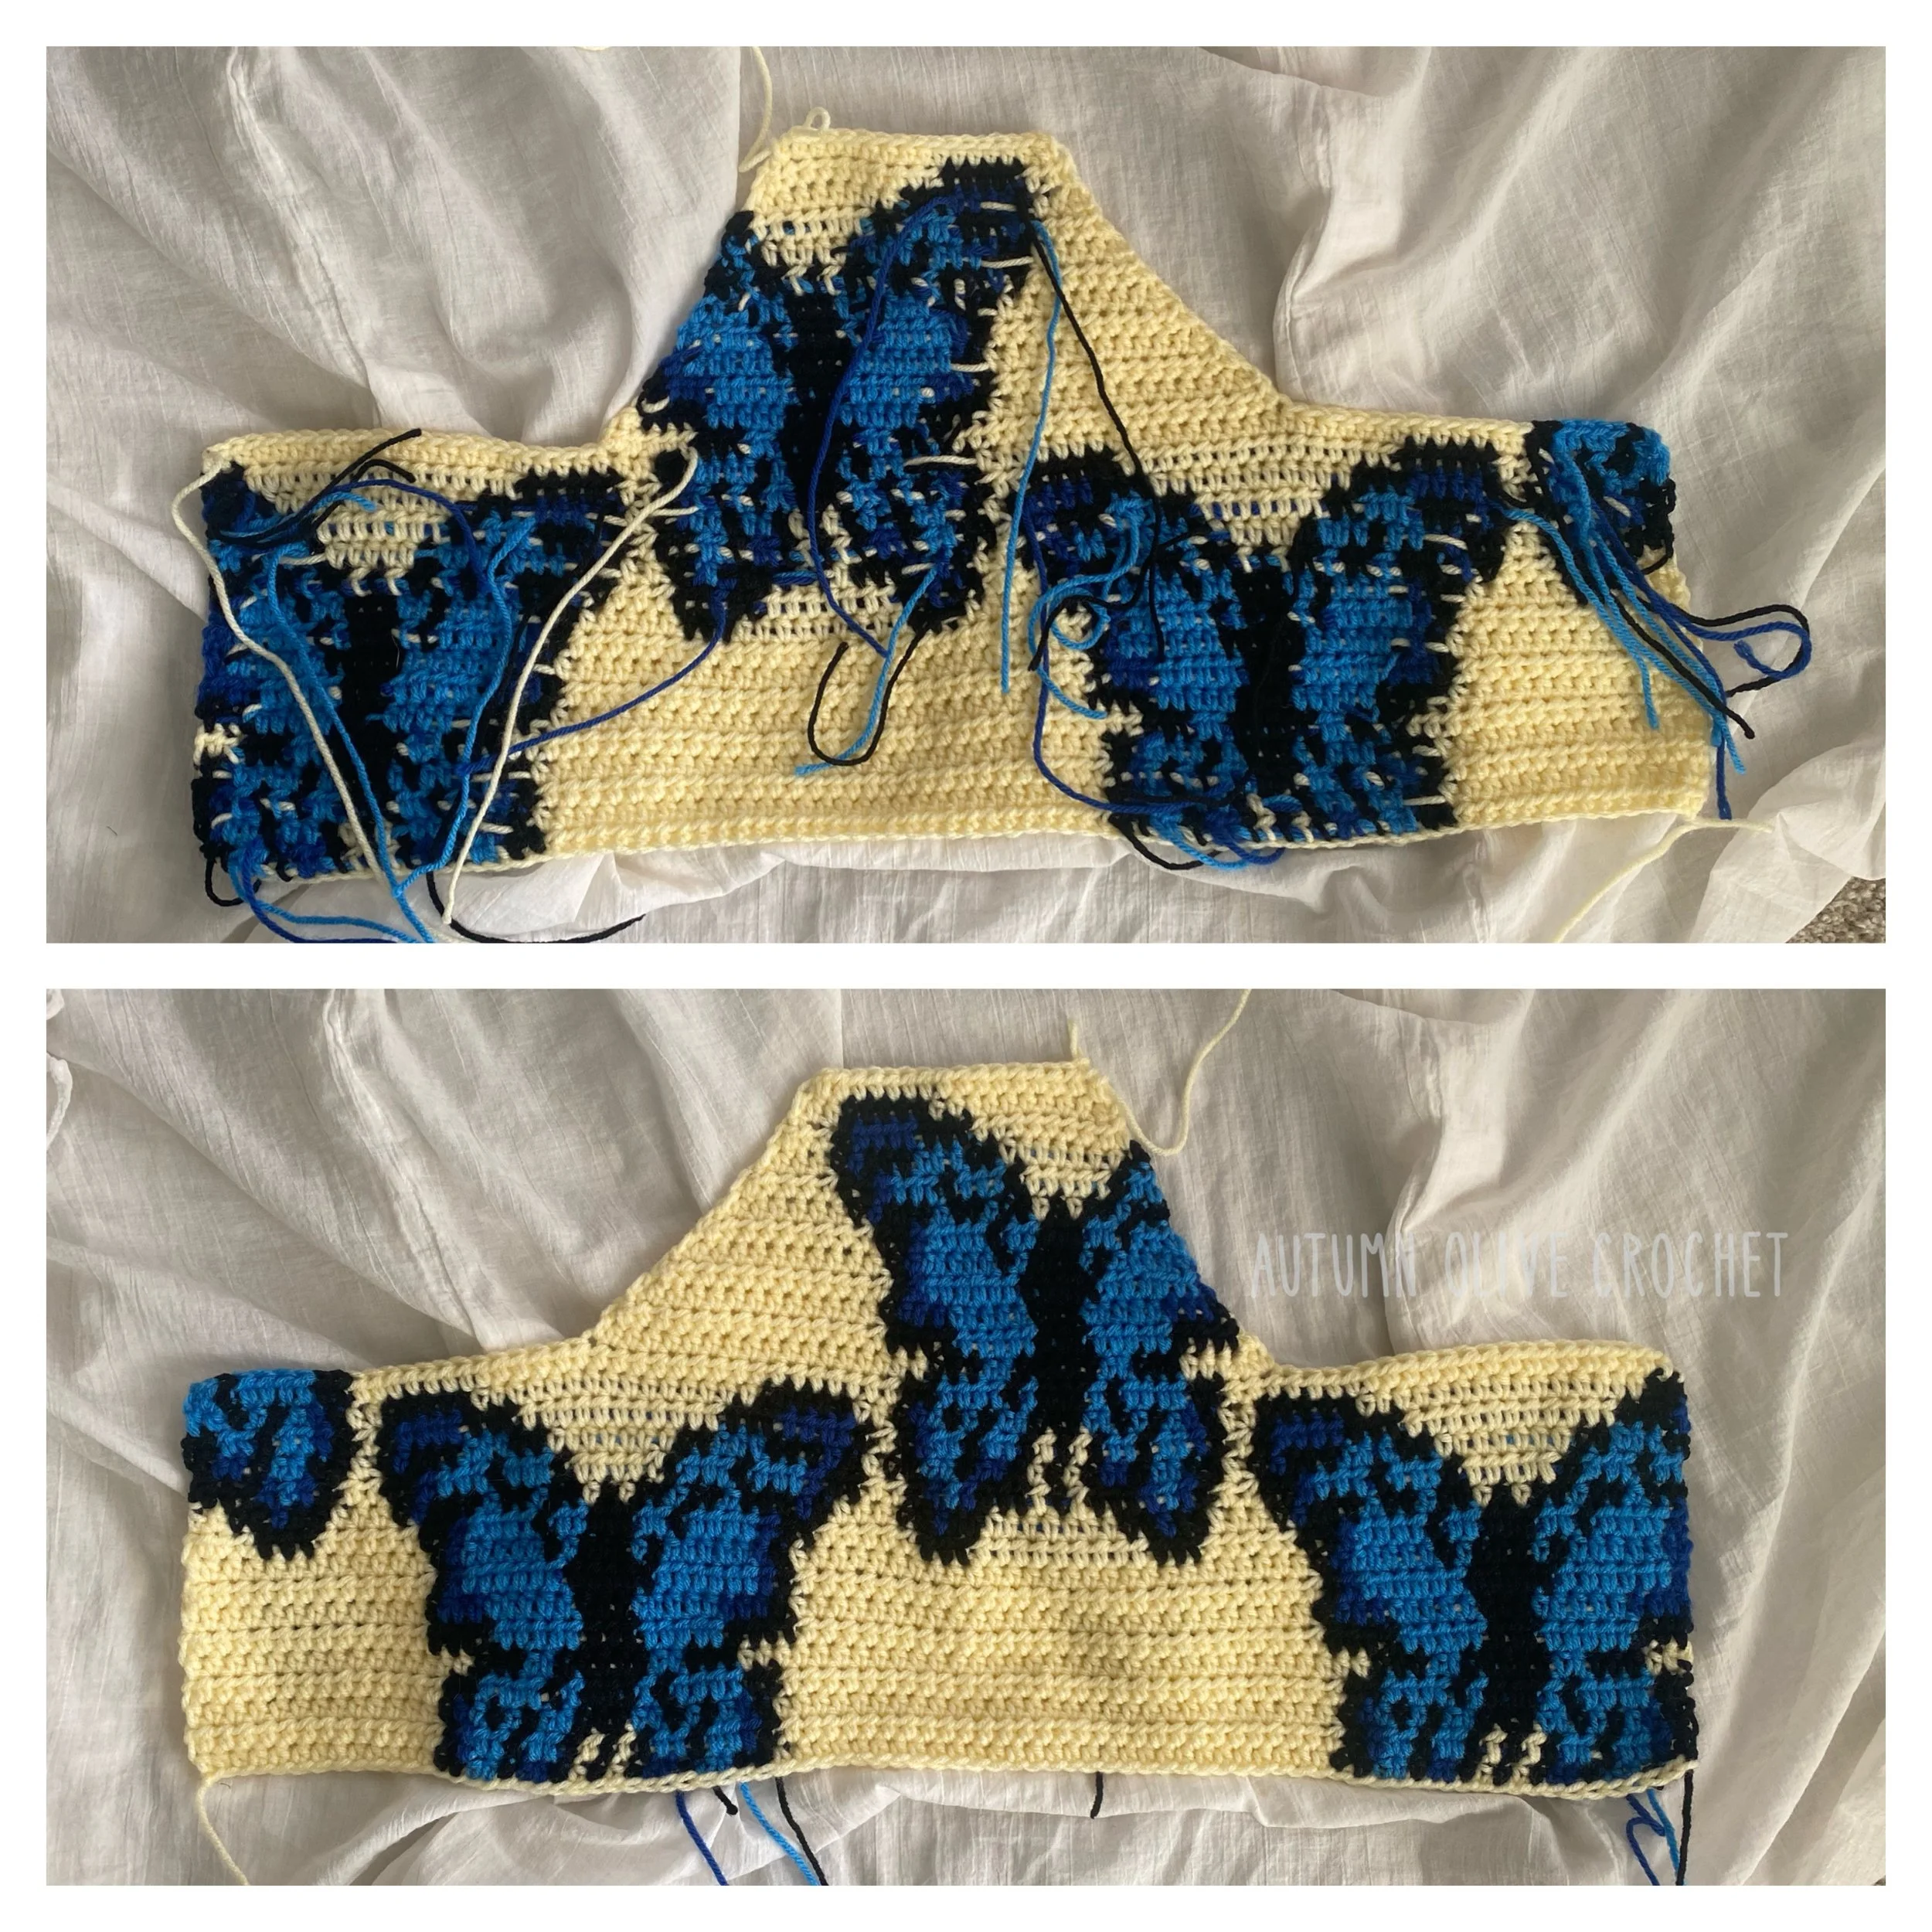
when changing colors it should be done on the last stitch of the current color: for hdc yarn over, insert hook, yarn over, pull up a loop, yarn over with the new color then pull through
I recommend crocheting over your non dominant yarn; keep all ends to one side of the piece
♡ PATTERN ♡
BODY — no decreases
begin with the number of starting chains as calculated above: calculation #1, ch 1, turn.
row 1: hdc into 2nd ch from hook and in each ch across, ch 1, turn
row 2 and up: hdc across, ch 1, turn
repeat row 2 for as many rows as needed until you reach the point of the start of the decreases as calculated above: calculation #2 minus calculation #3
fasten off
BODY – with decreases
after the fasten off, turn, you should now be working into the front side.
pull up a new loop (to find the correct stitch to pull up a loop, subtract calculation #4 from calculation #1, divide this number by 2, work into next stitch)
example: calculation #1 was a starting chain of 76 minus calculation #4 which was a new row of 38 = 38 > divide by 2 = 19 meaning there is 19 on either side of the 38, so the new loop should begin after stitch 19 on the 20th stitch
now, working from the new loop to form the first row before the decreases
hdc the first row as calculated above: calculation #4 across, ch 1, turn, resetting row count back to 1
row 1: work 1 hdc decrease, hdc across, work 1 decrease into the last 2 sts, ch 1, turn.
row 2 and up: repeat row 1 until you’ve reached the needed rows of decreases as calculated above: calculation #3
ch 1, turn, we are continuing into the border
with the front side facing you for the entire making of the border:
hdc into each stitch along the top
hdc into the side of each row down the first slope
hdc into each stitch along the side of the top
for where the two sides meet in the back we create holes for the ribbon lacing: sc into the side of the top row, *ch 2, skip 1 row, sc into the side of the next row* repeat from * across.
for the bottom scallops: *sl st, sk 1 st, HDC 5 into next st, sk 1 st* repeat from * across
now working back up the other side for ribbon lacing, sc into the side of the bottom row, *ch 2, skip 1 row, sc into the side of the next row* repeat from * across
hdc into each stitch along the side of the top
hdc into the side of each row up the other slope
sl st to top row, fasten off.
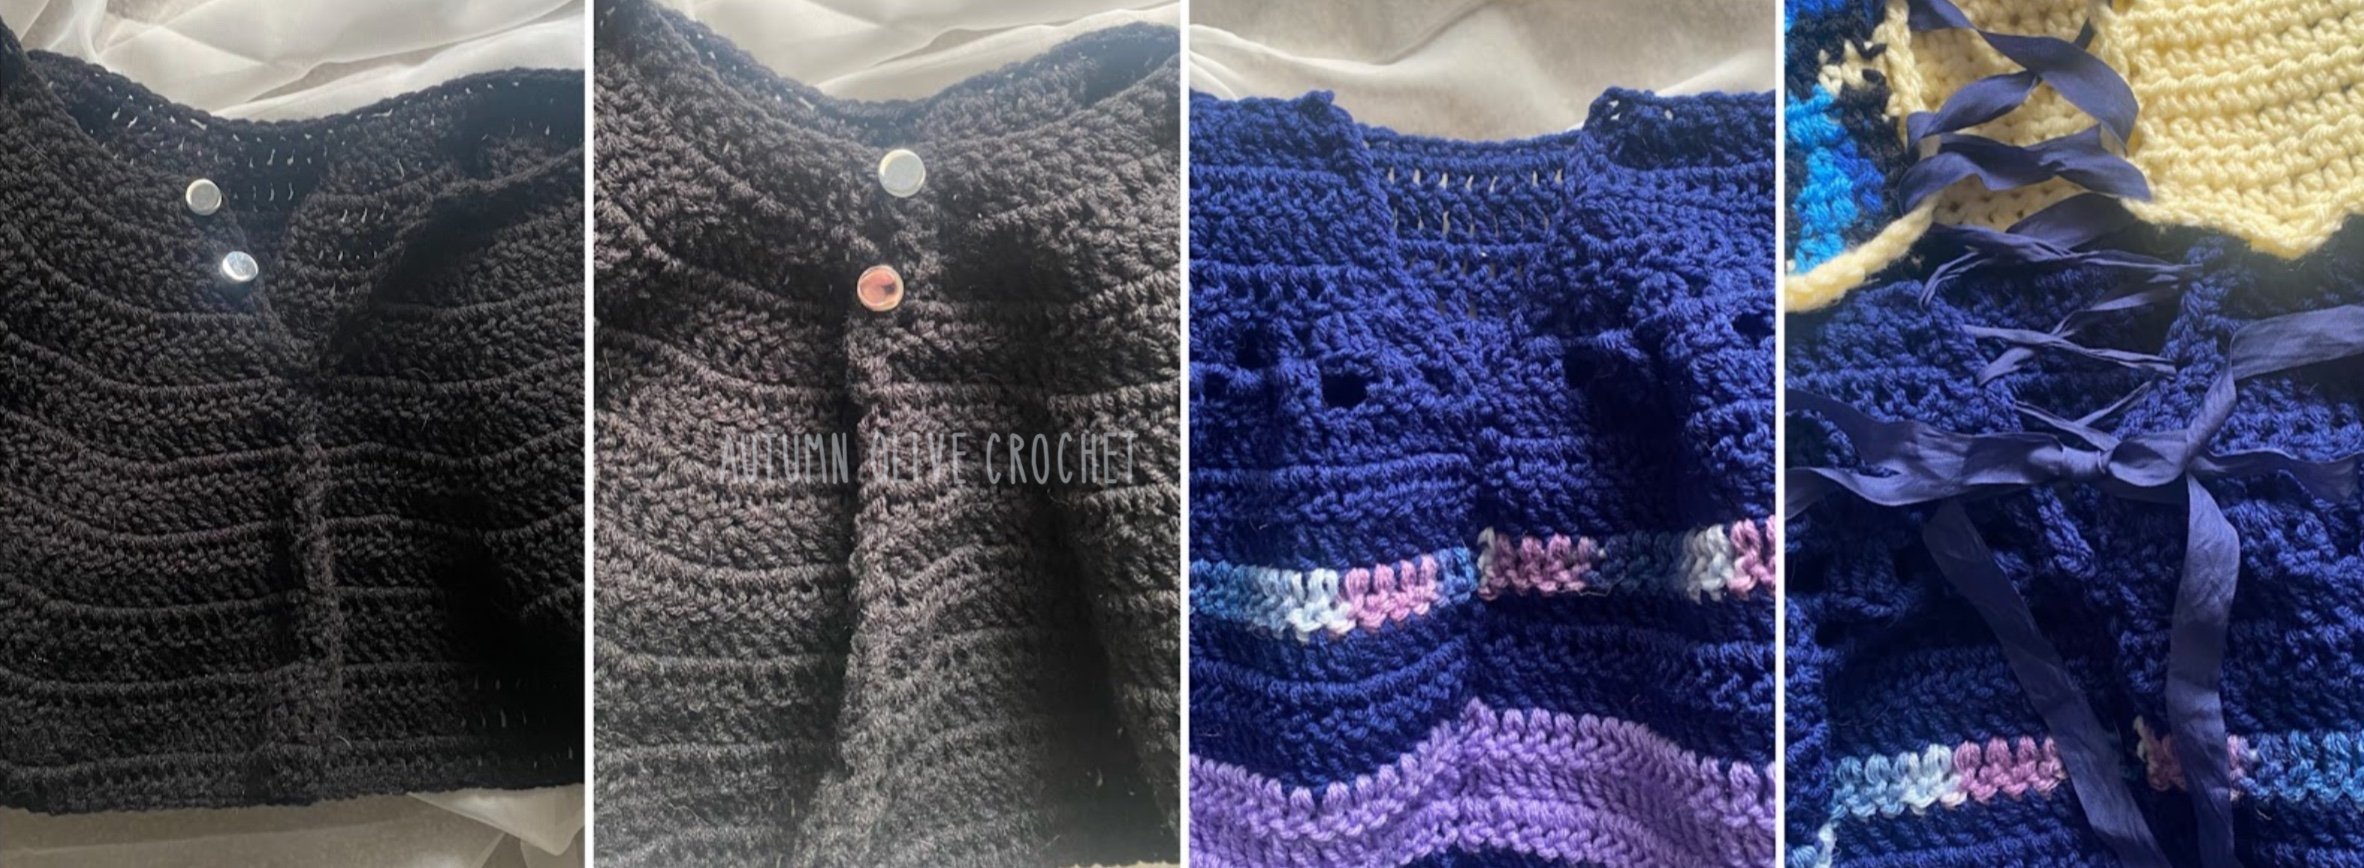
COLLAR:
the center of the collar will be attached as it it worked in order to reduce seaming, but you may make it separate and seam it if you'd like to (see below for alternatives)
to attach, for every 2 rows of the collar, you will slip stitch into 3 stitches on the top row of the garment, so use this formula to find which rows of the collar will be attached to the top
starting with the collar worked unconnected at first: ch 6, turn, working into the second loop from hook (chain any amount there for varying thickness of the collar)

row 1: hdc across (5) ch 1, turn
row 2 and up: in back loops only, hdc across (5) ch 1, turn
when you come to the first row of the center section to be attached, working into the front side of the top, using the example above, 7 rows are worked before attaching; so work the 8th row, attach, work the 9th and 10th row, attach, and so on, after the 17th row, do not attach
row 8: hdc across (5) slip stitch into next 3 stitches of the top, turn, do not work into the slip stitches
row 9: hdc across (5) ch 1, turn
row 10-17: repeat rows 8 & 9
row 18-24: repeat row 2
row 25: (second to last row) in both loops, hdc, hdc, ch 1, skip 1 stitch, hdc into next, hdc, ch 1, turn
row 26: (last row) in both loops slip stitch across
attach button on the second row
thread a ribbon or crochet chain through the back holes of the garment
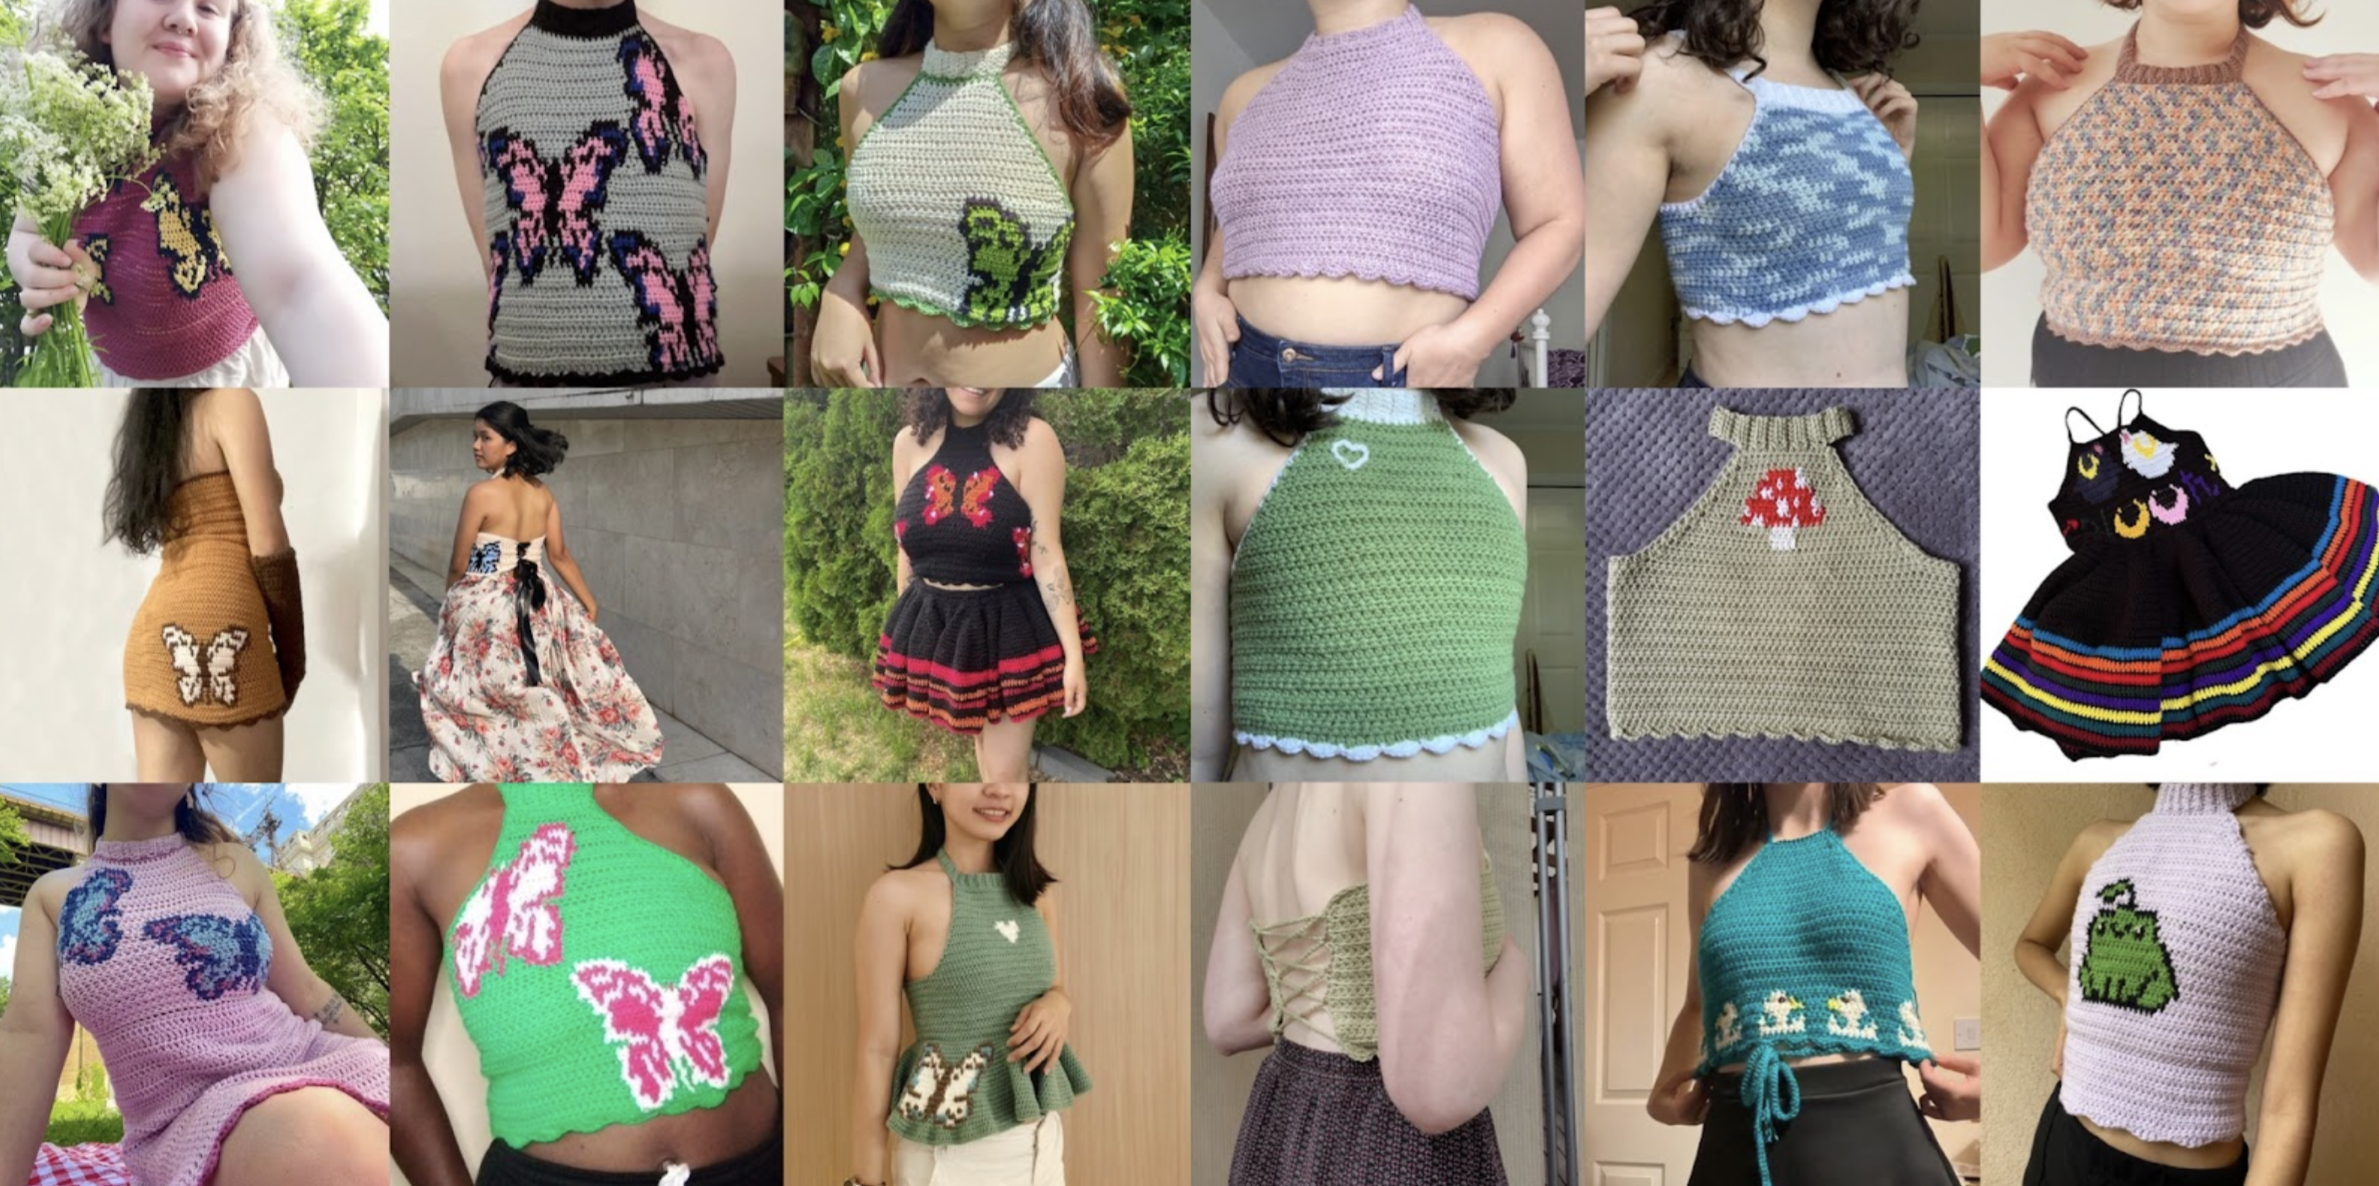
COLLAR ALTERNATIVE IDEAS:
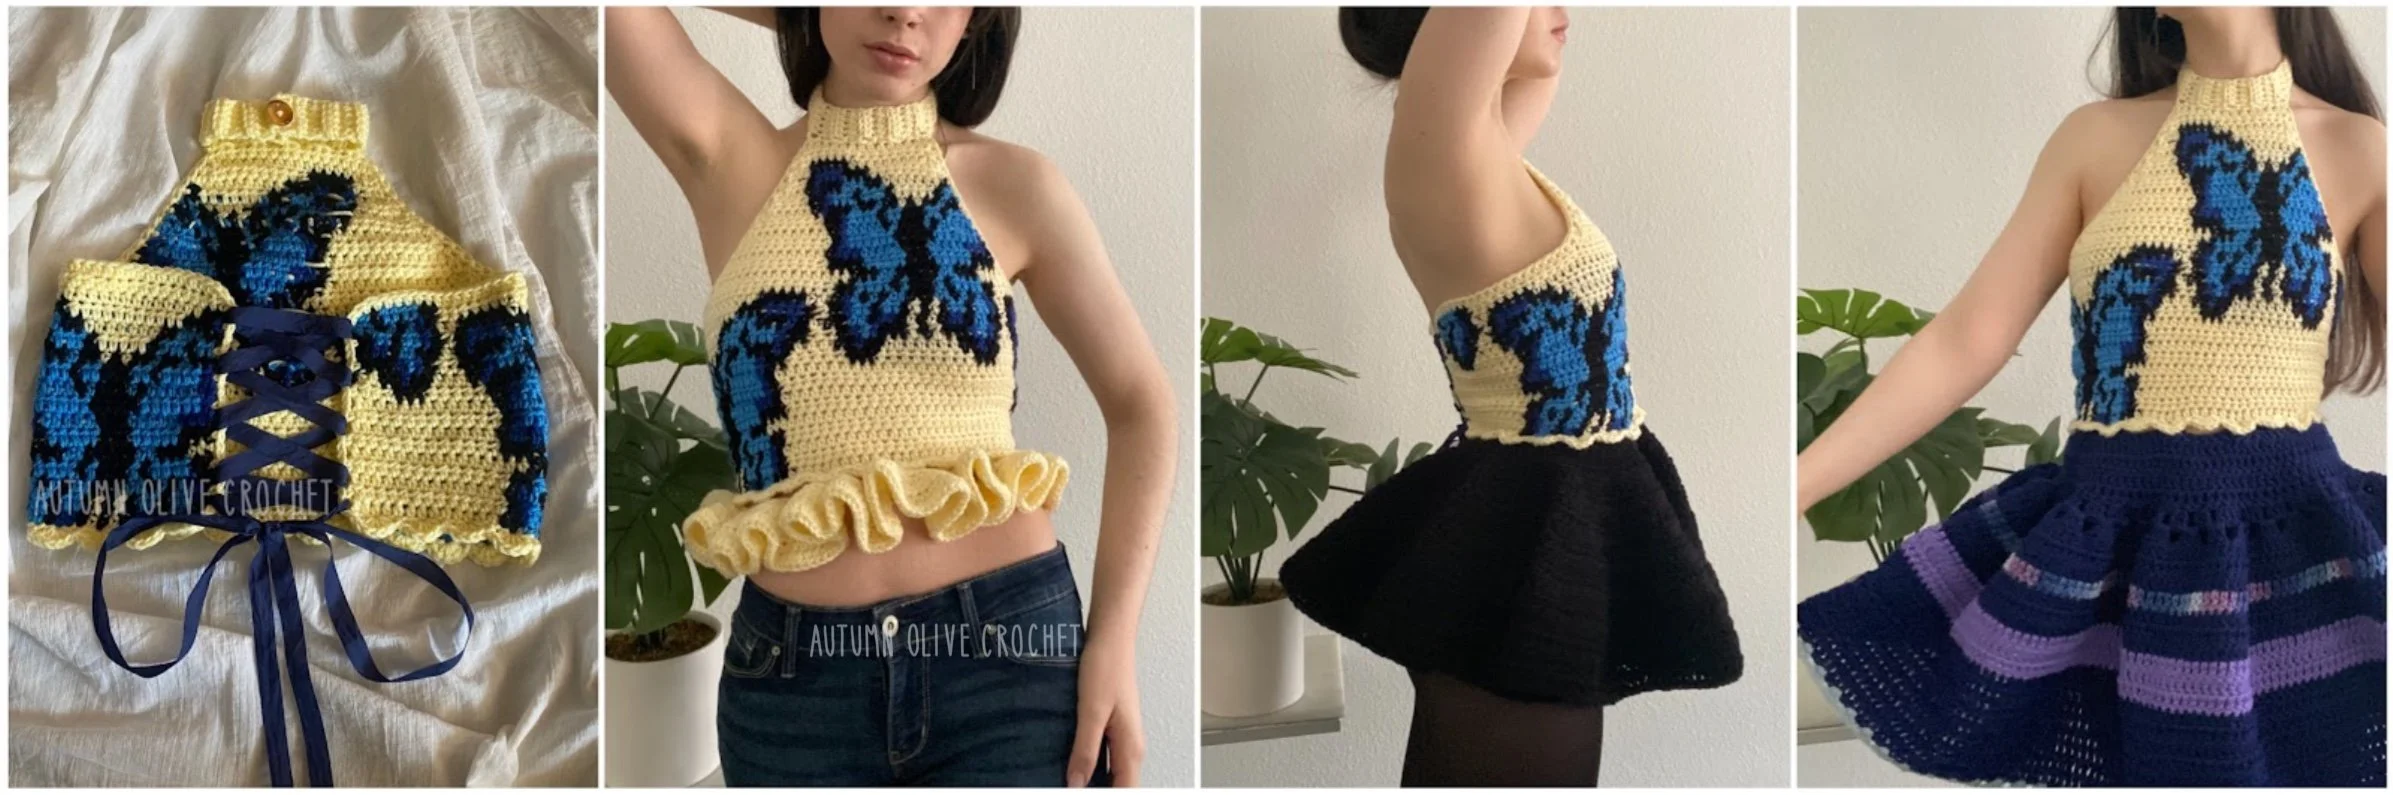
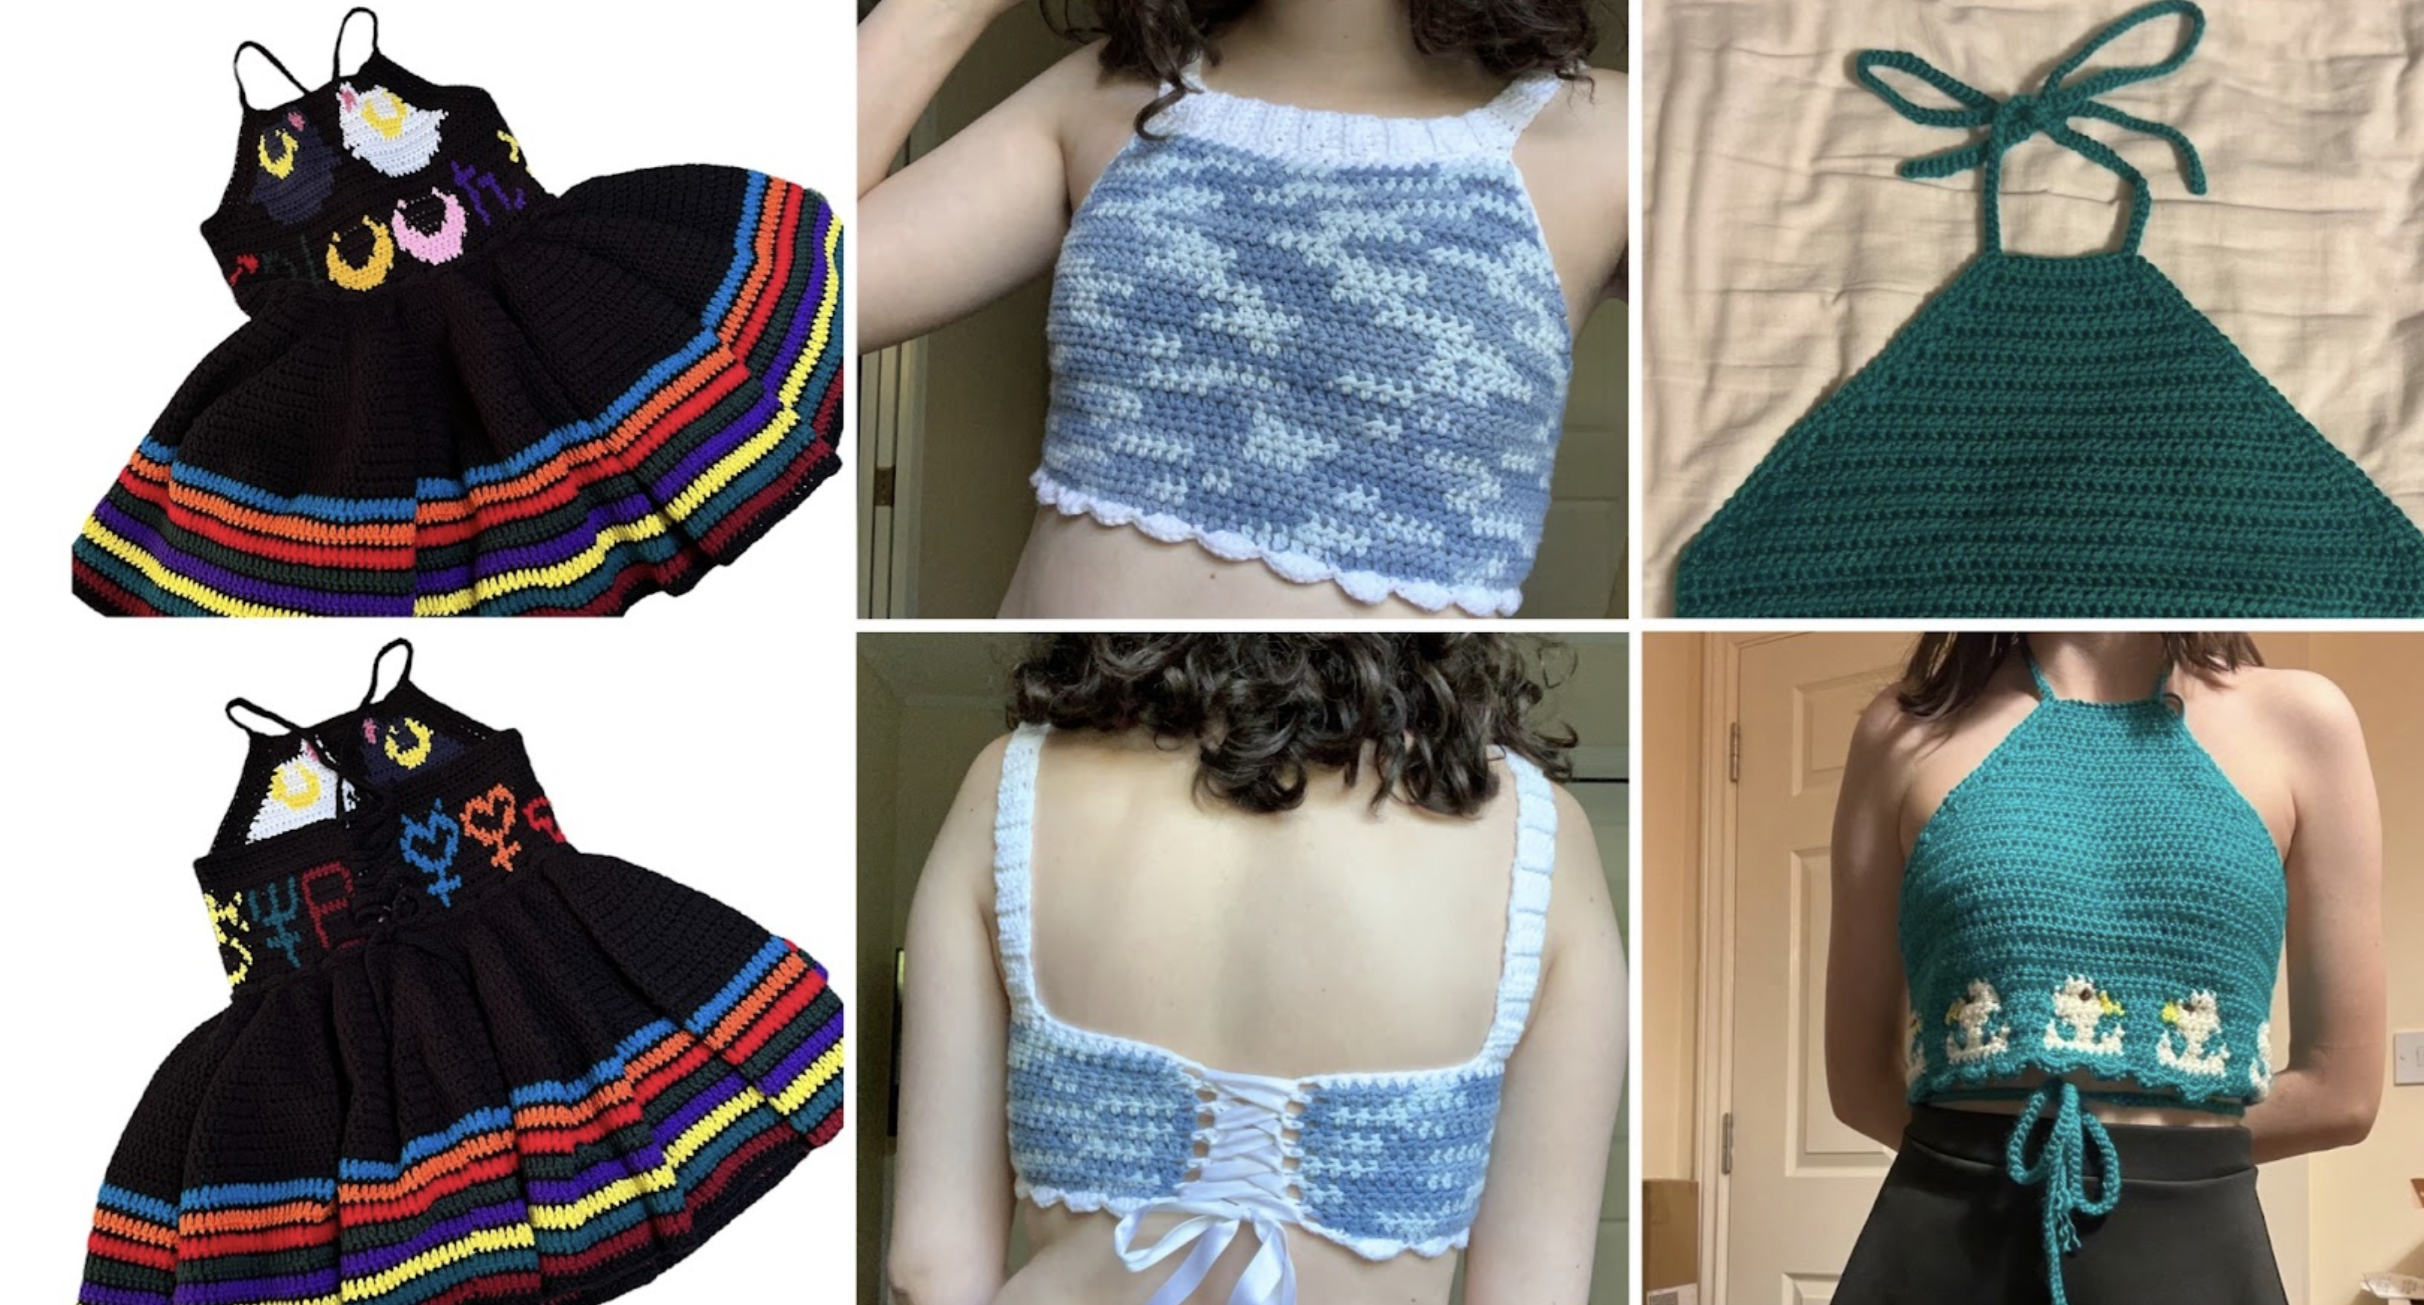
In the sailor moon dress, this tester made a strap on each corner of the neckline which go over the shoulder and function as the cord to lace the dress
In the bird top, this tester made a strap on each corner of the neckline which tie at the back of the neck
In the variegated blue top, this tester extended the hdc collar instructions and attached at the back to make a classic tank top style
FOR THE SKIRT BANDS:
there are a few options here ♡
you could make a removable skirt using buttons attached to the inside of the top behind the scallops (you could also do this method without buttons and use bits of string to thread in and tie the length onto the top)
for a permanent skirt, you could work directly into the back of the stitches above the scallops (or you can omit scallops by instead working a row of hdc at the bottom of the shirt and then working your skirt directly into the row of hdc)
you can make the skirt an entirely separate piece by following the below instructions without worrying about attaching
you can add graphics to the skirt by working in rows of single or half double crochet
you could make just a short added length for a peplum top
you can experiment with any stitches you want after working the waistline
for a button band for a removable skirt:
sew buttons on to the back of each outer scallop and every other scallop (or you could place them on every scallop)
you want to make sure the buttons are big enough to not slip out of the holes
here’s how many scallops you have based on your calculation 1:

make a chain that is the same as the initial starting chain, chain 1
working into the second chain from the hook in the back loops of the chain, sc into the next 2 chs, *ch 1, skip 1 ch, sc into next 7 chs* repeat from * around, and sc into the last 2 chs
(if you are attaching at every scallop work: sc into the next 2 chs, *ch 1, skip 1 ch, sc into next 3 chs* repeat from * around, and sc into the last 2 chs)
you should now have a chain the same circumference of your top, with the correct number of button holes for buttons
for a string band for a removable skirt:
weave a strand of yarn through the center stitch on each scallop or every other scallop, with the ends facing the inside (make it long enough to tie a bow on the inside)
make a chain that is the same as the initial starting chain, chain 1
working into the second chain from the hook in the back loops of the chain, sc across
you should now have a chain the same circumference of your top, where you will tie the strings to the sc stitches
there are no set rules for this, just one of a couple ways to hold up the skirt if you want it to be removable

FOR THE SKIRTS: working into the skirt band
example 1: hdc high volume peplum flare - very intense and takes time;
add a row of hdc across between each row with increases to reduce intensity if desired
R1: hdc increase into each stitch across, ch 1, turn
R2: increase, work 1 hdc, repeat across, ch 1, turn
R3: increase, work 2 hdc, repeat across, ch 1, turn
R4: increase, work 3 hdc, repeat across, ch 1, turn
R5: increase, work 4 hdc, repeat across, ch 1, turn
R6: increase, work 5 hdc, repeat across, ch 1, turn
R7: increase, work 6 hdc, repeat across, ch 1, turn
continue adding one more hdc between each increase every row until desired length is reached
example 2: dc mid volume skater mini dress - intense flare but works up slightly faster;
add a row of dc across between each row with increases to reduce intensity if desired
for this attachment I did the same steps as the previous example, except it is worked in double crochet which adds a little length to each increase. I also started the first row increasing every 7 stitches and then 8 and so on
R1: increase, work 6 dc, repeat across, ch 2, turn
R2: increase, work 7 dc, repeat across, ch 2, turn
R3: increase, work 8 dc, repeat across, ch 2, turn
R4: increase, work 9 dc, repeat across, ch 2, turn
continue adding one more dc between each increase every row until desired length is reached
example 3: freehand mixed stitch boho skirt
R1: increase, work 6 dc, repeat across, ch 2, turn
R2-5: dc across
R6: increase, work 7 dc, repeat across, ch 2, turn
R7-10: dc across
R11: increase, work 8 dc, repeat across, ch 2, turn
continue this pattern but use different textures, yarn weights or stitch heights to give it a potpourri effect
example 4: low flare A line skirt
R1: increase, work 1 hdc, repeat across, ch 1, turn
R2-4: hdc across, ch 1, turn
R5: increase, work 2 hdc, repeat across, ch 1, turn
R6-8: hdc across, ch 1, turn
R9: increase, work 3 hdc, repeat across, ch 1, turn
R10-12: hdc across, ch 1, turn
R13: increase, work 4 hdc, repeat across, ch 1, turn
R14-16: hdc across, ch 1, turn
R17: increase, work 5 hdc, repeat across, ch 1, turn
continue this pattern until desired length is reached
example 5: bodycon style
work in hdc or dc and add an increase at the beginning and end of each row until you reach the widest part of the hips
from here, either work straight across or add in decreases at the beginning and end of each each row for a few rows
FINISHING UP:
after finishing a skirt, you will need to decide if your want it secured over the lower back with buttons or with lacing;
with lacing, you can create one long closure that combines the top and the bottom
measure on the back from where the skirt attaches to the top down the lower back; if your skirt is longer than a peplum top you will take your finishing tail and seam (with whipstitch or mattress stitch) from the bottom up to conceal below the hips; stop seaming just before the widest part of the hips so that the skirt will easily slide up over hips
you will have a V shape on the skirt above the seam
pull up a new loop at the top of the waistband on the right hand side of the V
place a sc into the side of each row (or 2 per double/treble crochet rows) down the V shape and then up the left hand side, chain 1, turn
working back down the V, work a sc, *skip 1 stitch, sc into next 2 stitches* repeat
if you want a laced closure, you will mirror the last step on the opposite side, but if you want a button closure, simply work another row of sc on the opposite side and then add your buttons
fasten off and weave in all ends
The finished piece is loved by critics and photographers!
“Many thanks darling! just mail me the BILL” said Mademoiselle Oie Goose
thank you abracadabra dress testing team!! ♡