
cherry cottage crop top ♡

you can get the ad-free PDF here for $3.33
fairytale lace up halter top with 4 fruit motif options
an autumn olive crochet pattern by autumn olivia ward
written in standard US crochet terms
please do not sell, copy, or claim this pattern as your own
you may sell items made using this pattern! you must credit me as the designer in your listings and include the link to this pattern.
@autumnolivecrochet on all socials
please contact me with any questions or concerns.
INFO ♡
this is a made to measure pattern to fit any size – made with tapestry colorwork squares with cute details on the edges; uses half double crochet and single crochet throughout, has a mock neck button closure and a corset laced back with crocheted leaves
MATERIALS ♡
size H-5mm crochet hook
yarn needle and scissors
1 button (1 inch diameter) & needle/thread
size 4 ‘medium’/worsted weight/(5mm) yarn (I use acrylic) in main color (about 80-350g), in square color (about 20g per square), fruit colors, and green for the ties (about 50-80g)
GAUGE ♡
5 rows of 6 stitches, done in HDC
measures in inches 2” by 2”
if not, try adjusting your tension or hook size
ABBREVIATIONS/TECHNIQUES ♡ US standard terms
CH (chain)
ST/STS (stitch/stitches)
SK (skip)
SL ST (slip stitch)
HDC (half double crochet)
BLO (back loops only)
INC (increase)
DEC (decrease)
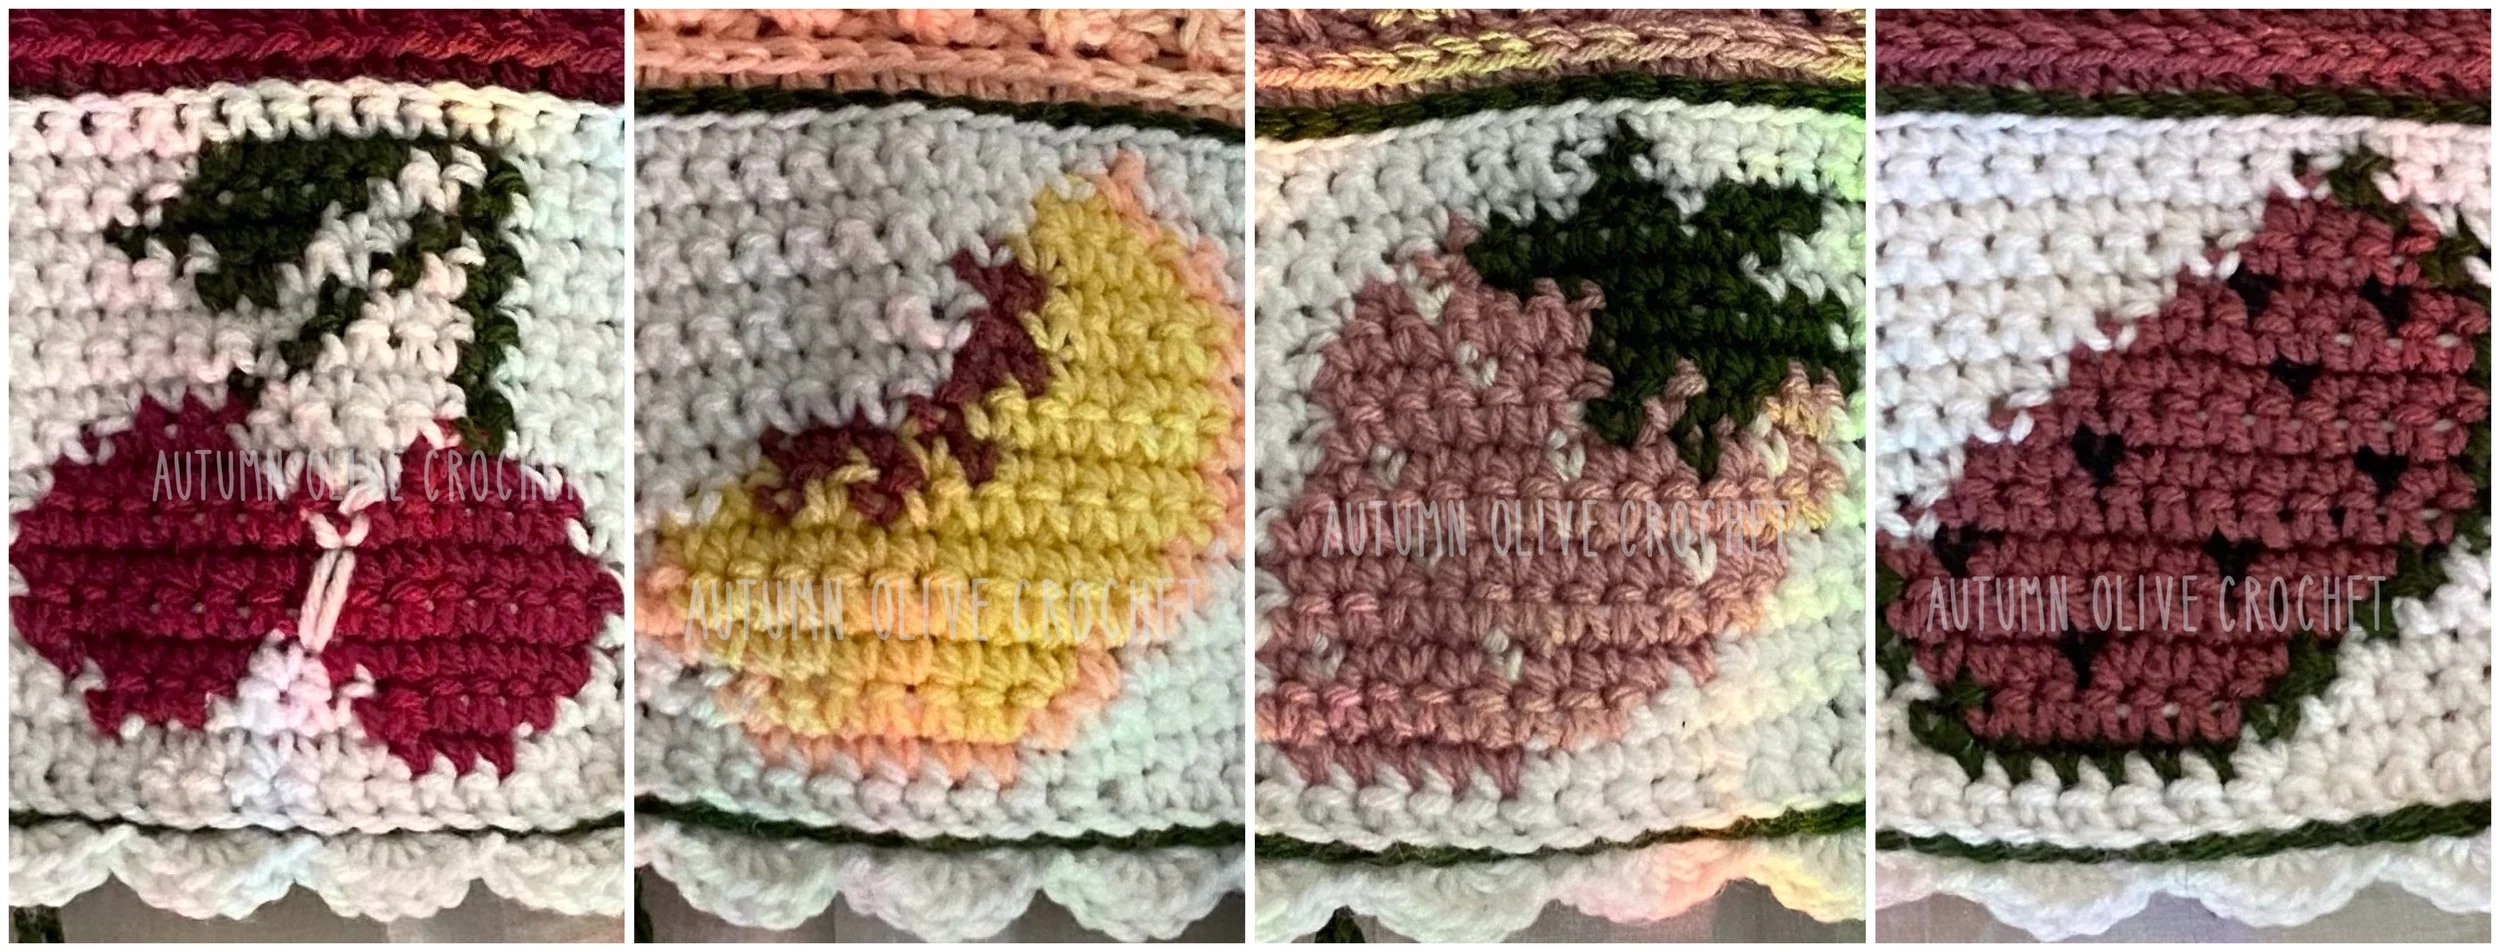
♡ FRUIT SQUARES ♡
each square should measure 5 inches by 5 inches
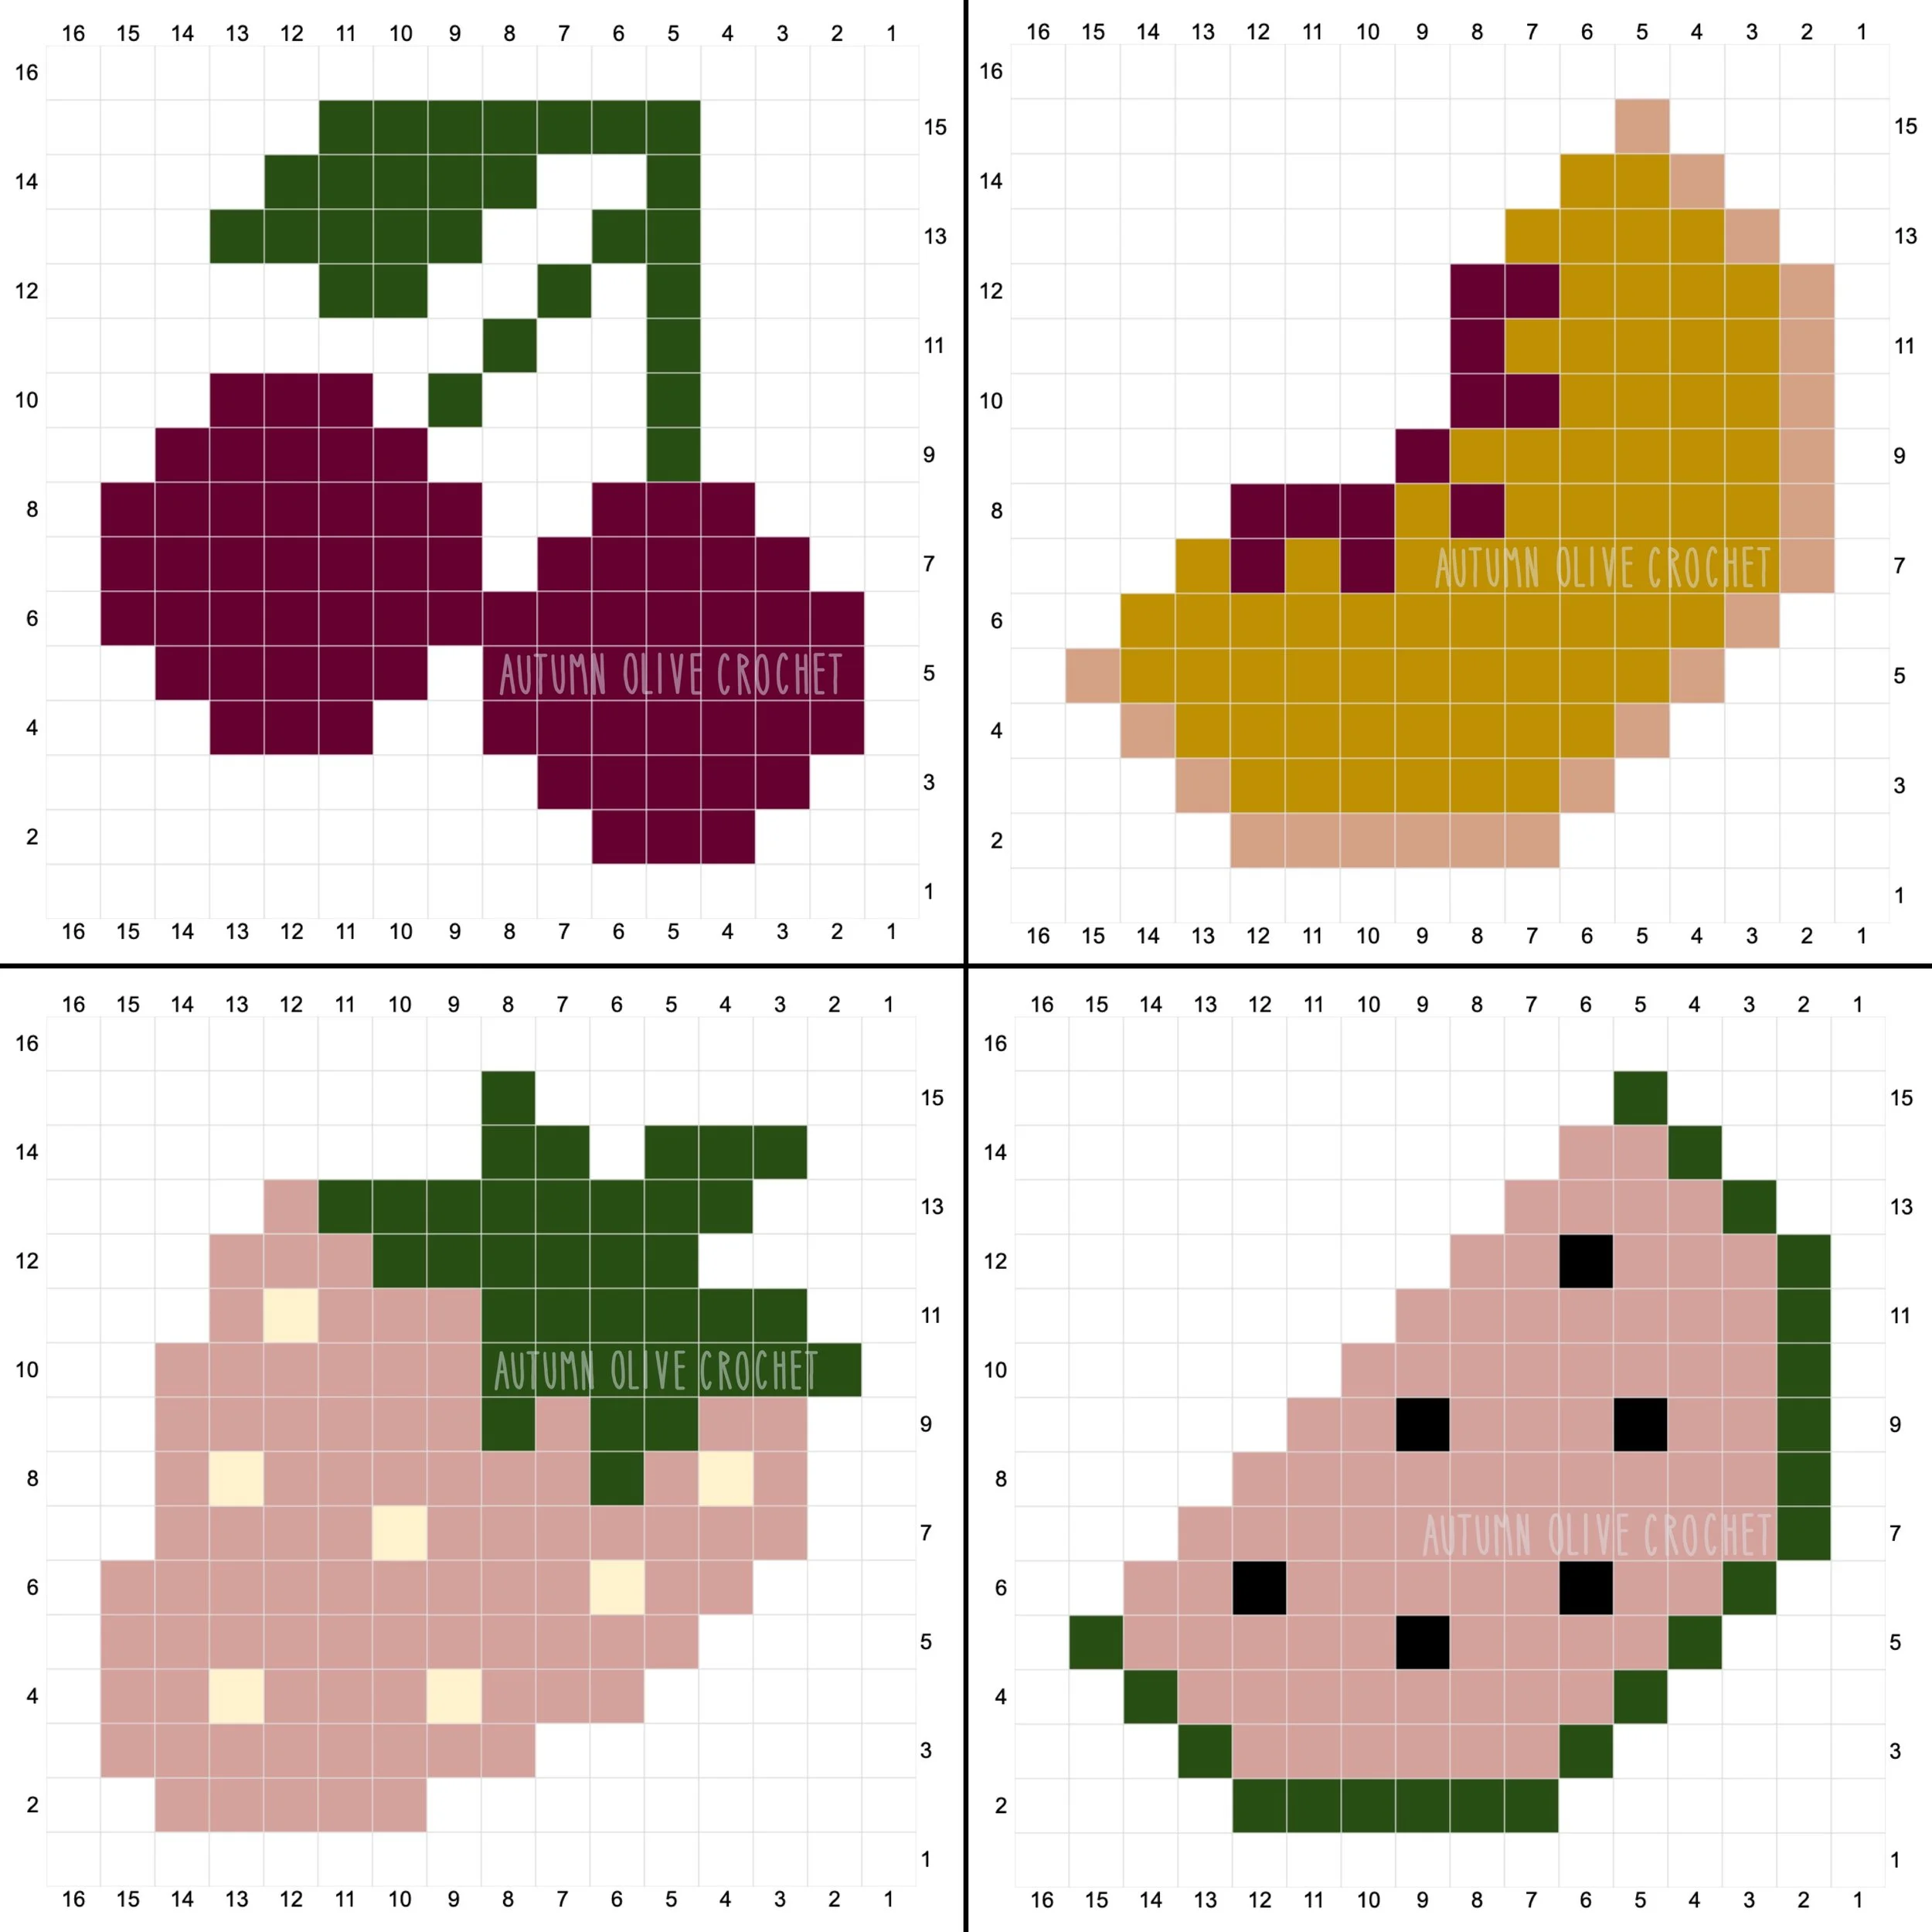
you can use any single crochet grid of 16 stitches by 16 rows
determine how many squares you will need to fit around the underbust while still leaving at least 5 inches of space to lace it
(example: chest measures 30-32 inches, crochet 5 squares to equal 25 inches)
when changing colors it should be done on the last stitch of the current color: insert hook, yarn over, pull up a loop, yarn over with the new color then pull through; you can cut each color change or simply crochet over them to carry them to the next stitch of that color – keep all ends to the back of the square
chain 17, turn, working into the second chain from hook
ROW 1: sc 16, chain 1, turn
ROW 2-16: repeat row 1, following along with the chosen colorwork grid
for the cherries, I used the white tail end to embroider a line between the pair to separate them, this is optional!
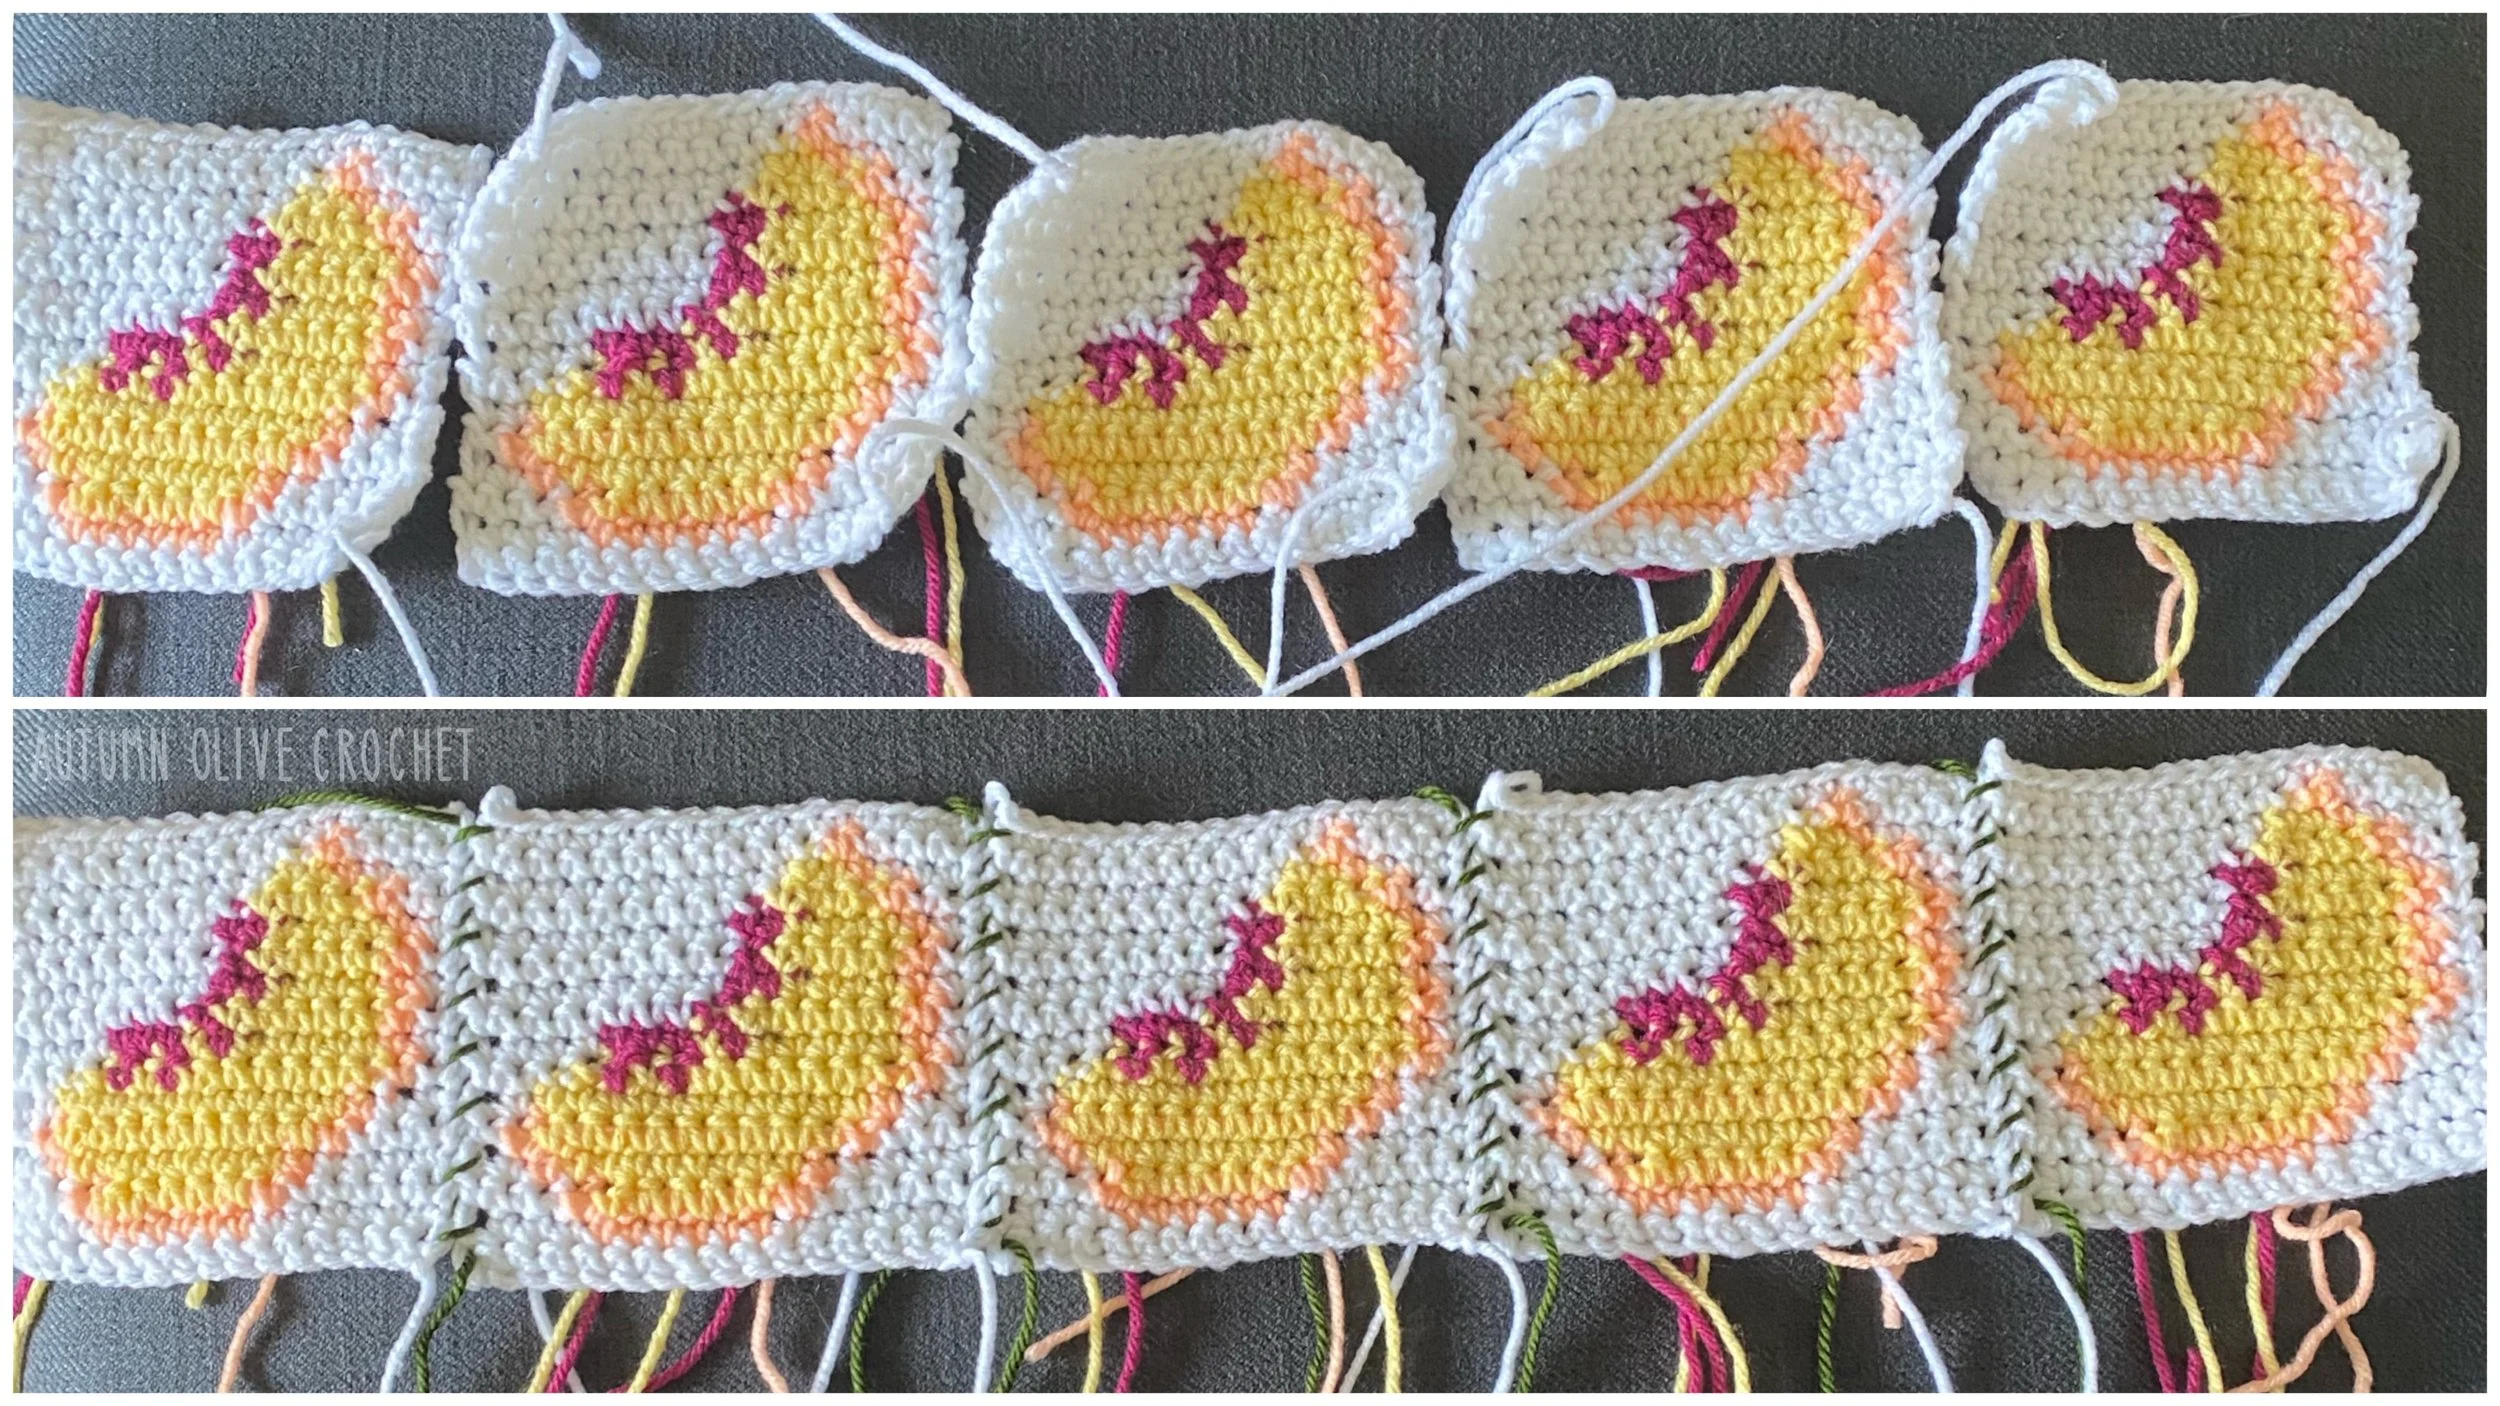
♡ SQUARES ASSEMBLY ♡
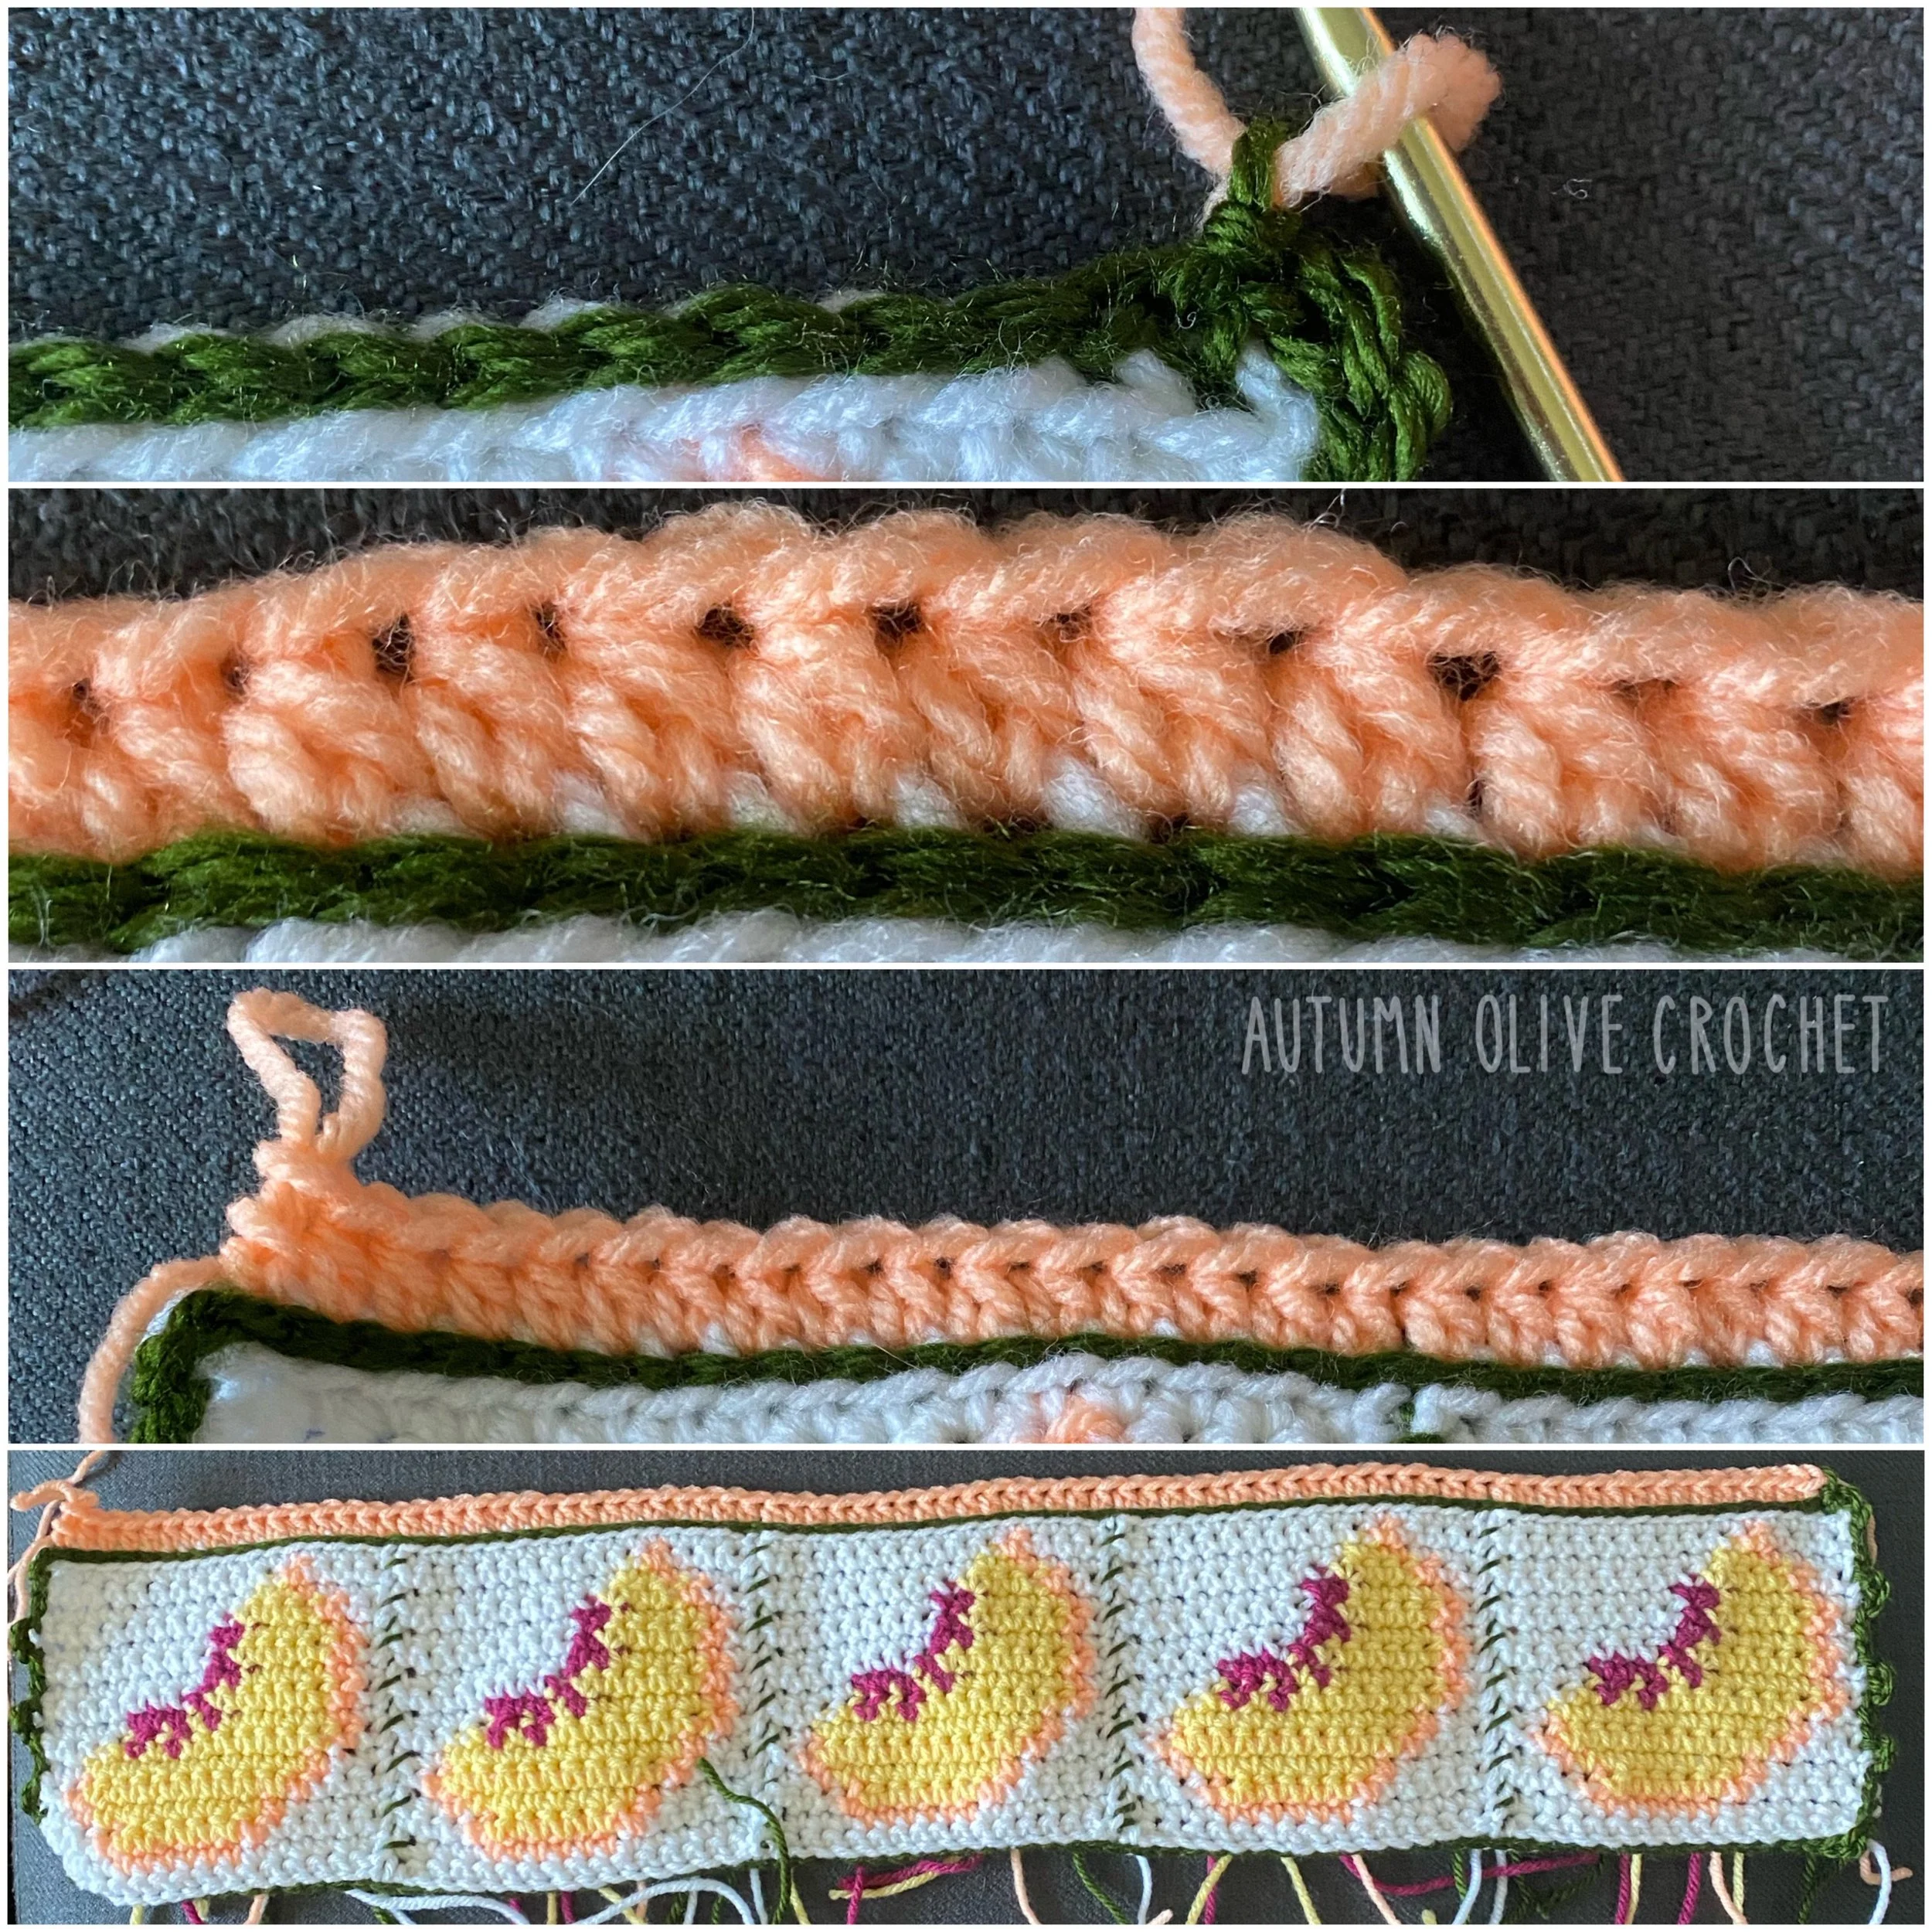
line up your squares with the right side facing you and in the green yarn, whip stitch or slip stitch them each together vertically
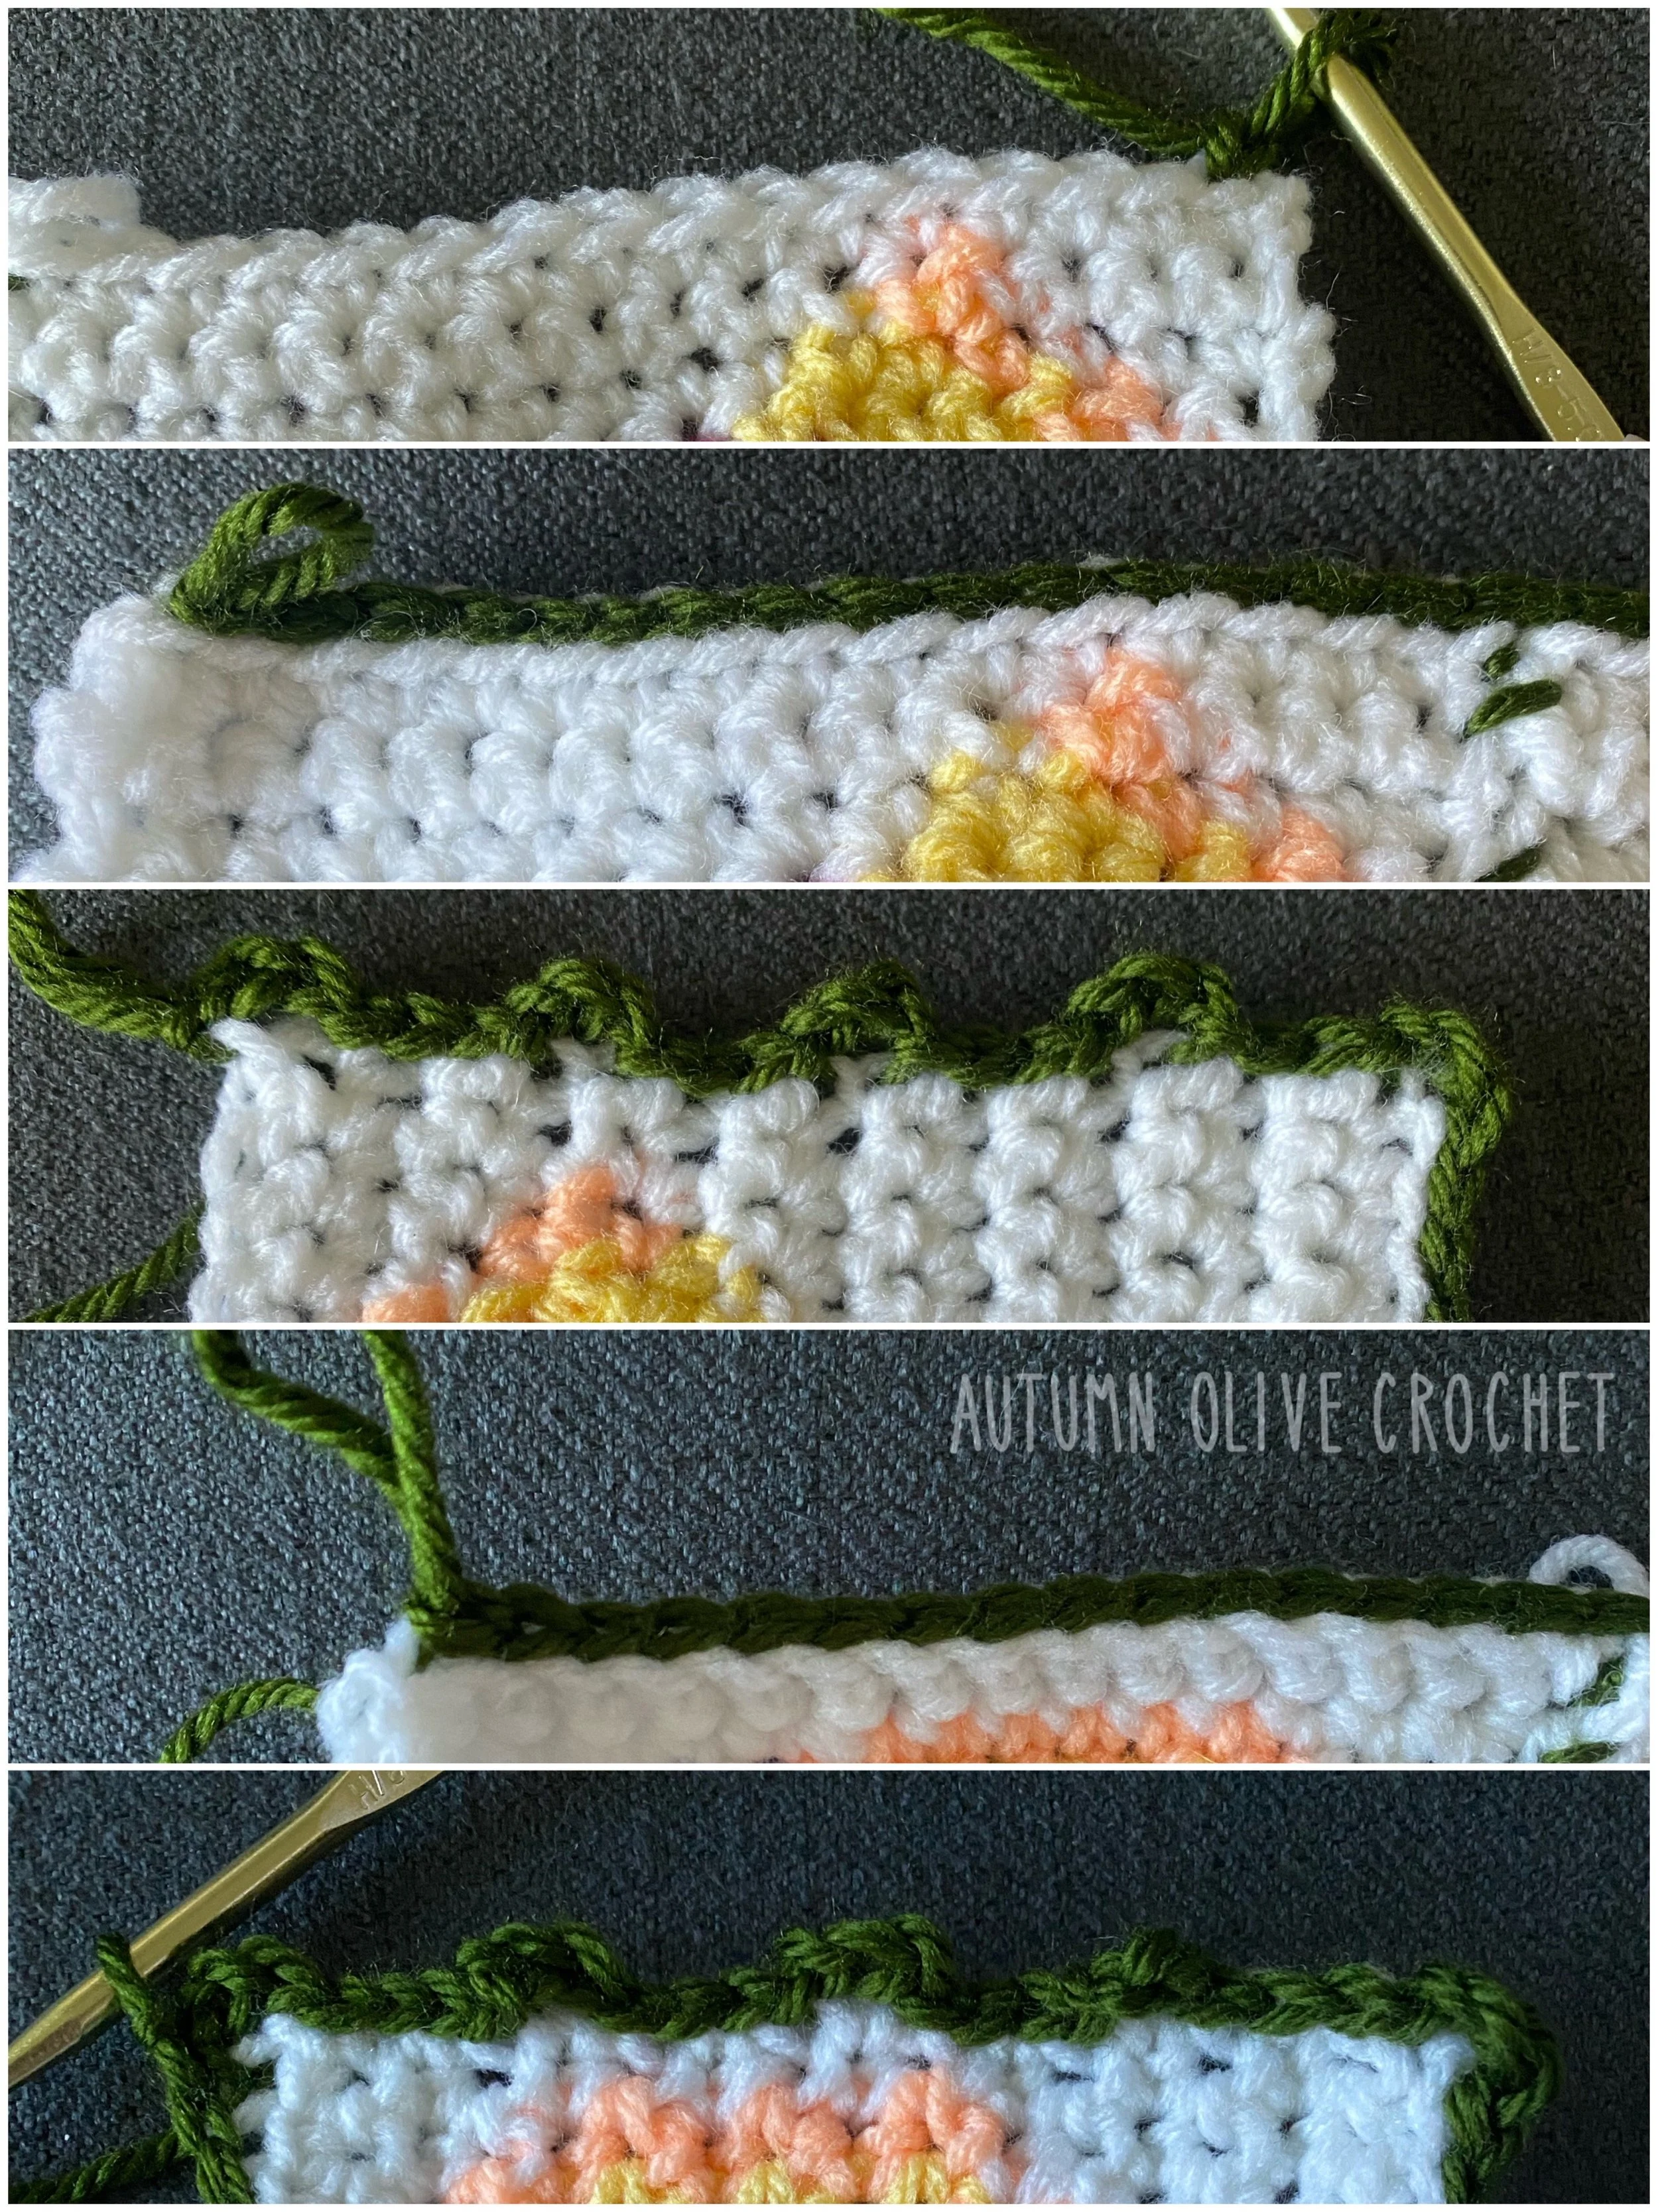
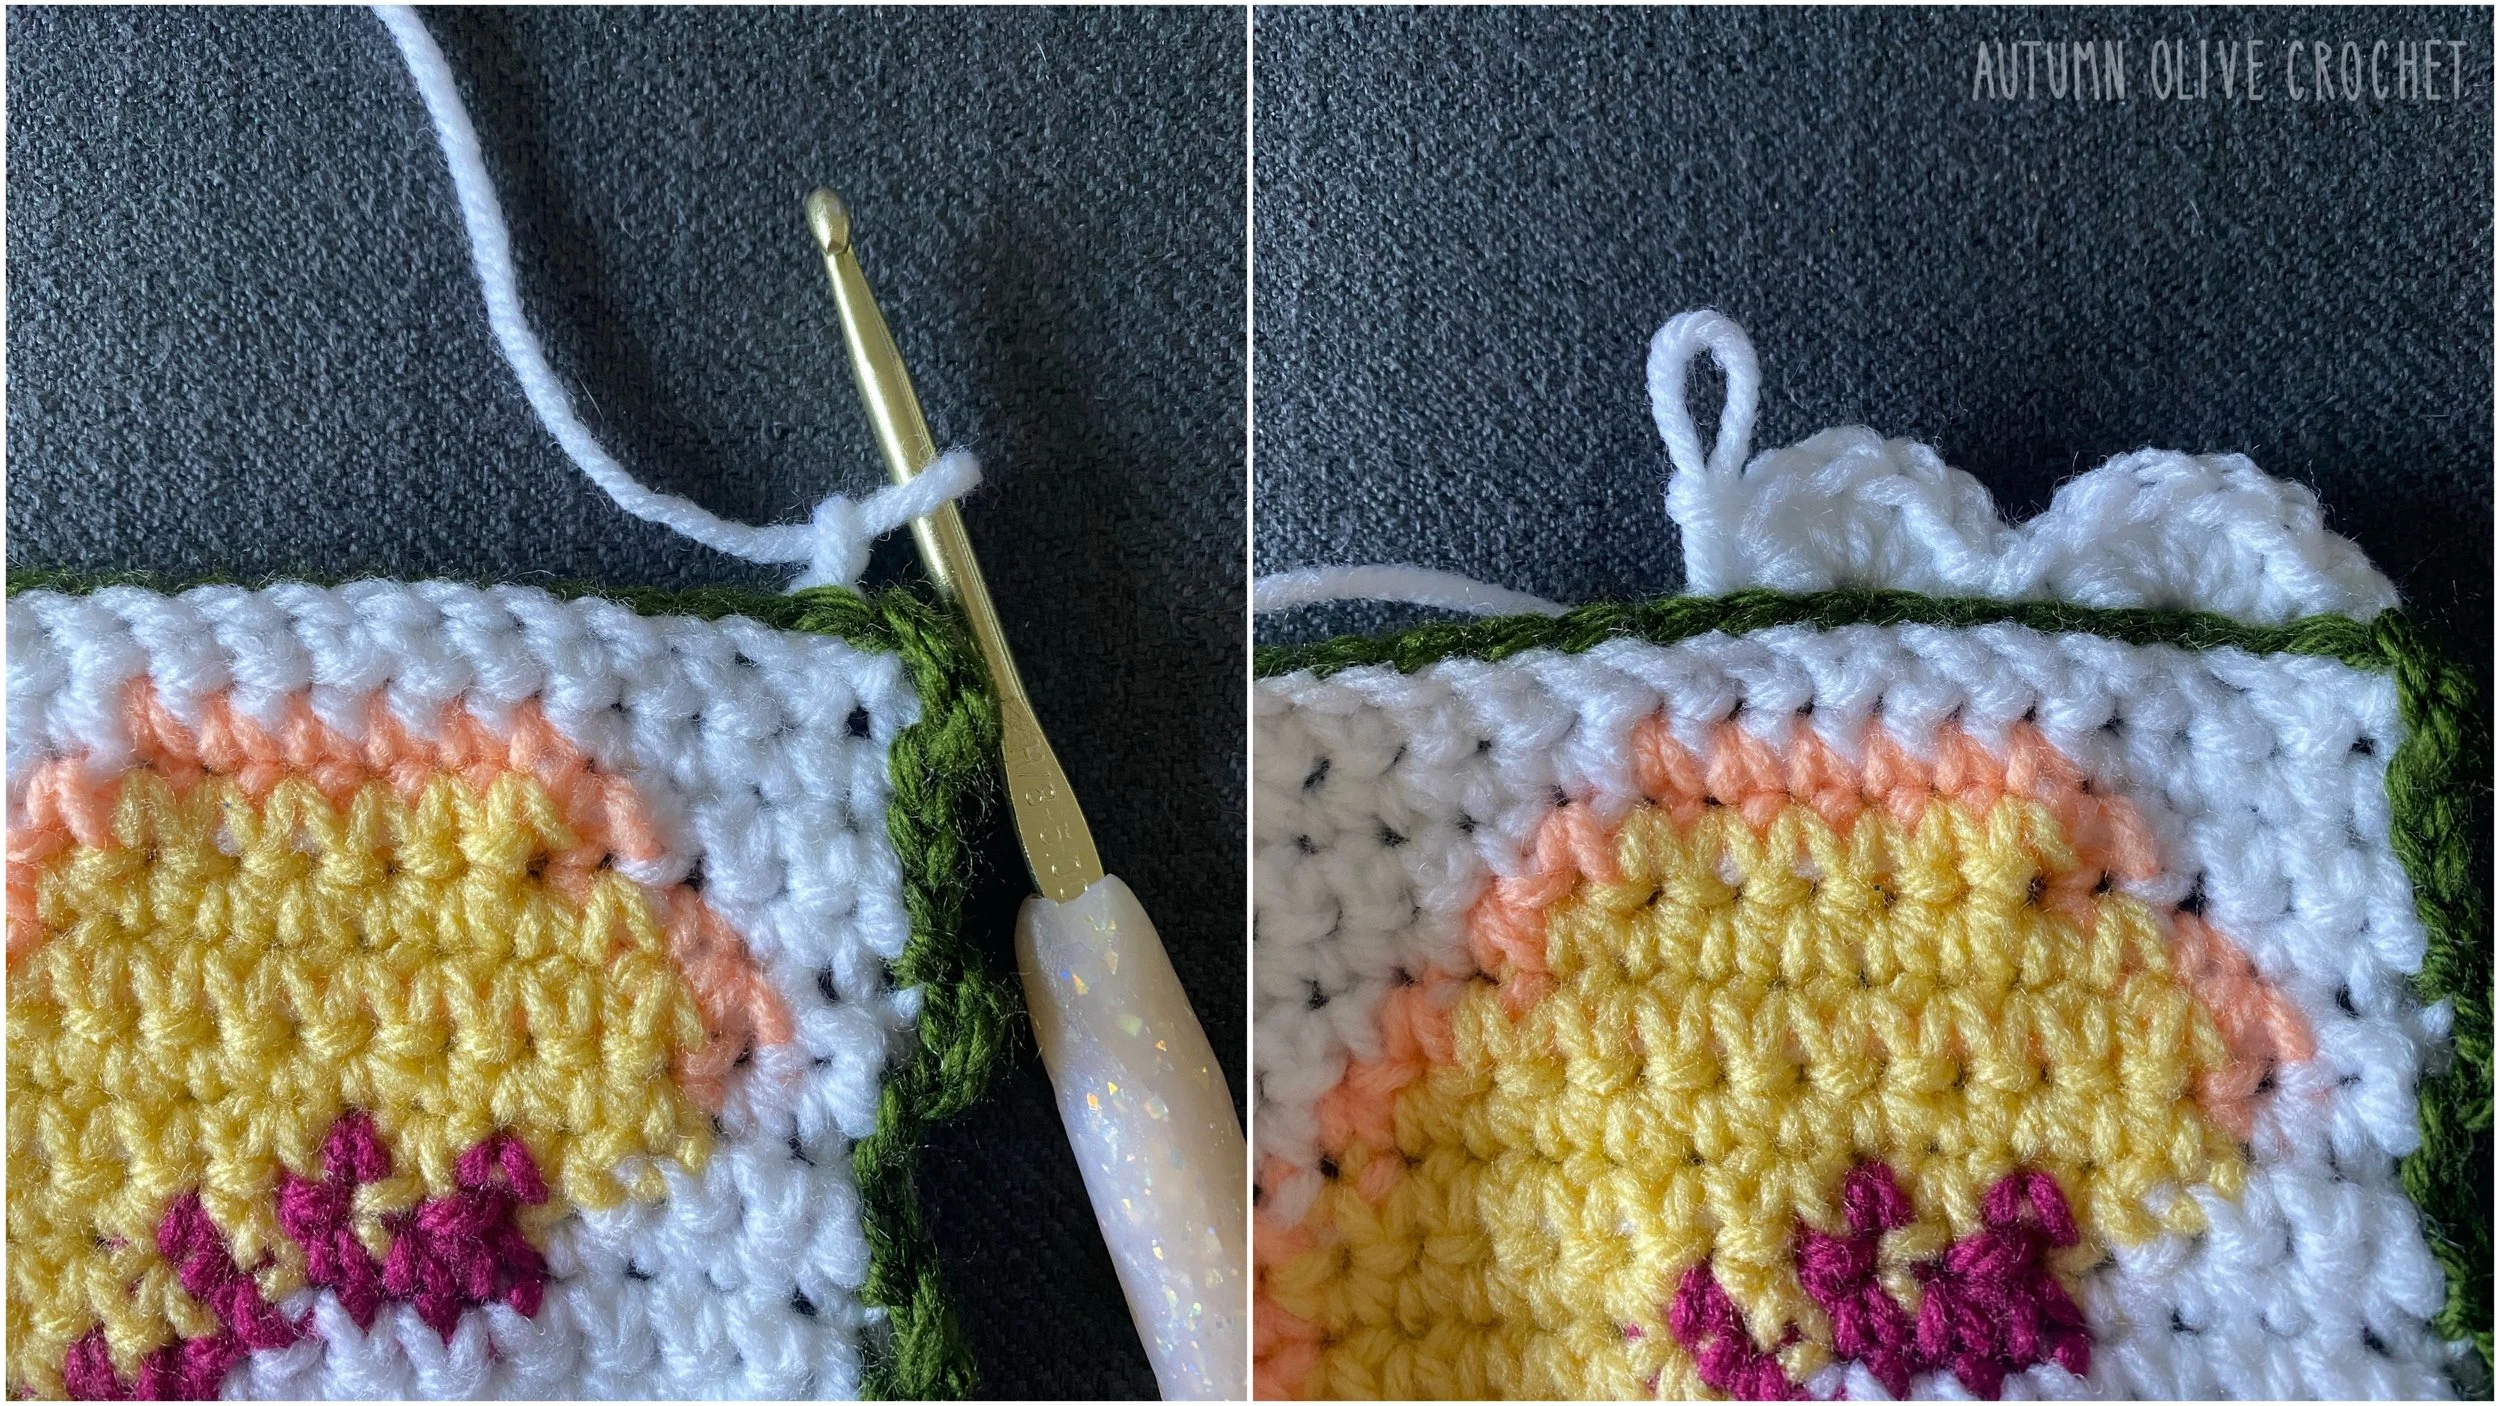
when finished, pull up a loop with green at the top right corner of this piece, chain 1, slip stitch into BLO across
rotate (don't turn), now working down the side of the rows to make the loops for lacing: chain 3, slip stitch into next 4, chain 3, slip stitch into next 4, chain 3, slip stitch into next 4, chain 3, slip stitch into next 4, chain 3, slip stitch into next
rotate (don't flip), slip stitch in BLO all along the bottom of the squares
rotate (don't flip), now working up the side of the rows to make the opposite loops for lacing: chain 3, slip stitch into next 4, chain 3, slip stitch into next 4, chain 3, slip stitch into next 4, chain 3, slip stitch into next 4, chain 3, slip stitch into first chain 1 on the top
do not fasten off
in main body color, pull up a loop through the green on your hook; hdc across the top, behind the green slip stitches in the white loops only
do not fasten off
♡ UPPER PORTION ♡
this piece will be worked in hdc, attached to the very back loops of the last row of lower portion as you go (the hdc has the front and back loops that we are used to but there is a 3rd loop even further back, that is what you will work into, and it will be the closest loop to you when you are working into it), it will be attached to the lower portion by 3 slip stitches per every 2 upper portion hdc rows you're working
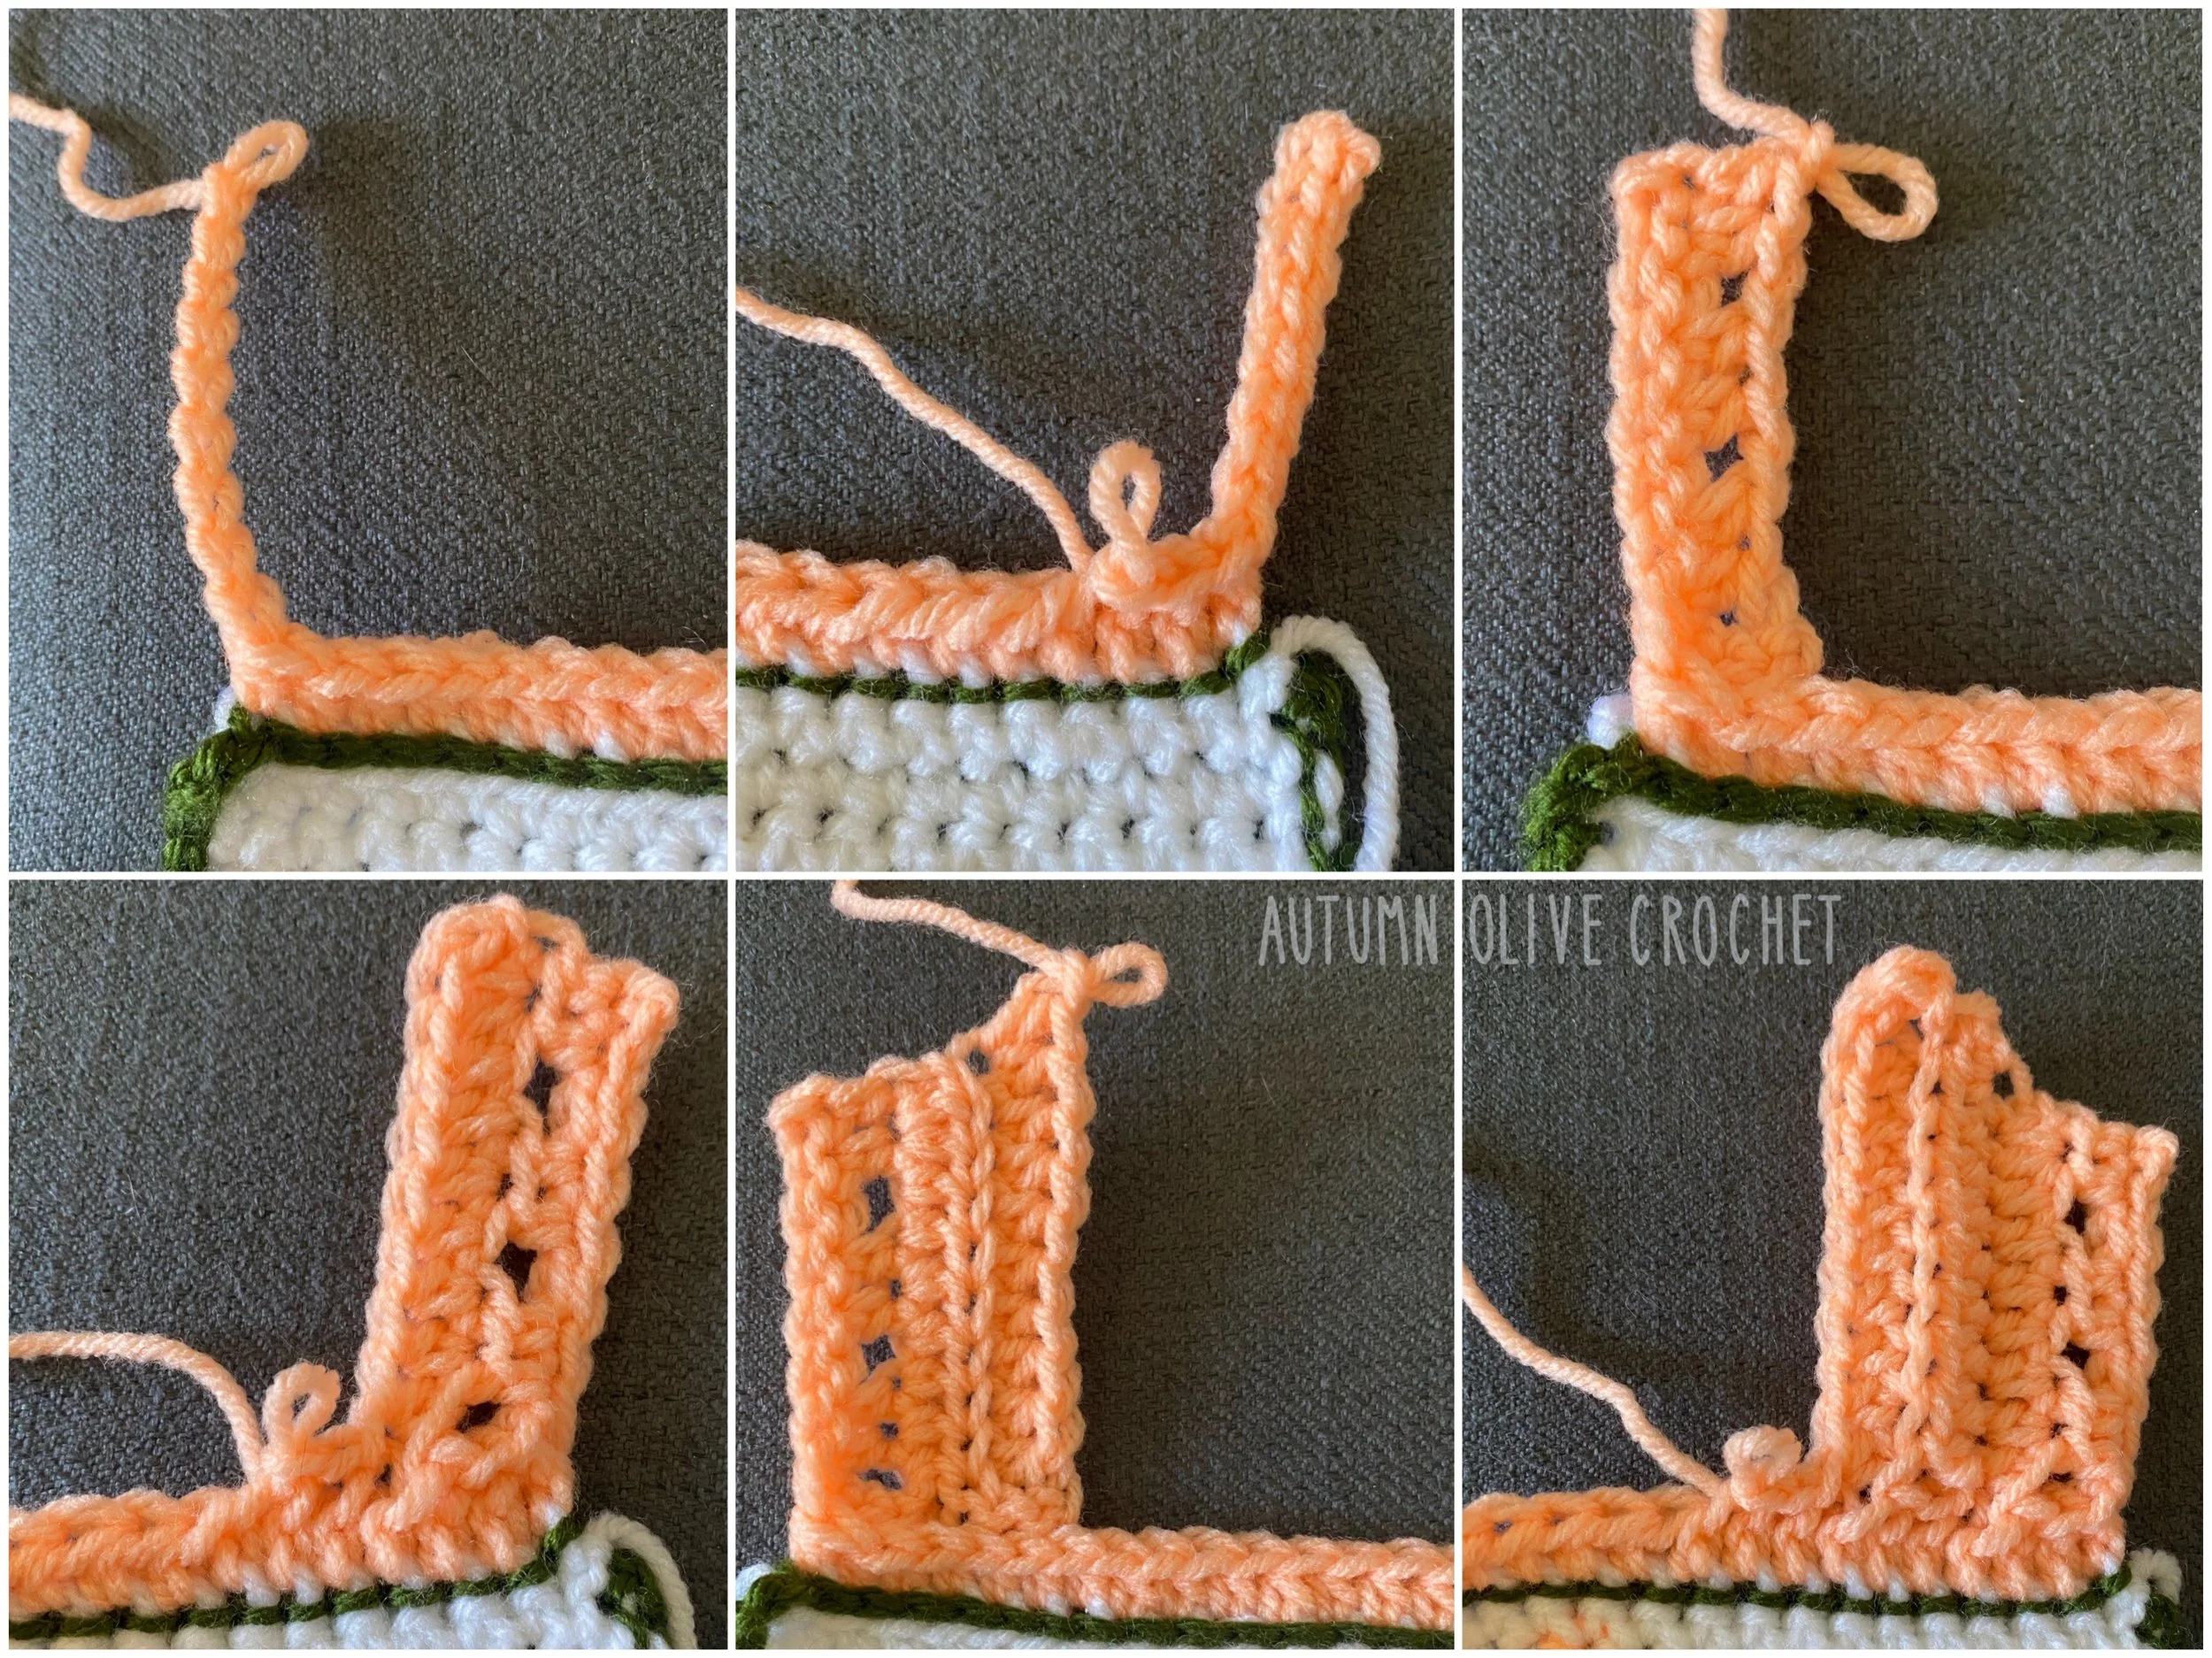
chain 9, turn, working into the second chain from hook (chains do not count as stitches)
slip stitch across back bumps of chain (8), slip stitch into next 3 very back loops of the lower portion, do not chain 1, turn
ROW 1: (skip the 3 slip stitches) work a hdc into each of the next 2 stitches, chain 1, skip 1 stitch, hdc into each of the next 2 stitches, chain 1, skip 1 stitch, hdc into each of the next 2 stitches (8) chain 1, turn
ROW 2: work a hdc increase into the first stitch, hdc into each of the next 7 stitches (9) slip stitch into next 3 back loops of the lower portion, do not chain 1, turn — now working into BLO for the upper portion
ROW 3: (skip the 3 slip stitches) in BLO, hdc into next 8 stitches, hdc increase into last (10) chain 1, turn
ROW 4: in BLO, work a hdc increase into first stitch, hdc into the next 9 stitches (11) slip stitch into next 3 back loops of the lower portion, do not chain 1, turn
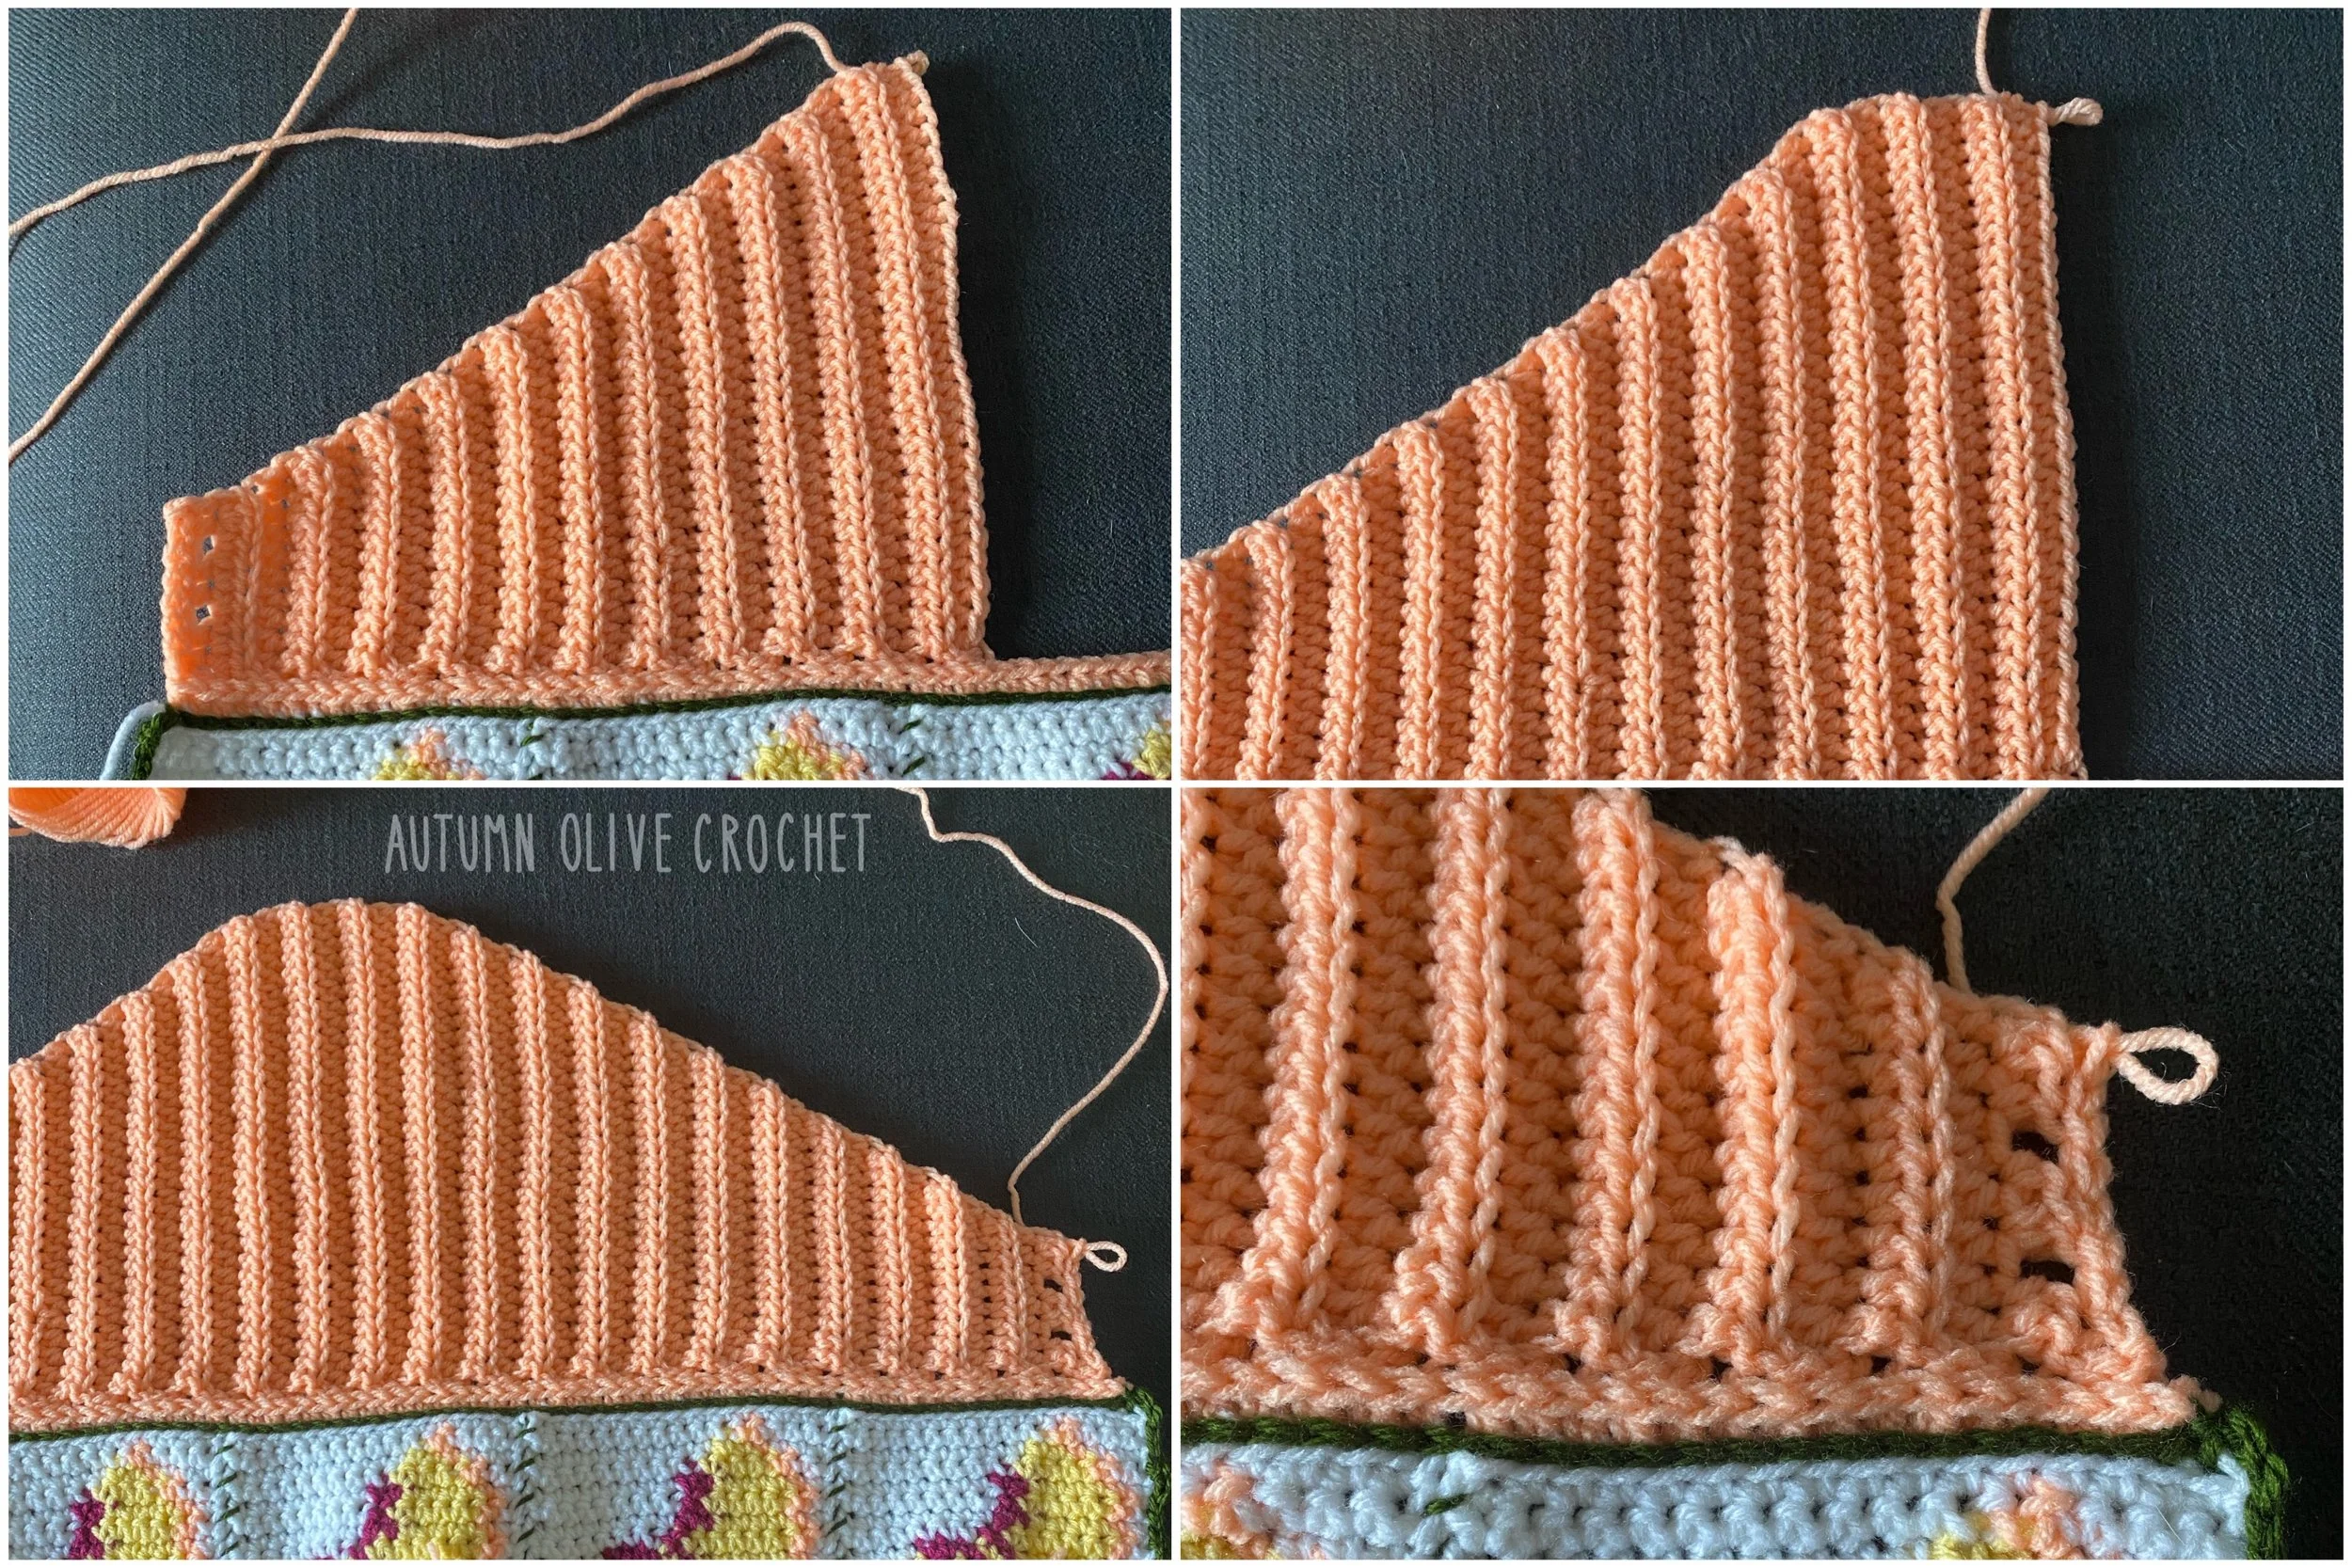
continue this pattern of increasing only in the top stitches to form a slope until you reach the center 6 rows, this is where the collar will be attached, so it will have no slope
you should end up with about 10 rows per square, so find either the center 6 rows above a single square if you had an odd number or between two squares if you had an even number
at the center 6 rows, hdc like above, work no increases, keeping it even at the top, after those 6 rows, begin working 1 decrease per row at the top — it should now be forming a downward slope
when you get to the last 8 stitches, no longer working in BLO, repeat
ROW 2 above, chain 1, turn — slip stitch across, fasten off
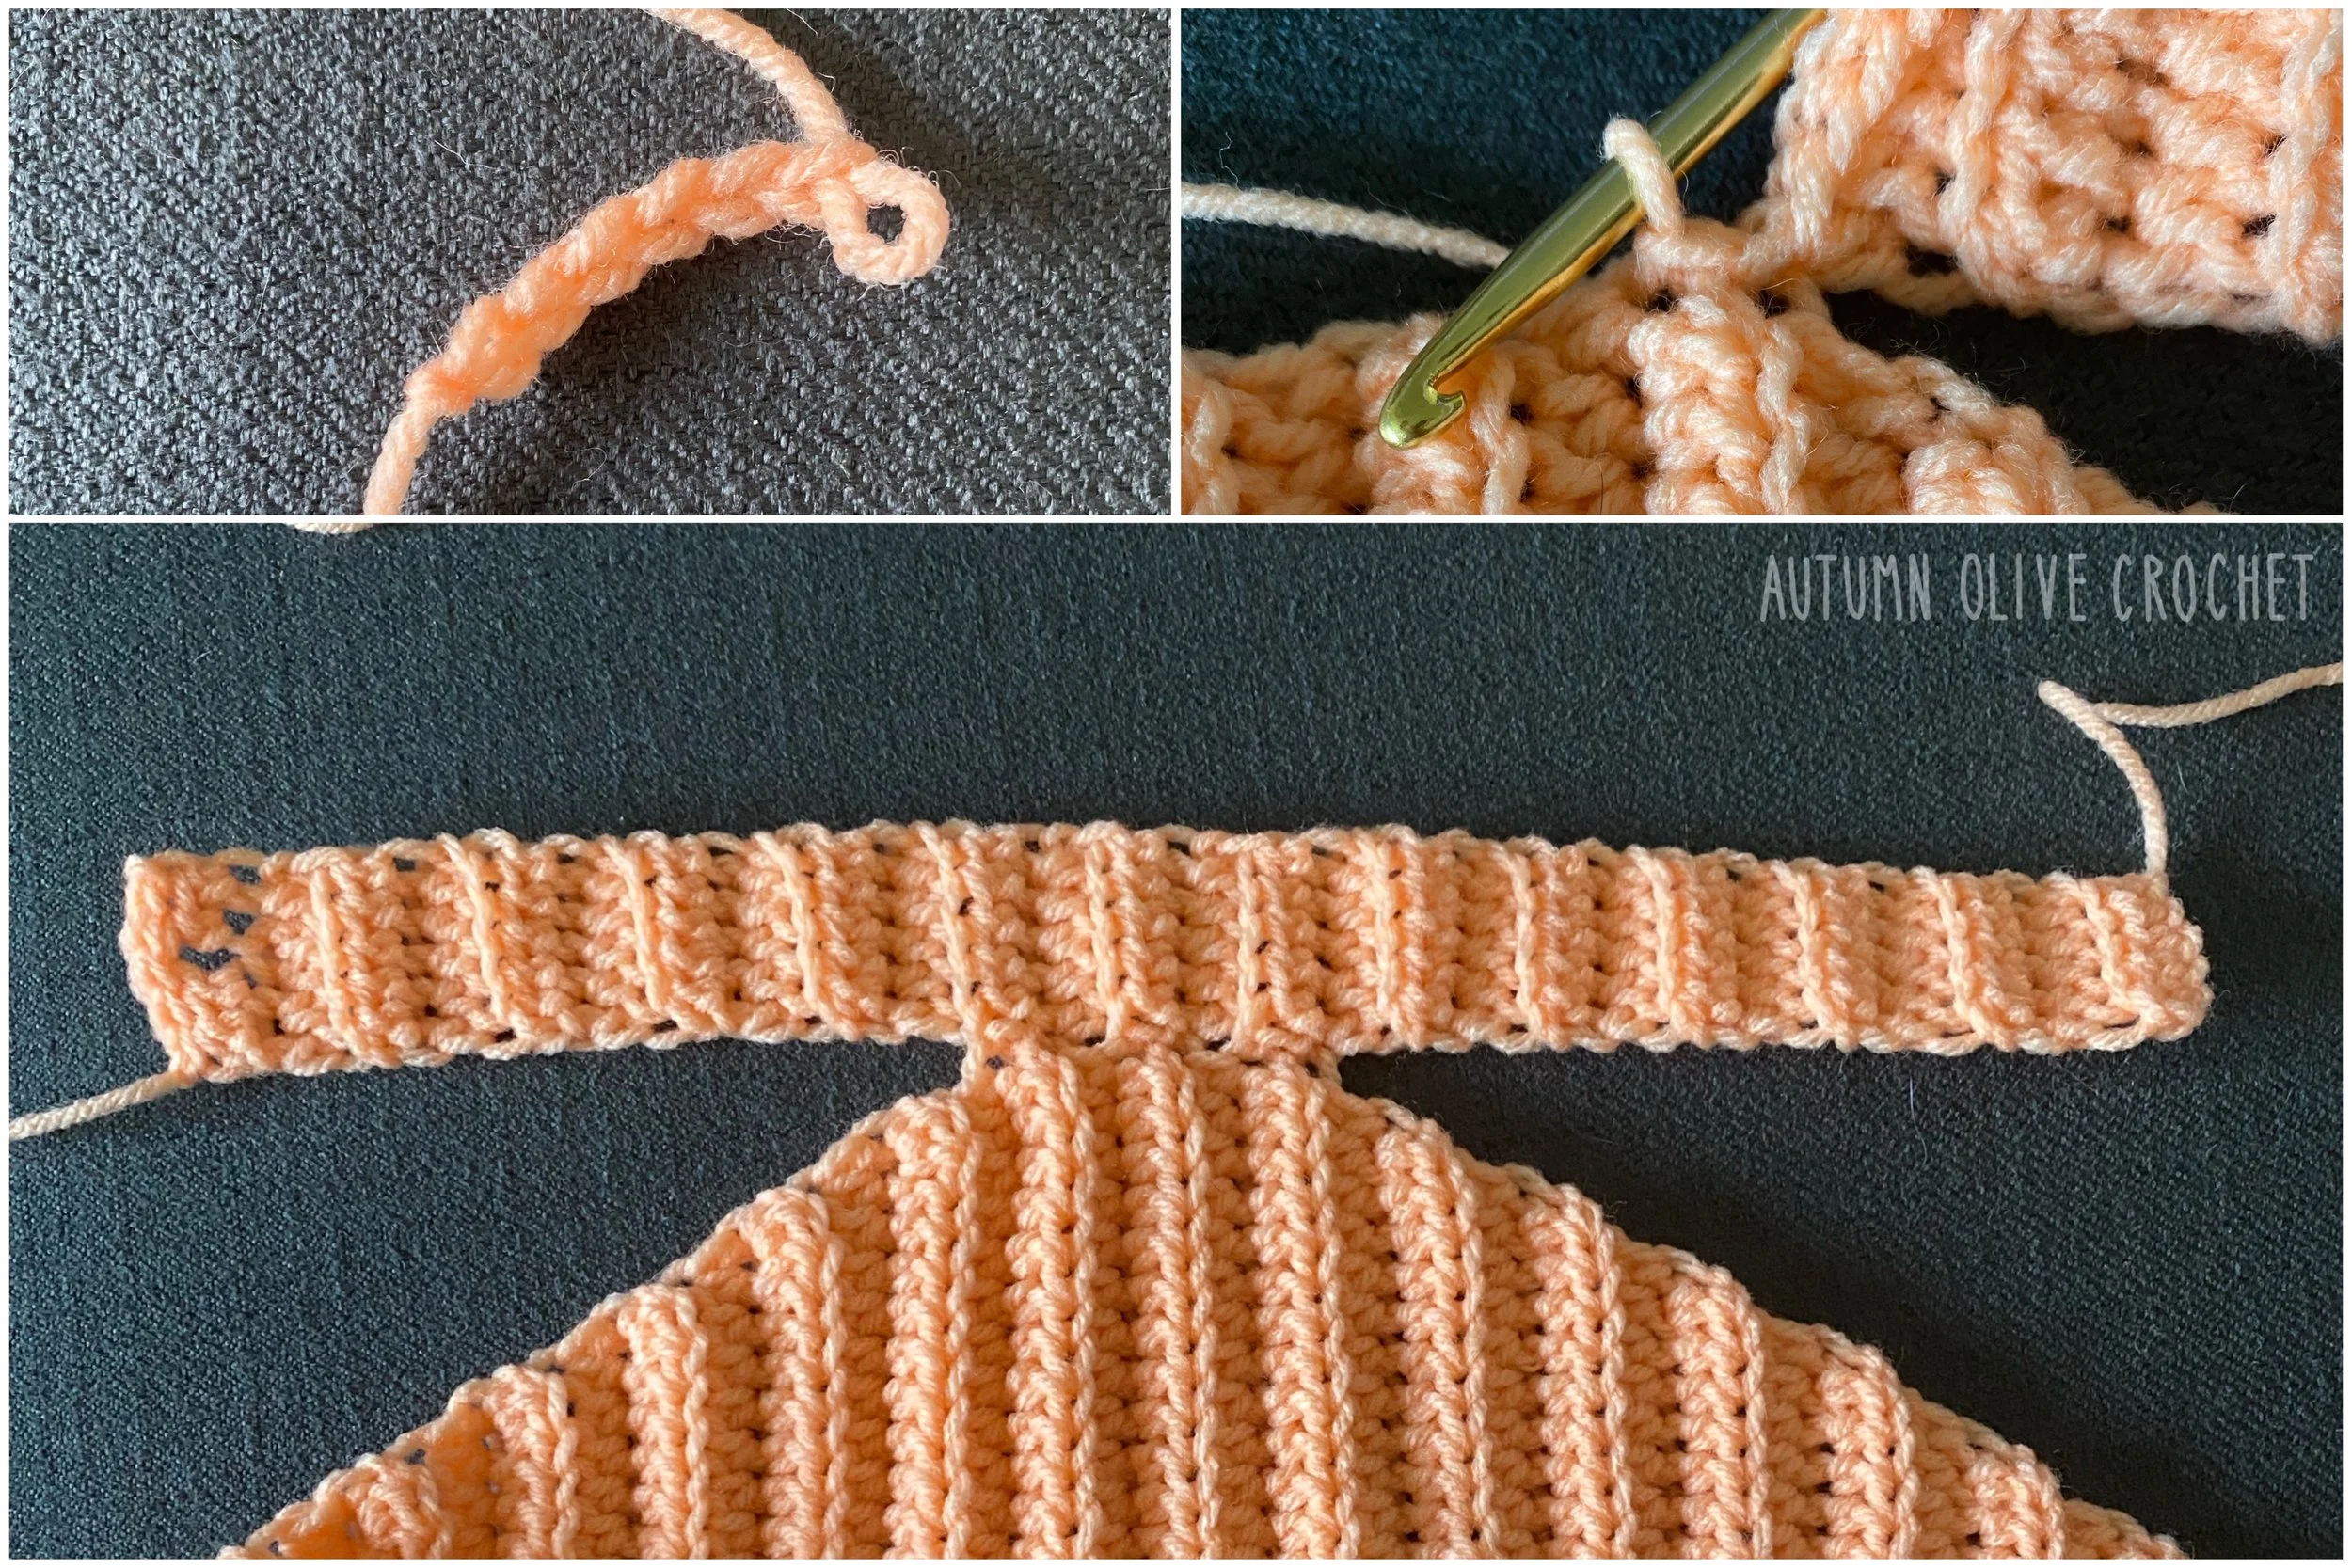
♡ COLLAR ♡
in main color, chain 6, turn (collar should be about 11 inches around — start/end with more or less basic rows if you prefer a size adjustment)
working in BLO, in second chain from hook (chains do not count as stitches)
ROW 1: hdc 5, chain 1, turn
ROW 2-12: in BLO, repeat row 1
slip stitch into the upper side of the first 2 rows of the plateau on the upper portion of the top, do not chain 1, turn
ROW 13: (skip the 2 slip stitches) in BLO, hdc into next 5 stitches of collar, chain 1, turn
ROW 14: in BLO, hdc into next 5 stitches of collar, slip stitch into next 2 rows of top, do not chain 1, turn
ROW 15: (skip the 2 slip stitches) in BLO, hdc into next 5 stitches of collar, chain 1, turn
ROW 16: in BLO, hdc into next 5 stitches of collar, slip stitch into next 2 rows of top, do not chain 1, turn
ROW 17: (skip the 2 slip stitches) in BLO, hdc into next 5 stitches of collar, chain 1, turn
ROW 18-26: in BLO, repeat ROW 1
ROW 27: no longer in BLO, work a hdc into each of the next 2 stitches, chain 1, skip 1 stitch, hdc into each of the next 2 stitches, chain 1, turn
slip stitch across, fasten off, attach button onto ROW 1 of collar
♡ SCALLOPS ♡
pull up a loop on the bottom corner
in BLO behind the green slip stitches in the white loops only, chain 1
skip 1 stitch, hdc 5 into next, skip 1 stitch, slip stitch in next repeat across
♡ LACING ♡
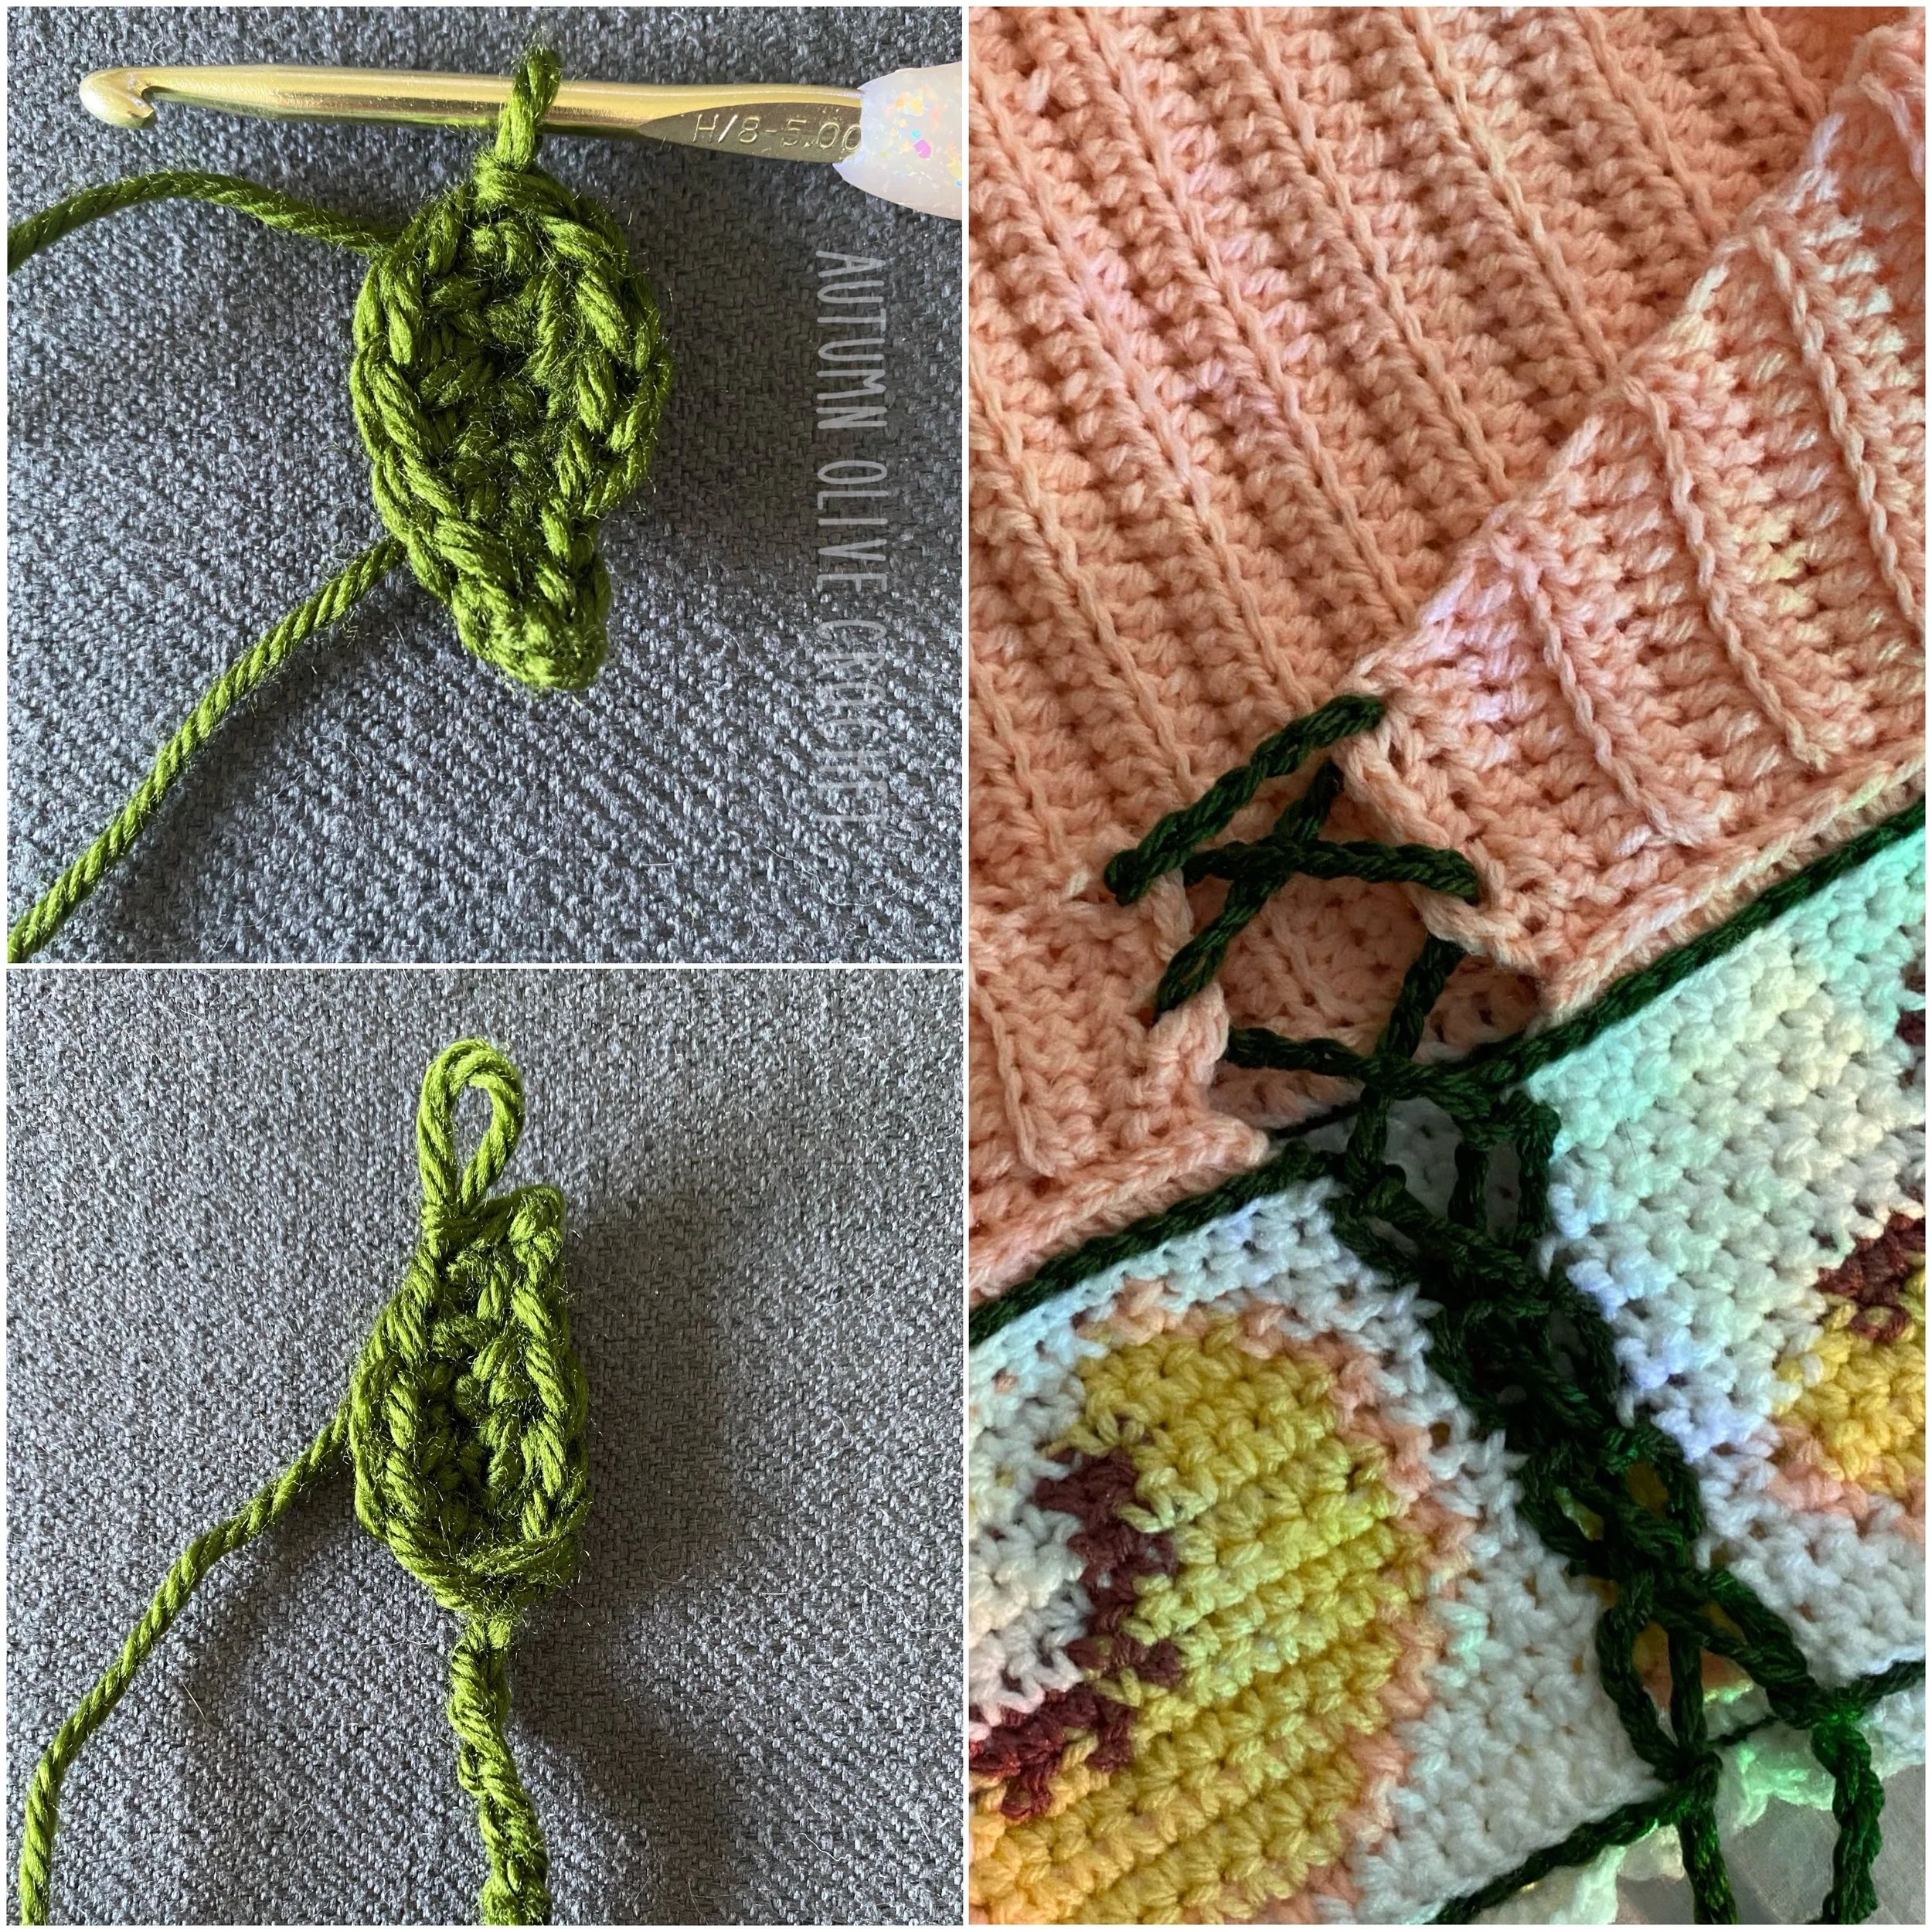
use green to start with a leaf
chain 6, turn, working into second chain from hook
sc, hdc, hdc, sc, slip stitch, chain 3 picot (slip stitch back into the first chain), slip stitch, sc, hdc, hdc, sc, slip stitch
chain about 200, plus 6 more, turn, working into the last 6 chains
slip stitch, sc, hdc, hdc, sc, turn, sc, hdc, hdc, sc, slip stitch, chain 3 picot, slip stitch
fasten off, lace through the back of the top as shown

♡ FINISHED — THANK YOU! ♡
@autumnolivecrochet on all socials
tag me so I can see your creations!